• Skip to primary navigation
  • Skip to main content
  • Skip to primary sidebar
  • Skip to footer
Lydon Solutions

Lydon Solutions

Construction Project Management Software Solutions

  • Construction Viz
  • Clover AI
  • Services
    • Business Consulting
    • Professional Services
    • Microsoft 365 Managed Services
    • Government Agencies
  • Company
  • Events
  • Blog
  • Careers
  • Contact
  • Search
  • Free Consultation
Show Search
Hide Search

Tips from the Field

Don't miss out. Receive blog updates on the latest Lydon Solutions company news, product updates, and much more by joining our mailing list today.

  • This field is for validation purposes and should be left unchanged.


Easily move files in SharePoint

Tips from the Field | May 5, 2016

Learn how to move files in Microsoft SharePoint

Have you ever needed to re-organize your files in Microsoft SharePoint? Maybe your manager wants to use a different folder structure (and yes, if you’re a regular reader of our blog, you know there are lots of limitations to organizing files by folders). Or perhaps you inherited someone else’s organization scheme and want to make it your own. There are many reasons why you may need to shift the location of your documents.

So what is the easiest way to move files in SharePoint?

We’ve heard from more than a few users who found themselves in this situation. They painfully recounted downloading all the files to their local hard drive, re-organizing them, and then uploading them all again.

A real pain, right? Yes, and completely unnecessary!

You can easily move and re-organize files in SharePoint using the Open with Explorer tool. No downloading required.

Open with Explorer is a cool feature that is often overlooked.  It basically opens a window to movable files in the current SharePoint library, making it easy to move or copy your documents.  Read on to see how it works.

How to move files in SharePoint

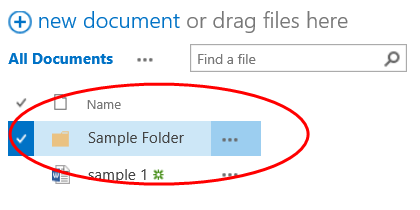
Let’s say you want to move the “sample 1” doc into Sample Folder.  Take the following steps:

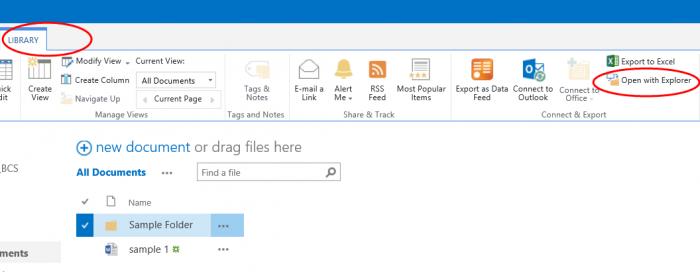
1. Navigate to the SharePoint Library with the file(s) you want to move.

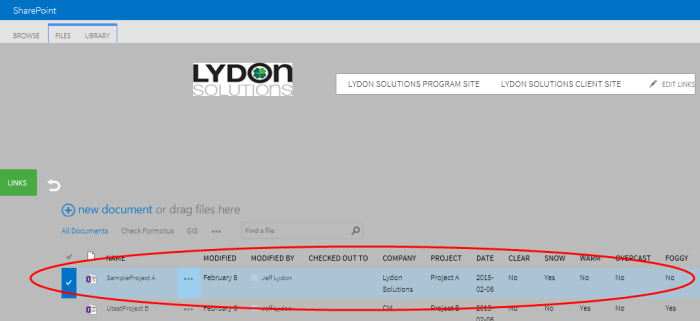
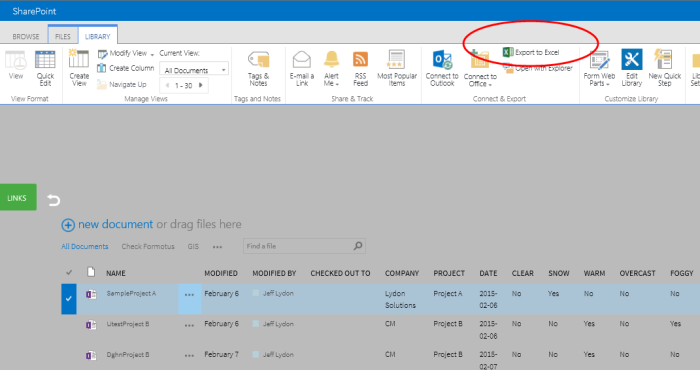
2. Click into the Library Tab and select Open with Explorer

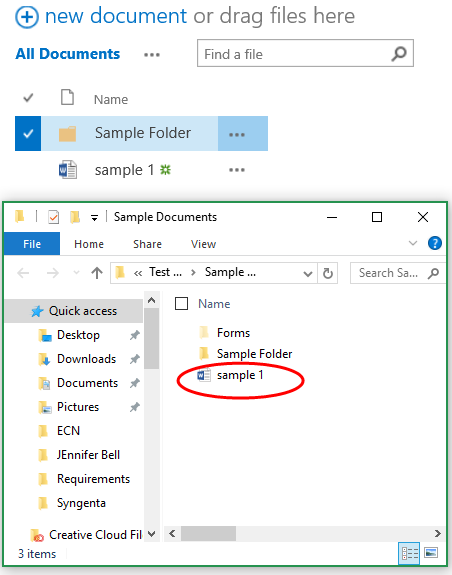
3. A new Explorer window will open. Select the file that you want to move.

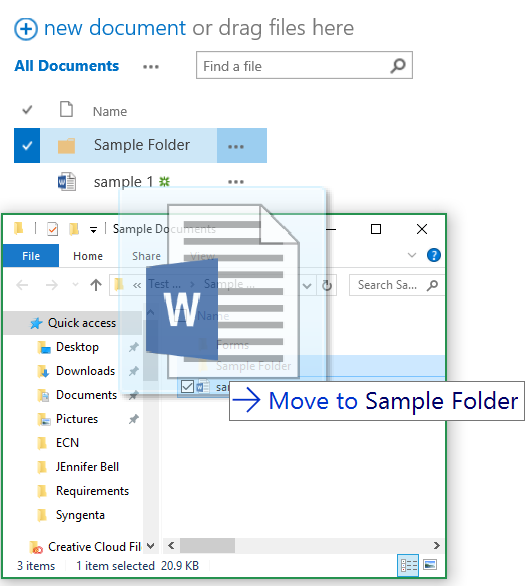
4. Drag the file into the folder

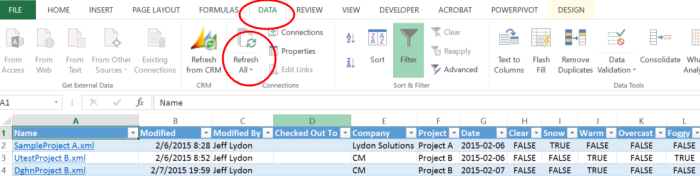
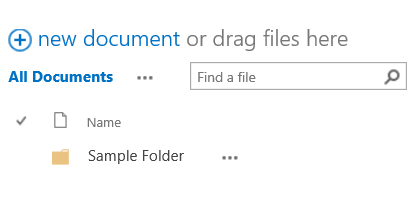
5. Refresh your browser. The File is moved into the folder you selected.

The above was a very simple example. But Open with Explorer can work on one or more files and saves a lot of time moving documents from one folder to another.  Good luck and happy SharePointing!

Want more tips and tricks for construction project management professionals?

Our new Tips from the Field series features handy information for construction project managers. Subscribe to our newsletter to get our latest tips and tricks delivered directly your inbox each month.

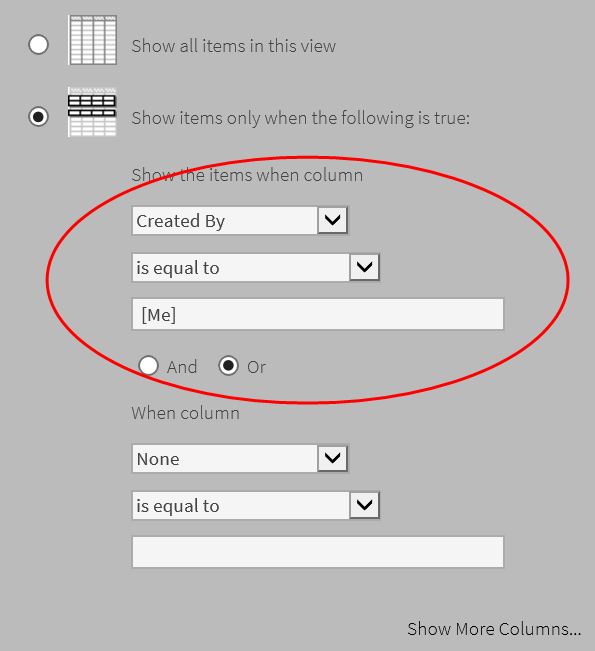
And be sure to check out last month’s installment to learn how to filter your SharePoint view to show documents requiring your action.

Filter your SharePoint view to show documents requiring your action

Tips from the Field | March 29, 2016

Learn how to configure your SharePoint view to show items you created or that require your review

SharePoint makes it easy to configure a view to see the items you need.  You can set one or more filter parameters when you create or edit a view. This comes in handy when you need to see just the documents you created or modified – or items requiring action by you.

The best part is that once you understand how to a configure a view, most apps across SharePoint (e.g. lists, libraries, etc.) behave the exact same way.

Scenario 1:  Show only your documents

The SharePoint document library can be a crowded place if you are part of a big team. But SharePoint has a quick out-of-the-box filter to create a view showing only your own documents. Here’s how:

  1. Select a list or library
  2. Click “Create” and select “Standard View”
  3. Scroll down to the “Filter Options” in the View Menu
  4. Select “Show items only when the following is true”
  5. Under “Show the items when column,” select following options from the dropdown box:
    • the field you want to filter (e.g. “Created By” or “Modified By”)
    • the “is equal to” condition
  6. Enter “[Me]”) in the filter criteria box
  7. Click “OK” at the bottom of the screen to create the view

Scenario 2: Show items requiring your review

Maybe your team wants to implement a document review process. In this case, it would be helpful to have a view showing documents where you are a reviewer. SharePoint makes it simple to do this.

First you will need to have a column to track reviewers:

(Your SharePoint administrator may need to help you with these steps)

1.       Add a Column called “Reviewer” to your SharePoint List or Library.

2.       Under “The type of information in this column is,” select “Person or Group”

3.        Go down to the “Additional Column Settings” section. Under “Show field,” select  “Name (with presence)”

You now have a new column called “Reviewers.” Make sure that when items are added to the List or Library, this field is populated with a name.

Follow the steps above in Scenario 1 to configure a new view, but use “Reviewer” as the filter instead of “Created By” or “Modified By.”

Scenario 3:  Show all items requiring review

Here is a variation on Scenario 2. Maybe you need to see all the documents or items that are pending review from everyone on your team. A status field column would be helpful here.

Once again, you may need your SharePoint administrator’s help depending on your user permissions.

1.       Create a new Column called “Status”

2.       For “The type of information in this column is,” select “Choice (menu to choose from)”

3.       Type each status choice in the box below.

4.       Under “Default Value,” select the appropriate status. For example, “Open.”

Make sure all new Documents or Items added to the List or Library have the new Status field populated.

Now you can group the Documents or Items by their status (e.g. Open, For Review, and Reviewed) by selecting the “Group By” option when creating or editing a view.

That’s it. You now have a new view showing all your documents and list items by Status where you are the Reviewer.

SharePoint has many other view options that you can access in same way to create custom filtered views. You can also edit existing views to customize what they display.

Want more tips and tricks for construction project management professionals?

Our new Tips from the Field series features handy information for construction project managers. Subscribe to our newsletter to get our latest tips and tricks delivered directly your inbox each month.

And if you are an Excel user, be sure to check out last month’s installment to learn how to export your project data from SharePoint to Excel and keep it automatically up-to-date!

Folders vs. Columns in SharePoint

Tips from the Field | March 16, 2016

What is the best way to organize your documents in SharePoint: folders or columns? This is a question we get from our construction industry clients all the time. The answer? It depends on your business use case – and your goals. Below are some questions to ask yourself when deciding which organizational method to use.

We discussed the three ways documents can be organized in SharePoint in our previous blog post. Now we tackle what approach (or combination of approaches) is best for your organization.

So folders or columns? It all depends on your business requirements and what you want to accomplish.

When to organize documents by folders in SharePoint

Using folders makes sense when most of the following apply to your use case:

  • You need permission controls – Folders are great for managing permissions within a document library.  You can assign permissions by individual folders. You can create folders for each permission group instead of creating multiple document libraries for every user/permission group.
  • You are primarily storing temporary documents – Folders work well for working documents. These types of files typically don’t need rigid organization or robust query, filter, and search capabilities. Users can just drop documents in folders for temporary storage and collaboration.
  • Only basic document organization is needed –  Folders make sense if you only need to sort documents by filename, who created or last updated it, and when.
  • User adoption is a concern – Using folders makes it easier for users. Let’s face it, whatever is easiest for user adoption is often the best solution.  When your users become more familiar with SharePoint – or their requirements expand – columns or meta data can be introduced.

Additional considerations

Here are a couple other things to keep in mind if you decide to use folders for organization in SharePoint:

  • Form libraries may have special requirements –  Folders are treated like a record by SharePoint. If you plan to implement InfoPath forms with a custom numbering scheme, make sure you take into account your folder names.
  • Folders can make for long URLs – Each folder and subfolder will add to a document’s URL. A long URL can impact connections and linking to documents.

When to organize documents by columns or managed meta data in SharePoint

You would be better off implementing columns or managed meta data when you have the following requirements:

  • Your users will make frequent folder name changes – If your users are constantly changing and reorganizing folders and their contents, columns or managed meta data are your best option.
  • You have a complex organizational hierarchy for your documents – It is hard enough to remember where you place files on your own local drive let alone a shared SharePoint document library.  Multiple levels of folders make data harder to find. Also, each folder level adds to the length of the URL, which can create problems down the road. Columns and managed meta data make the most sense when your organizational needs are complex.
  • You need advanced filtering, sorting and search – Custom columns in SharePoint give you lots of control to organize and filter documents. Columns and managed meta data also allow more powerful search. So go with columns or managed meta data over folders if detailed sifting of your documents is a critical need.

Getting Document Organization Right for Your Business

So there really is no easy answer to the folders vs. columns question. Every organization – and often each team or department – will have different requirements.

The good news is that SharePoint is flexible. You can take one approach for certain documents, and another for other kinds of data. You can mix and match approaches.

A well-thought out and professionally implemented SharePoint document architecture can increase your organization’s efficiency and reduce costs.

Want to explore a document storage approach in SharePoint that is right for you?

Contact us for a free consultation.

3 Ways to Organize Your Documents in SharePoint

Tips from the Field | March 9, 2016

What is the best way to organize your documents in SharePoint? There are three approaches: folders, columns and managed meta data. You can also combine approaches. Below we share the pros and cons of each.

Microsoft SharePoint is very flexible when it comes to organizing documents. You can organize documents with folders. You can let users tag documents with user defined columns. You can create a managed hierarchy of metadata for users to select from when uploading documents. Or you can use a combined approach.

It is important to understand the benefits and limitations of each approach before deciding which is right for your use case.

Approaches to Organizing Documents in SharePoint

1) Organizing Documents in Folders

Most organizations primarily use folders in Document Libraries to store documents.

Organizing by folders is popular because it builds on the familiar. File folders are based on the way paper documents used to be stored in file cabinets. Folders also mirror a typical shared drive. So users find this approach intuitive and easy.

One downside of folders is upkeep. Documents have to be moved from one folder to another to be re-classified. The organization scheme of several levels of folders can be confusing. Documents can get misfiled in incorrect or redundant folders over time.

2) Organizing Documents with Columns

A second organizational approach makes use of columns to sort documents.

This approach is implemented by creating SharePoint columns in Document Libraries. Columns of various types can be added easily. The columns are then applied to each document at upload.

Columns make it simple for users to filter, sort and organize content. Documents can be re-organized by editing the columns. There is no need to physically move documents in order to re-classify based on columns.

There are a couple considerations that limit the utility of columns by themselves. First, they do not provide permission control like folders. But you can use a third-party tool if permissions are a requirement.  Second, the organization of documents can get messy over time with redundant or unnecessary columns added by users. You can mitigate this by instituting site columns or content types site across your sites or collections .

Combining Columns and Folders:

Columns and folders can also be combined for a hybrid approach. Folders enable permissions control – a key requirement for many use cases. The use of columns helps with filtering, sorting and searching.

This hybrid model is often preferable to only using folders for organization. But it still has some of the drawbacks listed above for folders and columns.

3) Organizing Documents with Managed Meta Data

A third approach organizes documents using a centrally managed set of terms in the SharePoint term store.

This approach relates documents to keywords like the column approach above. The distinction is that users cannot create their own meta data unless they are given access to the term store. All organizational terms are managed by the administrator and can be utilized across sites and collections.

The managed meta data, or taxonomy, approach therefore requires a more structured document organization model. An organizational hierarchy must be created in advance and maintained over time. These terms become the choices available as meta data columns in your content libraries when users upload documents.

The big advantages of this approach are 1) more robust filtering and searching, 2) standardization across all of your content and 3) centralized management of terms.

Managed meta data also enables SharePoint Drop Off Libraries.  A Drop Off Library allows users to upload documents in a single library.  Documents are then routed to a specific location based on rules, simplifying the upload process for the end user.

Managed meta data can also be used for navigation across sites and collections and as keywords to aid in search refiners.

But there are some downsides. There is significant work involved maintaining a managed meta data hierarchy. Users must learn the rigorous document management controls involved with this approach. Finally, some content types in SharePoint do not play nice with meta data.  So it is important to consider what types of content will be used as a first step.

Bottom line: most organizations would not use the managed meta data approach without a strong use case justification.

Combining Columns, Folders, and Managed Meta data:

You could combine columns, folders and managed meta data for a hybrid approach. This would give you the permission capabilities of folders, the search and sorting of columns, and the structured classification of all your documents using managed meta data.

So Which Approach Should You Use?

Each of the above organizational approaches is appropriate for certain use cases. This is why gathering requirements to understand your document management needs is an essential first step.

Our next blog post will discuss document organization in relation to common requirements in the construction industry. Be sure to check back for tips on picking the right document organization approach for you.

Want to learn more about the powerful document management features of our award-winning Construction Program Management Portal powered by SharePoint?

Contact us for a free consultation.


Export to Excel – Tips from the Field

Tips from the Field | February 16, 2016

Learn how to export your project data from SharePoint to Excel and keep it automatically up-to-date in this installment of Tips from the Field.

You and your project team probably share Excel lists and forms all the time as email attachments. But hunting out attachments in your inbox is a pain. And you never can be sure everyone is seeing the latest version.

Here’s a way to stop drowning in email attachments.

Use SharePoint to export a list or form to Excel and share it with your team for reporting or analysis. The spreadsheet now automatically has a connection back to SharePoint. This means that users can easily see the latest data from Excel with a simple click. Read on to see how it works.

Export to Excel from SharePoint

First, use the Export to Excel function in SharePoint. Here’s how:

1.       Select an item in a SharePoint List

2.        Click on the Library tab and then select Export to Excel in the Ribbon

3.       A New Workbook will be created in Excel. You can save the spreadsheet and share the file with your team.

Keep your spreadsheet up-to-date

The added value of the Export to Excel function is that the spreadsheet maintains the connection back to SharePoint. A user can simply refresh the data connection in Excel and all of the SharePoint List data will be updated automatically with the latest data.

Here’s how:

  1. Open the spreadsheet in Excel.
  2. Go to the DATA tab in the ribbon.
  3. Click Refresh All to update the spreadsheet with all the latest data from SharePoint.

Want more tips and tricks for construction project management professionals?

Our new Tips from the Field series will feature handy information for construction project managers.

Subscribe to our newsletter to get our latest tips and tricks delivered directly your inbox.

[contact-form-7 id=”1510″ title=”Newsletter – Subscribe”]
  • « Go to Previous Page
  • Page 1
  • Page 2
  • Page 3
  • Page 4

Primary Sidebar

Recent Posts

Microsoft News | May 8, 2024

The New Microsoft Planner: One Plan to Rule All Your Construction Projects!

AI Solutions | April 26, 2024

AI Invoice Processing Solution for Microsoft 365

Microsoft Tips | April 5, 2024

Jumpstart Your Projects with These SharePoint Construction Templates

IT services construction
Company News | March 26, 2024

Lydon Solutions Reaches the 15-Year Mark!

Microsoft Tips | February 22, 2024

Microsoft 365 Horror Stories

Microsoft Tips | February 14, 2024

How to Use Tags to Organize Files in Microsoft 365

Footer

About

Lydon Solutions is a WBE consulting group specializing in construction project management software solutions using Microsoft SharePoint. Learn more >

Products & Services

  • Construction Viz
  • Clover AI
  • Professional Services
  • Business Consulting
  • Microsoft 365 Managed Services
  • Government Agencies

News & Events

  • Events
  • Blog

Company

  • About
  • Careers
  • Contact Us

Join our Mailing List

  • This field is for validation purposes and should be left unchanged.
Lydon Solutions

© Lydon Solutions

  • Sitemap
  • Privacy
  • Cookies
  • Terms of Use
  • Disclaimer

Click here to start a Microsoft Teams chat.

Contact Us
Name(Required)
This field is for validation purposes and should be left unchanged.