Most construction organizations prefer to store electronic project files in folders. While a file folder system is familiar and easy to use, metadata can offer many benefits. This article delves into the SharePoint term store, one approach to leveraging metadata as part of your overall document control strategy.
Folders vs. metadata is always a source of discussion when implementing a construction document management solution. In a previous post, we discussed the pros and cons of metadata vs. folders. If you want to gain more reporting and searching on your files, the SharePoint term store might be an option without overturning the folder applecart.
What is the SharePoint Term Store?
Metadata is information about information. The SharePoint term store is a directory for creating and managing metadata in SharePoint.
So, instead of building custom SharePoint columns or enabling site columns to store metadata in each document library, the term store allows you to add a managed metadata column that points to the centrally managed term store.
Build the SharePoint term store once and add it in multiple places.
How Do I Use the SharePoint Term Store?
Once you create a term in the term store, you can add it as a managed metadata column to SharePoint lists and libraries, Teams files, and even Power Apps.
After you add the managed metadata column, a user can “tag” files with terms instead of just adding them to a folder when uploading.


Where Do I Create and Administer Terms?
As a SharePoint administrator, you can navigate to the term store from the SharePoint admin center under Content Services. The term store is organized in a hierarchical structure.
A good example of a hierarchical set of terms would be the CSI MasterFormat. The Term Store is organized as follows:
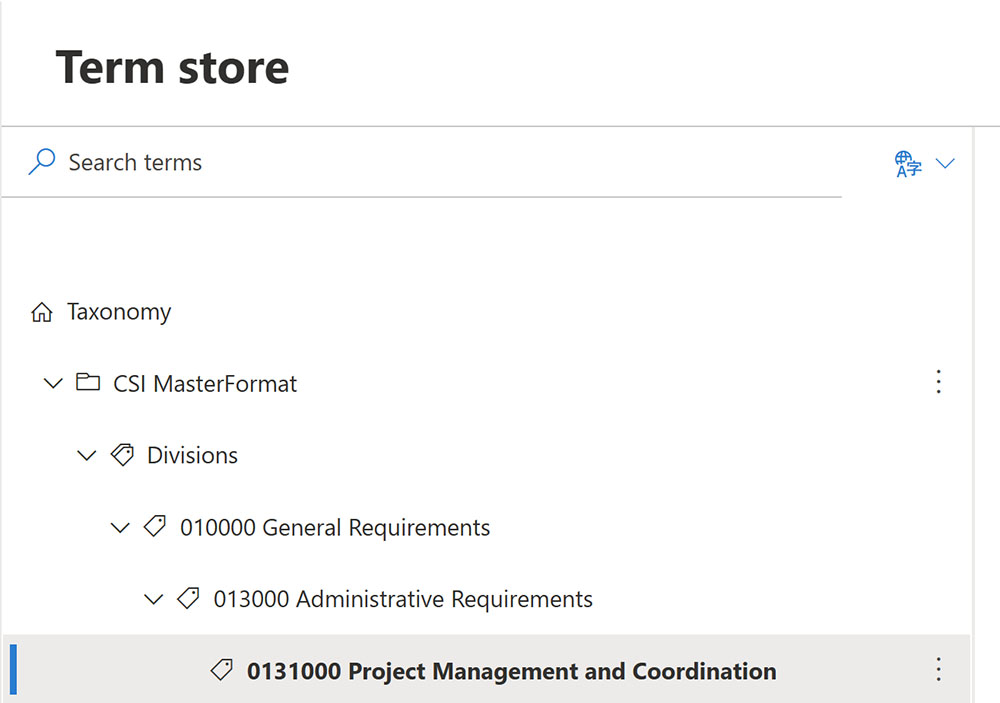 Term Groups - Term groups are related terms identified with a folder icon. Ex. CSI MasterFormat
- Term Sets - Term sets are added to Term Groups to collect related terms. Term sets display with a multiple tag icon. Ex. Divisions
- Terms - Terms are the values within the Term Sets that the user would select when “tagging” a file. Terms display with a tag icon as well. You can add nested terms, like folders, to create a hierarchy. Ex. 010000 General Requirements, 013000 Administrative Requirements,, 0131000 Project Management and Coordination
Terms are the values within the term sets to select when “tagging” a file. Terms display with tags as well. You can add nested terms, just like folders, to create a hierarchy.
The Advantages of Adding Terms to Your Projects
Using terms with your project is beneficial for several reasons:
- You can filter and search by terms to make finding files easier than just knowing the folder structure or file name.
- You can assign multiple terms to each file without creating additional columns.
- You can import terms from Excel.
- You can still use folders with terms.
- Managed metadata columns are available for reporting in Power BI.
Considerations:
- Users must take the extra step of “tagging” the files unless you add a custom workflow.
- Up-front planning is essential so that once they are out in the wild, terms are used correctly and consistently across projects.
- A term store administrator/point of contact should be assigned to manage terms and overall change management.
There are many features in SharePoint and Microsoft 365 that can help construction organizations manage their projects. If you need help delivering the right solution for your specific needs, you can reach out for a free one-hour consultation by filling out the form below. If you are looking for an enterprise construction management solution for Microsoft 365, you can request a demo of Construction Viz here.