• Skip to primary navigation
  • Skip to main content
  • Skip to primary sidebar
  • Skip to footer
Lydon Solutions

Lydon Solutions

Construction Project Management Software Solutions

  • Construction Viz
  • Clover AI
  • Services
    • Business Consulting
    • Professional Services
    • Microsoft 365 Managed Services
    • Government Agencies
  • Company
  • Events
  • Blog
  • Careers
  • Contact
  • Search
  • Free Consultation
Show Search
Hide Search

PMIS

Microsoft 365 for Construction Management Case Study Part 2: Project Online

Case Study | November 7, 2022

This article is part two of our case study examining how we helped one of our clients manage their construction projects better with Microsoft 365. If you have not read the first installment, you might want to check out part one of the case study before proceeding.

The client in this case study contracted Lydon Solutions to develop a Microsoft 365 project management solution for a multi-billion-dollar program with over eighty active projects. In our first post, we outlined the client’s project needs, including how they currently handled these tasks and how we planned to help them improve their workflows with Microsoft 365 and its related applications.

One primary requirement of our client was integrating Microsoft Project into their overall project management solution. This article will detail our approach to creating a solution centered on Project.

A quick primer on Microsoft Project

Before we get into our client’s challenge, it might be helpful to review the evolution and status of  Microsoft Project since the nuances affect the solution you can implement.

Microsoft Project is several different applications rolled into one:

Microsoft Project desktop application

The desktop version of Project is the application we all have used for years. Most construction companies have Project Standard or Project Professional installed locally on their computers.

The desktop version of Project is the most feature-rich version of the application but is not connected to the internet unless you pay for a Project Online subscription (see below). You need the more robust Project Professional to create complex schedules (beyond predecessor logic) and assign organizational resources and custom fields. You can do project-specific reporting in either desktop version of Microsoft Project.

Microsoft Project Online (Project Web App or PWA)

ProjectCaseStudy_1

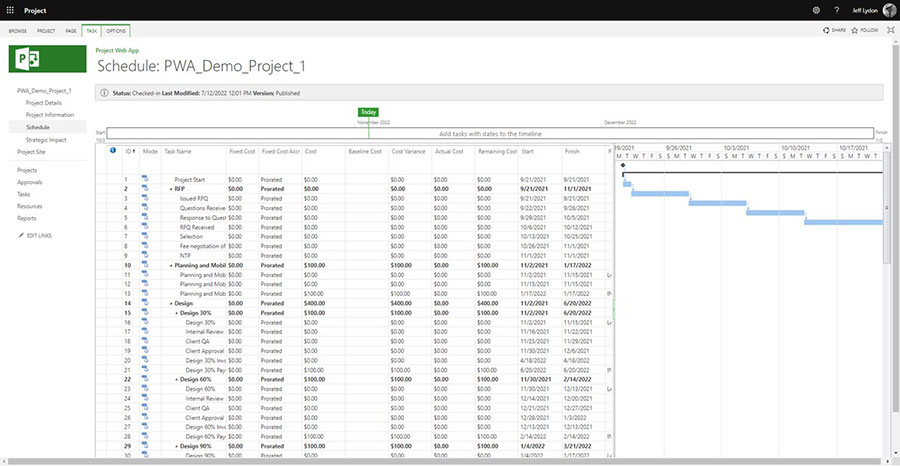
Microsoft Project Online is the web-enabled version of the application. With this version, you can manage a portfolio of projects, create Microsoft Project and SharePoint templates and sites, create and share company resources and custom fields, implement timesheets, and connect to the desktop Project application.
ProjectCaseStudy_2

You can update schedules in PWA, but the functionality is limited to predecessor logic. You need Project Standard or Professional for more complex scheduling, organizational resource management, custom fields, and project-specific reporting. Note: PWA schedules do not integrate with Project for the Web (described below) since the app stores schedule data in SharePoint sites. You need Power BI to do multi-project reporting.

Microsoft Project for the Web (PFTW)

ProjectCaseStudy_3

Microsoft Project for the Web is a more flexible, dynamic, and modern scheduling version of Microsoft Project. PFTW appears to be the future of Microsoft Project, but the development roadmap has been moving at a glacial pace.

Organizations trying to use both PWA and PFTW can confuse users since PFTW is a lightweight scheduling tool that looks and behaves differently than PWA, but both are considered Project Online. PFTW has similar functionality as PWA, but it does not integrate with PWA schedules or schedules made in the desktop version. PFTW is a stand-alone modern application that stores data in the dataverse, not SharePoint. You need Power BI to do multi-project reporting.

https://lydonsolutions.com/wp-content/uploads/2022/11/ProjectCaseStudy_4.mp4

Now that we got that out of the way, you can see why the complexity of the Project ecosystem and how the various features and differences between the versions can create additional challenges when trying to develop a solution.

How our client used Microsoft Project

Our client was using Microsoft Project Online (PWA) to manage their portfolio of projects. The other factors we had to consider included the following:

  • The client’s project managers (PMs) did not want to use Project to update their schedules and instead leveraged construction coordinators to provide schedule updates on their behalf. Management wanted to change this behavior so that PMs were responsible for their updates but the solution needed to be as easy as possible.
  • The PMs did not have the desktop version of Microsoft Project to update schedules.
  • The PMs wanted to use Project for cash flow forecasting across projects.
  • The PMs wanted weekly reporting on all scheduled milestones and late tasks by Project but had not set up zero-duration milestones in their schedules.
  • There were over 80 active projects in their Project Online project center

Our approach to making Microsoft Project the core of the client’s solution

From experience and discussions with the client, we knew that email was the easiest way for PMs to update schedules.

We designed a solution to aggregate project schedule and task data across all projects from PWA into a centralized SharePoint list daily. We developed a Power Automate workflow to send emails with adaptive cards to the PMs when their tasks were due so that they could update them in Outlook without having to go into Project. The SharePoint list received the task updates, and another Power Automate workflow processed the updates back into PWA. Other parts of the solution leverage this same SharePoint list, providing a single source of truth for projects without users needing to interact with the Project application. We will explain further in a future post.

Next, we needed to use Project schedules for cash flows. For this, we had to be able to assign a cash flow resource to the schedules. Doing so would allow the schedules to drive the cash flow amounts. So, we created new cash flow enterprise resources for the organization in the PWA resource center. We created both budget and generic resource types. We established cost budget resources as the overall project budget at the project summary level (task 0) in Project. We used cost generic resources to assign the cash flow amounts for cash flow milestone activities at the task level.

We then created new cash flow milestones in Project with the schedule logic of how pay apps would be submitted and approved. Since cost generic resources represented our budget at the task level, the actual cost would update automatically when a user marked a cash flow milestone task as 100% complete.

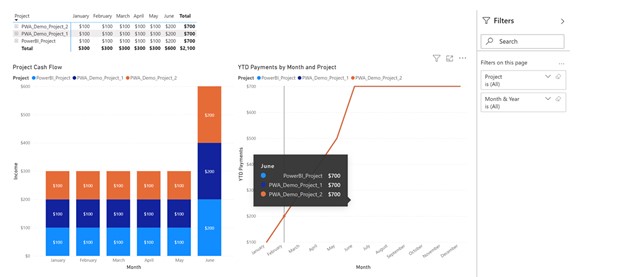
For reporting, we leveraged Power BI to provide cross-project cash flow reports. There is a Power BI web app connection that you can leverage to access PWA data. This connection includes the Microsoft Project data lists so you can generate reports in Power BI. We’ll get into the details of how we developed the reports in a future post.

Do more with Microsoft 365 and Project

Find out how to take Microsoft 365 and Project to the next level by submitting a free consultation request. If you prefer a turnkey project management solution powered by Microsoft 365 and SharePoint, check out Construction Viz and our extensive lineup of construction apps.
The 1 tool you should consider for project brainstorming

Reviews | January 18, 2022

Microsoft Whiteboard is a brainstorming and collaboration tool for Microsoft 365. It is available as a browser-based application and a standalone tool that integrates with Microsoft Teams. The Whiteboard app allows for real-time collaboration with team members, in an easy to use non-structured way, across devices using a mouse, stylus, keyboard, or even your hands.

To fully appreciate the Whiteboard app, it is interesting to consider the evolution from capturing notes on a chalkboard to show to people in the same room to an easy-to-use app that you can download and within minutes share your ideas with the entire world. Let's consider the history:

  • 1800s – The invention of the chalkboard. Most of us grew up with chalkboards made from slate and written on with sticks of chalk derived from calcium sulfate or calcium carbonate. Chalkboards still find a use today, mainly because they are relatively inexpensive, but the downside is that you still must take notes before someone erases your work.
  • 1960s – The coming of the whiteboard.  Albert Stallion created the dry erase board from enameled coated steel. He went on to start Magiboards, a company selling whiteboards in the mainstream. Whiteboards are relatively low cost and, just like chalkboards, are still in use today. They provide a more natural surface for writing, do not create dust, can be magnetized, and work well with overhead screens but, like the chalkboard, they still require taking notes to retain work.
  • 1990s – PCs and the introduction of SMART Boards. The advent of personal computing created new opportunities for capturing and sharing notes. SMART Technologies introduced the SMART Board, interactive whiteboards using LCD screens attached to computers. Like whiteboards, they are still in use today. When SMART Boards came to market, they were expensive, but they allowed users to save images of the screen and application files and then share them via email or hard copy with participants of the meeting.
  • 2000s – The Internet, touch screens, Microsoft 365, and the Whiteboard app. When all the right technologies line up, you have the opportunity to redefine the space. The Microsoft Whiteboard app leverages the latest technologies to the fullest and addresses all the shortcomings of prior technologies by providing the ability to collaborate in real-time across multiple devices of varying types.

Why Microsoft Whiteboard is great for construction projects

So, what’s so great about the Microsoft Whiteboard, and how would you use it for your construction projects?

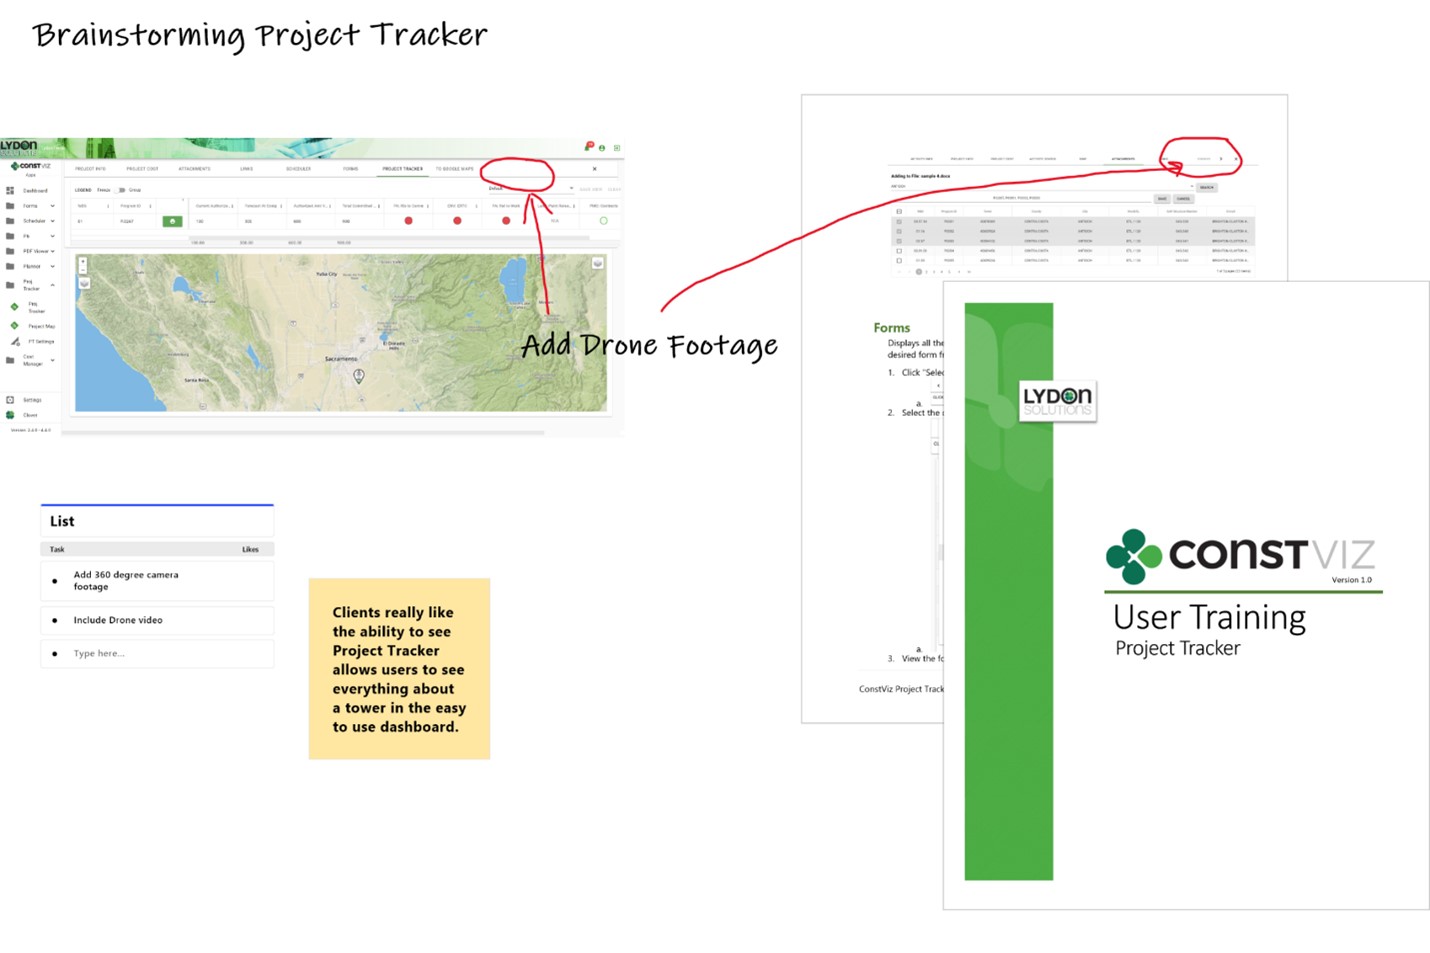
The Whiteboard app shines when your team is on Microsoft 365, your users have touch screen devices, and your team needs an easy way to share ideas fluidly.  Getting started is simple. You simply create a canvas and invite your team members. Your team can add images, documents, tasks, notes, text, lists, and freehand drawings. The app saves those files to the cloud automatically, and they can be opened and edited at any time. Further, you can share your canvas with users, with the ability to post to Teams and export as SVG and PNG image files.

For a construction project, you could use the Whiteboard app for the following:

  • Mark up PDF drawings using text and insert notes as needed.
  • Create a plan of the day (POD) for fieldwork, complete with images, maps, documents, and a formal task list.
  • Brainstorm new ideas and processes using free-form text, notes, and related images.
  • Review documents by adding pages from a Word document to your canvas and then using free-form text to insert notes as needed.

Once you create a Whiteboard canvas, you can post it to Microsoft Teams, where a link will display in the Posts tab of a Team. Team members can click the Whiteboard link in the Post, and the canvas will open for viewing and further editing.

Project-Brainstorming_1

While Whiteboard is a powerful tool and a technology revolution since the chalkboard days, there are a couple of concerns to keep in mind. First, you cannot currently access the actual Whiteboard files that the app automatically stores in Microsoft Azure. Second, you do not have the ability to permission control the files outside of the users with whom you have shared the Whiteboard files.

I encourage you to give the Whiteboard app a try. Like any other Microsoft software, they will likely continue to enhance it over time. If you need any help with Microsoft 365, check out our Microsoft 365 Managed Services and sign up for a free consultation.

If you are interested in a prebuilt enterprise-ready project management information system for your Microsoft 365, have a look at Construction Viz. You can submit a demo request there to find out more.

Using Microsoft Power BI for Reporting with Project Online

How-To | December 7, 2021

More than likely, your organization uses the project-specific reports available out of the box with the Microsoft Project desktop application. But as your portfolio grows, you may need to move to Microsoft 365 Project Online. Project Online offers many advantages over the desktop version, including enterprise resources and codes, permissions management, project templates, and integration with the Microsoft 365 Power Platform. Unfortunately, you will quickly realize that there are no canned reports in Project Online like those you are familiar with in the desktop application. So, what do you do?

Using Microsoft Power BI to create Microsoft Project Online reports

The “official” reporting solution for Microsoft Project Online is Power BI. Power BI is another Microsoft 365 subscription. If you are going to build custom reports, you may want to have at least one Power BI Pro license. Note: Power BI Pro comes with a Microsoft 365 E5 subscription or is available for $9.99/user/month for an individual license.

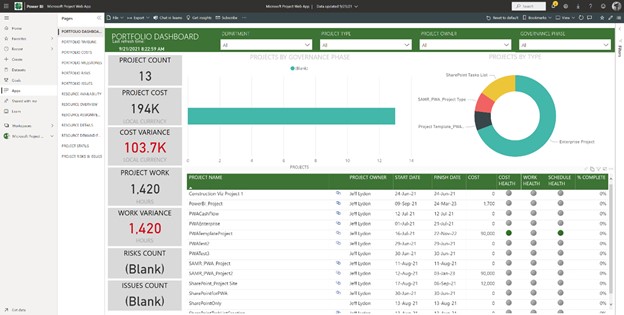
Next, you will want to install the Microsoft Project add-in for Power BI, which you can download here. The add-in includes some key data fields from Project and some visually appealing pre-defined dashboard report templates.

Project Online Add-In for Power BI

WhereReports_1

So, you are all set to create your custom reports across your portfolio! Well, not exactly…

You will find out pretty quickly that if you want to create a “simple” report like a monthly resource cash flow across all your projects in Power BI, it is much more complicated than you would think. The good news is that Lydon Solutions has built several configurable Power BI solutions that can generate monthly expenditures for any resource or activity across your portfolio. The report can be further customized to your organization’s needs and added to Teams or SharePoint.

Project Online Cash Flow Report for Power BI

WhereReports_2

Get Help with Microsoft 365, Project Online, and Power BI

As you know, setting up a portfolio cashflow report in Microsoft Project Online is more than just building a report in Power BI. Lydon Solutions can assist you with everything from Microsoft 365 configuration to delivering custom Power BI reports so you can focus on managing your construction projects. You can find out more by requesting a free consultation here.

Need help with Microsoft 365 for Construction Projects?

Consulting News | October 20, 2021

More and more organizations are taking the leap to Microsoft 365. They see the benefits of having all of their company data securely stored in one location while accessing Microsoft's multiple services such as Teams, SharePoint, Project, and Office. They are also taking advantage of the Power Platform to create organization-specific customizations that they can readily distribute to users as joined-up solutions.

If your organization is one of those that have taken that first step and signed up for a Microsoft 365 subscription, congrats! Microsoft 365 has all of the tools you need to build an enterprise-scale organization or project solution. Now comes the hard part.

IT initiatives are not unlike any construction project. You need to design, budget, and have experts in the field with a successful track record that can deliver. Check out our series of blogs articles with tips and suggestions on using Microsoft 365 to manage your construction projects:

  • Part 1: How to Start Managing Construction Projects in Microsoft 365 – Part 1
  • Part 2: How to Start Managing Construction Projects in Microsoft 365 – Part 2
  • Part 3: How to Start Managing Construction Projects in Microsoft 365 – Part 3

Expert help from Lydon Solutions on managing construction projects with Microsoft 365

Lydon Solutions has been delivering enterprise-scale Microsoft-based solutions for construction since 2009. We offer Microsoft 365 managed services to get you up and running at any point in your journey. We've delivered solutions for small organizations and fortune 500 companies ranging from a Power Automate workflow automating the review of daily reports to custom SharePoint program management solutions supporting multi-billion dollar projects.

While there are many IT companies out there, what makes us different is our consultants have both construction and IT experience. We've been there with you, and our solutions prove it. Check out our Microsoft 365 Managed Services or submit a free one-hour consultation request here.

Supporting a new Project Management Information System

How-To | December 16, 2020

This is part four of four in a series of blogs called Tips on Deploying Construction Project Management Software for Your Organization.

In prior posts, we outlined the best practice to follow when rolling out a new Project Management Information System (PMIS) at your organization. Refer to the previous three articles for planning, evaluating technology, and implementing a PMIS. Now comes the often overlooked part of your journey: support.

Off-the-shelf solutions are pretty standard. Pay the monthly service level agreement fee, and off you go. The system dictates how you use it, requiring you to adjust your processes around it accordingly. You will need to monitor technology changes such as browser and device issues and storage, but for the most part, you should expect a consistent experience until you no longer do.

But what happens when you customize a solution? Or when your processes need to change after the system has been deployed? Over the past 11 years, we have seen this scenario play out in most, if not all, of our clients since our solutions can be highly configured and customized. There are some considerations to plan for before and after you implement a custom solution.

Tips to Better Support a Project Management Information System

Here are some things to keep in mind when planning support for your PMIS:

• Finalize business processes. You should revisit the business requirements documents and update them to represent the processes currently being used. Include adjustments as needed during the change control process. These documents feed training and are crucial to establishing scope management controls after implementation.
• Establish a ticketing system. Make sure to establish a ticketing process for collecting system and user issues. Ensure the ticketing system has enough data points to analyze the trending of requests by functionality, category, time to respond and close tickets, responsibility, and severity. This data will help target future enhancements, drive accountability, improve training and documentation, and ensure the users get the most out of the PMIS.
• Develop a knowledge center. Identify information and resources that you can provide for users as a ‘first port of call’ for support, such as FAQs, how-to videos, and training documents. Consider establishing a Center of Excellence and encourage key users to make themselves available to their colleagues for community support and knowledge sharing, helping triage many issues without opening a ticket.
• Implement change control. A change control process will be essential to prioritize new enhancements and fixes, update training material and requirements, and schedule future migrations and implementations.
• Develop a roadmap. Develop an enhancement roadmap for the system based on priority and cost-benefit analysis. Also, evaluate related technologies affected by the PMIS roadmap, such as versions of Microsoft Office, Adobe Acrobat, browser versions, etc.
• Simplify where needed. Frequently, the implemented PMIS can be overly complicated for the users. After using the system for six months or so, pause to assess usability. You may need to swing the control pendulum back to provide flexibility in what the system needs to track versus what you can handle using other legacy applications, such as email and Excel. Also, consider minimizing redundant functionality that may exist across your portfolio of systems or that your new PMIS can replace.
• Survey users. Reach out to users to find out what works and what does not work in the PMIS. Capture lessons learned and any suggestions for improvement. Surveys will help identify opportunities to adjust training based on responses.
• Communicate to users. Ensure regular communications with the users about system issues, changes to their processes, planned enhancements, and upcoming training sessions as needed.

We hope these tips will help you with your PMIS journey. Make sure to check out the prior articles of this series detailing upfront planning steps, technology to consider, and implementation strategies. In future posts, we will provide management tips for construction organizations to ensure the entire process stays on track. Stay tuned.

Get Expert Help Deploying the Right PMIS for Your Construction Organization

Implementing a construction Project Management Information System (PMIS) for your organization can be extraordinarily complex and costly without proper planning and management. If you have any questions or are looking for help implementing Microsoft 365 for construction, contact us for a free consultation. Alternatively, if you prefer a turnkey solution, checkout Construction Viz, our innovative app-based construction project management software solution powered by Microsoft Office and SharePoint.

Check out more blogs from Tips on Deploying Construction Project Management Software for Your Organization

  • Part 1: Picking the Right Construction Project Management Software
  • Part 2: The Best Technology for Your Project Management Information System
  • Part 3: Eight Tips to Successfully Implement a Project Management Information System

Eight Tips to Successfully Implement a Project Management Information System

How-To | October 29, 2020

This is part three of four in a series of blogs called Tips on Deploying Construction Project Management Software for Your Organization.

Are you about to deploy a new Project Management Information System (PMIS) at your construction organization? Hopefully, you have done the upfront planning to ensure a successful project, and you have carefully evaluated the available technology platforms out there. Now comes the hard part: implementation.

Over my many years helping deploy multiple enterprise PMIS at various construction organizations, I have seen that the implementation phase is a big stumbling point for most teams. You can do all the right planning and select the best technology platform and still fail if you have an inexperienced or under-resourced implementation team.

What do I mean by implementation? This phase includes solution deployment, training, ongoing product management, organizational change management, scope change control, data migration, lessons learned, closeout, archiving, and making sure the ship launches without hitting an iceberg.

A Project Management Information System Implementation Checklist

Here are eight things to consider when implementing your PMIS:

1. Start planning for implementation on day one. Make sure you budget for sufficient resources to support implementation as this is the one area where you do not want to cut costs. Prepare an implementation plan that defines roles and responsibilities, timelines, scope, risks, and change processes.

2. Establish management support. Getting senior-level sponsorship from the initial planning stage through implementation and ongoing support is crucial to your PMIS deployment’s success. Construction organizations are typically matrixed organizations that are highly resistant to change. Having a senior manager as a champion for your PMIS will help cut through bureaucracy, gain buy-in where needed, and clear a path to success across your organization.

3. Address politics. Although a new PMIS should bring organizations closer together, they frequently surface the political strife within a company and expose inefficiencies and mismanagement. Deploying a new PMIS forces change, so prepare for the fallout. While a new system should make everyone’s life easier, it may also mean that some people, even whole departments, lose their power or their jobs. Have these discussions during the upfront planning so that managers have time to align their departments and express concerns.

4. Incorporate organizational change management (OCM). You can never over-communicate during a PMIS implementation, so be sure to incorporate OCM into your implementation strategy. Deploying your PMIS will almost certainly affect other processes, systems, and departments across your organization. And their processes might, in turn, affect your PMIS. Regular communication throughout the entire PMIS selection and deployment process will ensure that your users, and the overall organization, stay informed and aligned.

5. Plan for obsolescence. When I was a project controls manager, I always dreaded when a new senior manager came on board and decided to change everything in their image, which often meant switching to their preferred PMIS. The problem was that the incoming PMIS never dropped anything off our plates. The same processes continued but were now more complicated as the new systems required redundant steps because nobody had the authority to end-of-life the old PMIS. To gain more commitment from your teams, find ways to make their lives easier with the new PMIS by removing redundant tasks, re-engineering outdated processes and systems, and automating when possible.

6. Find the right team. Implementing a PMIS is complicated, and unless you have done it many times before, you should probably look for an external consulting company to support the effort. When selecting an external consulting company to provide implementation services, make sure that they specialize in the technology you are using. Many consultants claim to be experts in every PMIS, but they are just casting a wide net to get any business they can. Take the extra step to evaluate consulting companies; speak to clients that have completed an implementation with the vendor, and give the vendor a test so you can assess their approach as well as their general knowledge of the product. Then compare vendor responses.

7. Avoid staff augmentation vendors. If you choose to contract out your implementation team, avoid staff augmentation. While that may sound like a pretty bold statement, I have never seen a group of staff augmentation contractors pull off a successful implementation. Staff aug companies provide individuals with a limited skill set, and whether it is a successful project or not, they are getting paid. Service companies leverage a more comprehensive range of skills, and they typically structure their contracts around deliverables and milestones, which at least ensures some level of accountability.

8. Pilot first. We recommend this to every one of our clients. Start with one project and get a win before you roll out to an entire organization. Shotgun enterprise-wide deployments often fail. By piloting a single project successfully, you can get buy-in from the project team, who can then help promote it across the rest of the organization. You might also find that the software you chose or the team you selected to implement is not up to snuff during the pilot. Piloting gives you a chance to course-correct before you make too much of a time and monetary commitment.

Get Experienced Expert Help Deploying Your PMIS

I hope the tips above help you with your PMIS journey. If you have not already, be sure to check out our previous blog posts on pre-planning and selecting the right technology for a new PMIS. Stay tuned; in future posts, we will provide tips on best supporting a PMIS.

If you have any questions or are looking for an enterprise PMIS, contact us for a free consultation. Good luck!

Check out more blogs from Tips on Deploying Construction Project Management Software for Your Organization

  • Part 1: Picking the Right Construction Project Management Software
  • Part 2: The Best Technology for Your Project Management Information System
  • Part 4: Supporting a new Project Management Information System
  • « Go to Previous Page
  • Page 1
  • Page 2
  • Page 3
  • Page 4
  • Go to Next Page »

Primary Sidebar

Recent Posts

Microsoft Tips | March 12, 2025

Take Project Photos in the Field Using the Microsoft 365 Copilot App!

Microsoft Tips | March 3, 2025

Portfolio Management in Project for the Web (Planner Premium)

Microsoft Tips | February 27, 2025

Use AI on Your SharePoint Sites with Copilot Agents

Case Study | February 11, 2025

How to Work Successfully with Vendors on a Software Deployment

Company News | January 31, 2025

Get in Shape in 2025 with the Murph Challenge

Microsoft Tips | November 21, 2024

Say Goodbye to Post-It Notes with the New Microsoft Sticky Notes App

Footer

About

Lydon Solutions is a WBE consulting group specializing in construction project management software solutions using Microsoft SharePoint. Learn more >

Products & Services

  • Construction Viz
  • Clover AI
  • Professional Services
  • Business Consulting
  • Microsoft 365 Managed Services
  • Government Agencies

News & Events

  • Events
  • Blog

Company

  • About
  • Careers
  • Contact Us

Join our Mailing List

  • This field is for validation purposes and should be left unchanged.
Lydon Solutions

© Lydon Solutions

  • Sitemap
  • Privacy
  • Cookies
  • Terms of Use
  • Disclaimer

Click here to start a Microsoft Teams chat.

Contact Us
Name(Required)
This field is for validation purposes and should be left unchanged.