• Skip to primary navigation
  • Skip to main content
  • Skip to primary sidebar
  • Skip to footer
Lydon Solutions

Lydon Solutions

Construction Project Management Software Solutions

  • Construction Viz
  • Clover AI
  • Services
    • Business Consulting
    • Professional Services
    • Microsoft 365 Managed Services
    • Government Agencies
  • Company
  • Events
  • Blog
  • Careers
  • Contact
  • Search
  • Free Consultation
Show Search
Hide Search

How-To

Don't miss out. Receive blog updates on the latest Lydon Solutions company news, product updates, and much more by joining our mailing list today.

  • This field is for validation purposes and should be left unchanged.


How to Fail with SharePoint (Without Even Trying)

How-To | August 30, 2018

We’ve been developing and implementing SharePoint-based solutions for almost a decade. Over these years, we’ve talked with hundreds of users, would-be users, and former users.

One thing we have learned is that companies either love SharePoint…or hate it. There seems to be no middle ground.

This begs the question: why is the feedback so mixed? Why do some companies (our clients among them) thrive on the platform, and others throw up their hands in despair?

We’ve analyzed this situation, and come up with six ways we believe you can fail with SharePoint without even trying.

In tongue-in-cheek fashion, here they are.

Don’t plan anything.

Whatever you do, don’t lay out your vision for the system. Don’t prepare a roadmap of where you want to go, which projects you want to deploy, and what functionality you need. Skip this step. You’ll be able to get started right away. (You will bog down later, but that’s fine, isn’t it?)

Let everyone “do their thing.”

Don’t set up a process to control, manage and standardize the content. You don’t want to stop users from building whatever they want, whenever they want. Let them be creative; let the users run the hen house. It’s much more interesting that way.

Make sure the IT department is in charge.

If not the users, make sure your IT department is in charge. I mean, really in charge. Have them put lots of controls in place. This should be easy. After all, SharePoint is typically deployed by IT departments as a private intranet. And IT departments love to limit functionality, restrict access, and control what users can and cannot do. Of course, the more that IT department manages things, the more support is required, the more work there is for the IT department, and the bigger the IT budget grows. But that’s not your problem.

Do not provide training.

SharePoint is intuitive, right? It’s just another online application. So don’t waste time and money training your users. They’ll figure it out as they go. Believe me, we know. We have seen some very creative things in our day. We’ve seen users given free rein to build lots of sites and document libraries without coordination. Seen companies create thousands of separate sites for every page of a project, and then wonder why search was not working correctly. Seen forms built without any regard for reporting or viewing in a list, and environments built without any workflow or business services. But I digress. The point is, let your users teach themselves the application. You can always deal with the consequences later.

Hire lots of developers.

If you need help, hire a few co-called “SharePoint developers.” Any staff-augmentation supplier will be happy to provide you with some billable bodies for as long as you like. Many of them will know little or nothing about the software, but don’t let that stop you. They’ll probably be able to create a webpage or add some functionality someplace. They don’t need to know how a whole PMIS system works, now do they?

Do not customize the application.

Keep things simple. Keep SharePoint exactly as you found it. Yes, “vanilla” SharePoint does have a reputation of being slightly difficult to use. But that’s no reason to customize it. Just keep it as is and let your users adapt to it, and not the other way around.

If you want to make sure that SharePoint does not work for you, we encourage you to try any or all of these time-tested tips.

Alternatively…

If, instead, you want a system that is as powerful as SharePoint, and is also easy to use and configured for construction management, we encourage you to look at Construction Viz. This construction management system was designed by a team of IT experts, with specialists in each functional area of the system as well as construction professionals.

We have done the heavy lifting. We have customized SharePoint’s incredible capabilities—including forms, workflow, reporting, and search—to make it easy for you to manage your construction projects. The result is a powerful, flexible, scalable application that can help you get the job done.

Contact us to see how this construction project management software can quickly, easily and cost-effectively make your job easier.

Dashboards made simple with SQL Server Mobile Report Publisher

How-To | December 5, 2017

Construction Viz and SQL Server Mobile Report Publisher from Microsoft let you build and easily share gorgeous custom project dashboards with your team.

If a picture is worth a thousand words, then a well-designed dashboard is worth ten thousand.

Dashboards and visual reports are essential for construction organizations managing multiple projects, letting stakeholders see project status and other critical data at a glance. And since your project team members are constantly on the go, they need to have access to these dashboards on their mobile devices.

Which is why we are thrilled to see Microsoft continue to enhance their SQL Server Mobile Report Publisher – and why we leverage its capabilities within Construction Viz.

SQL Server Mobile Report Publisher, introduced in 2016, builds on technology from Datazen Software, a mobile business intelligence and data visualization startup that Microsoft acquired in April 2015. We were already integrating Datazen’s technology into solutions for our clients, so Microsoft’s move made a lot of sense to us. We were eager to see Microsoft add Datazen’s offerings to the SQL reporting stack.

Fast forward to today and Microsoft just keeps making SQL Server Mobile Report Publisher better. The simple-to-use tool lets users build powerful and attractive dashboards in minutes. Users can then share and access the dashboards directly on a mobile device or embed them into a Construction Viz / SharePoint page like other SSRS reports.

Read on for a quick run through.

How to Create a Dashboard in SQL Server Mobile Report Publisher

Building a dashboard in SQL Server Mobile Report Publisher is very intuitive.

Step 1: Configure Your Data & Settings

SQL Server Mobile Report Publisher has a simple menu system of tabs on the top left of the tool (see image below).

Click through the Layout, Data and Settings tabs to configure your report.

Layout – Where you pick the components of your report, which can include:
•      Navigators – Menu system
•      Gauges – KPIs
•      Charts – Standard charting tools
•      Maps – Maps of continents, states, and custom maps
•      Data Grids – Grids to filter data

Data – Where you add data from multiple sources to your report.

Settings – Basic report settings such as start and end date.

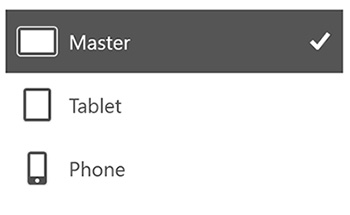
Step 2: Define Your Target Device

Click the dropdown on the top right to specify whether you are creating a master or a custom version for tablet or phone.

TIP: It is best to save layouts for each so that your dashboard looks good on all devices.

Step 3: Build Your Report

Drag the desired elements (navigators, gauges, charts, etc.) from the Layout tab onto the grid for your new mobile report. You can resize each element as necessary.

If any elements are missing information you need, you can go back to the Data tab to select other data sources. Update the Layout parts if needed.


Step 4: Preview the Report

Click on the Preview tab to see what your report will look like with actual data before you publish it.

Step 5: Publish the Report

That’s it – you finished building your custom report. You can now share or embed your report.

Mobile-first Construction Project Management with Construction Viz

Construction Viz, our turnkey construction project management solution powered by SharePoint 2016 and SQL, lets you stay productive in the office and at the job site.

We designed Construction Viz to offer a seamless mobile-first experience using our bootstrap front-end framework and offline support technologies. So you can use your preferred browser and device to access and update mobile forms and reports—even if you don’t have internet access.

Contact us for a free consultation to learn how you can combine the power of SQL Server Mobile Report Publisher and Construction Viz to provide stunning mobile dashboards for your team.

How to Successfully Manage a Construction Software Deployment

How-To | November 3, 2017

This is part three of three in a series of blogs called How to Plan for a Construction Software Deployment.

We gave you five foundational steps to plan for a successful construction software deployment – along with several tips and best practices in our two earlier blog posts. Now we offer advice on managing the rollout of your construction software deployment.

The saying in construction is “plan the work and then work the plan.” Software product and project managers need to do more than just put together a plan and expect IT to follow it.  You need to manage scope, schedule, and budget just like you would for a construction project. Below is our advice on managing the process.

1) Keep the rollout small and focused

This was tip #2 on our list of best practices during the planning phase, but it bears repeating here. Resist the temptation or outside pressure to go for a big, top-down rollout.  We have seen too many software deployments fail when VP-level stakeholders get involved and push a mandatory new tool down to users.

Change is a big scary beast for most companies.  The more opportunity you give users to get their feet wet before jumping in will help build support. Stick to your plan for a small and focused rollout. Take a phased approach. Use early wins to build grassroots adoptions. Doing so will make your entire project smoother and more successful.

2) Leave room for customizations & enhancements

If you followed the advice from our earlier posts, you analyzed the needs of your stakeholders and documented your business processes as part of your planning process. But don’t assume your plan is final. It is important that you keep an open mind and listen to input. Let project teams shape the tool

Some of you may object and say that a project needs to be standard across your organization. Standard, yes. Rigid, no.

You want your users invested in the software you are deploying. The best way to do that is to give them the chance to make it their own. If a project manager cannot tailor a tool to their specific management needs, you will have a harder time getting your software deployment accepted across the organization.

And, assuming you did your homework during the planning phase, hopefully the system you are deploying is configurable and customizable down to the individual project manager level (like Construction Viz, our flexible construction project management solution powered by Microsoft SharePoint 2016).

3) Update your plan & requirements documents

Requirements are essential to building anything from an office building to an enterprise construction software solution.  But requirements are not a one-and-done deliverable at the beginning of the project.  They are living documents and are relevant throughout the entire life cycle of the system all the way through scoping, change management, testing, training, and implementation.

You should keep your planning documents up-to-date as scope changes occur. Use version control to ensure the developers and stakeholders are all working off the latest specification.

4) Plan for change

You will have changes.  There is no way around it.  Maintain a contingency allowance for changes. You can use an approach similar to the estimate contingency levels defined by AACE.  The more defined the scope, the better the cost and schedule.  Keep a change log and budget accordingly.

5) Schedule regular design reviews

IT developers often gather requirements and then go off to build in isolation.  The problem with this scenario is that most IT developers do not know construction. And they definitely do not know everything about your organization and your needs. They could therefore misunderstand requirements and spend countless hours on meaningless items. Do not let this happen with your project.

Maintain regular design reviews with your developers.  This gives you the opportunity to see what they have built to date, clarify requirements and questions, manage scope, and remove roadblocks as needed.

6) Don’t forget User Acceptance Testing

Software testing involves both Functional Acceptance Testing (FAT) as well as User Acceptance Testing (UAT).  Your IT provider should perform FAT. UAT should done by your users and include the project SMEs and Champions (functions described in Step 2 of the first blog post in this series).

A thorough UAT will uncover issues that might not have been clear during requirements gathering or design reviews, so make it an integral step to both fixes and enhancements.

7) Avoid communication layers

There is a good chance you are working with different teams to build, host and deploy your construction software. For larger organizations, these can all unfortunately be different companies, a fact that can complicate communications and accountability. If you are not careful, it can even derail or delay your entire project and cause support nightmares down the road.

Mitigate this risk by ensuring that roles and responsibilities for the project are clear – especially if there is another company between you and the developer. Make sure you have a direct channel to those doing the work. Avoid unnecessary communications layers that can slow down information getting to those who need it.

8) Get a pulse from your users & stakeholders

Do not wait until the end of the project to survey users about their likes and dislikes of the system.  Getting their constant feedback – and letting them know you are listening to their concerns – is essential throughout the process. You want to make sure that your project is meeting the success criteria you defined in your business case.

Send frequent updates to the users about new features. Build a community of users that have influence over the direction of the system.  You will find that these engaged users may even help you uncover opportunities to solve challenges you did not initially foresee.

9) But they are still using Excel?!?

Here’s a common scenario: You roll out your new construction software system, but project teams are still using Excel. Don’t panic – your project did not fail. Let’s face it, Excel is not going away just because you roll out a shiny new enterprise construction management system.  There simply is no tool that gives users the flexibility they have with Excel. And it is hard to beat Excel for one-off analysis and reporting.

Ideally your construction management software will integrate with Excel (Construction Viz leverages SharePoint for deep integration with Excel, for example).   If you planned your construction software deployment following the steps and tips we’ve shared, your users should have everything they need to automate standard templates and track critical information.

Our advice: Embrace Excel instead of ostracizing it and your users will rejoice. Excel is a great proof of concept and prototyping tool.  Let users develop Excel solutions to supplement your offering so you can further understand how they work and what information they use to manage.  If your user base sees the value in their effort, plan for a future enhancement to your PMIS.


If you are just starting your planning for a new construction software deployment, be sure to check out part one and part two in this blog series. We invite you to let us know your organization’s experiences and share any advice in the comments below.

Thinking of deploying a construction project management solution for your organization?

We have helped our clients deploy Project Management Information System (PMIS) solutions to manage multi-billion-dollar construction projects. Our Construction Viz platform includes everything you need to manage your construction projects— document management, dashboards, reports, forms, workflows and more—in one place.

Contact us to get a free consultation to learn more about what Construction Viz can do for your organization.

Check out more blogs from How to Plan for a Construction Software Deployment

  • Part 1: How to Plan for a Construction Software Deployment
  • Part 2: How to Plan for a Construction Software Deployment – Part 2

How to Plan for a Construction Software Deployment – Part 2

How-To | September 12, 2017

This is part two of three in a series of blogs called How to Plan for a Construction Software Deployment.

Here are several tips to help your organization successfully deploy a construction project management information systems (PMIS) or other similarly large-scale IT solution.

We shared five foundational steps for planning a construction project management software implementation in our last blog post – so if you haven’t read Part 1 yet, you should start there.  For Part 2, we'll offer a handful of best practices to keep in mind whenever you plan any major system deployment for your organization. In our upcoming Part 3, we will cover managing a construction software deployment.

Step 1 – Get IT onboard early

We recommend getting your IT team involved early in the project even if you are working with an outside vendor. Any major system deployment will involve multiple IT infrastructure considerations. The software, hardware, firewalls and virus protection in use at your organization can all impact your new system and it is best to discover and resolve any compatibility issues as soon as possible.

Chances are your IT group will also have a compliance checklist. Any new software platform or externally hosted solution will need to meet relevant information governance or other requirements. Obtaining early input and approval from IT will prevent issues downstream for your project.

Step 2 – Start small

It will be tempting to go big with the construction project management software implementation and deploy it across your organization or on multiple projects. Caution!!!! Don’t do it.

Our recommendation is to select a single project or two to pilot on first. This keeps your investment small. If things don’t work, you can easily write it off and move on to something else. If your trials succeed, you then have a better justification to move on to a wider deployment with more budget and resources.

Starting small also lets you build grassroots acceptance for your system among project team members as well as test and refine your assumptions. Top-down, mandated software deployments are much more challenging and have a low success rate. Do yourself a favor and score some wins early to pave the path forward.

Step 3 – Have a communications plan

Make sure you have a communications plan in place from the start of your project that includes a regular cadence of updates to other teams in your organization. Start educating potential stakeholders and project teams early so that they understand the project’s goals as well as its value to them and the organization. Building interest in this way not only helps find potential sponsors and champions, it also improves user adoption down the road.

Related to the above, communications shouldn’t just be one way –  you need to collect feedback. Set up open forums or focus groups to get input from stakeholders and users. Doing this early and consistently will help you pre-emptively resolve concerns before they become roadblocks to your project.

Step 4 – Don't forget about legacy data

Consider how your organization handles existing data in other systems or locations. If you followed the steps in our previous blog post, you should have documented your business practices and know where your new system will intersect with legacy data. You will need a migration strategy for any information that needs to be imported or converted to your new construction project management software system.

Step 5 – Develop an ongoing support strategy

Don’t forget to figure out who will support the solution and for how long. An effective support strategy will need to involve both your solution vendor, the business owners (Sponsor, Champions, SMEs), and your IT group – with clear handoff points and escalation paths.

Your support strategy should also include a roadmap of future project priorities for any upgrades or enhancement as well as potential integrations with other systems.

Step 6 – Invest in a solution, not software

Do not buy software, buy a solution. Software is only one piece of the pie. It is easy to be wowed by a long list of features and promises from prospective construction project management software vendors. But don’t lose track of what is most important.

You want a solution that is flexible and user-friendly to ensure that your users will actually want to use the system. Most importantly, the system you deploy should fit your business, not the other way around.

Finally, any vendor or service provider you select should know the construction industry, have proven successes, demonstrate content expertise and be flexible with their offering to meet your business needs.

We hope you found these tips helpful. Part 3 in this blog series will share advice on managing a construction software deployment. In the meantime, let us know if you have questions in the comments below. And if you recently deployed a new construction project management software system, what tips did you pick up along the way?

Your organization is unique, your PMIS should be too

We designed Construction Viz based on the idea that ever organization, project and PM is unique. Construction Viz is our flexible, subscription-based construction project management solution powered by Microsoft SharePoint 2016, SQL 2016 and Azure. The platform includes everything you need to manage your construction projects— document management, dashboards, reports, forms, workflows and more—in one place.

Contact us to get a free consultation to learn more about what Construction Viz can do for your organization.

Check out more blogs from How to Plan for a Construction Software Deployment

  • Part 1: How to Plan for a Construction Software Deployment
  • Part 3: How to Successfully Manage a Construction Software Deployment

How to Plan for a Construction Software Deployment

How-To | August 24, 2017

This is part one of three in a series of blogs called How to Plan for a Construction Software Deployment.

Are you considering deploying a major new construction software system for your organization? Here’s how to set the foundation for a successful launch.

Undertaking a major construction software implementation can feel overwhelming. But with the proper planning, you can lay the foundation for a smoother process and better results.

We have helped many organizations plan, scope, design and implement project management information systems (PMIS) and other similar large-scale construction software projects since 2009. Below are five foundational steps you can take to get your project off to a good start.

Our next blog post – How to Plan for a Construction Software deployment – Part 2  – gives you a few more tips and best practices for planning a major construction software implementation.

Step 1 – Develop a business case first

Starting with a solid business case is essential. This is where you define your goals, priorities and stakeholders. It’s also where you describe your desired outcomes.

You’ll need a persuasive business case to convince senior management and others in your organization of the merits of the new system. Plus, having a business case document will enable you to measure success at the end of the project and serve as a reference when you need to make tough choices about priorities.

A business case for your construction software implementation project should include the following sections:

  1. Problem statement – All system deployments are fundamentally about solving problems for your organization. Use this part of the business case to define in detail the problems and challenges the system will address as well as the relevant stakeholders.
  2. Priorities – List and rank your priorities for the project (e.g. cost, schedule, audit, risk, greatest impact and so on). Putting these in writing upfront will help you make decisions along the way if multiple priorities come into conflict.
  3. Definition of success – What are the outcomes that you want to achieve? Spell out what a successful deployment looks like for all stakeholders. Having this defined before you start will let you evaluate your end results and avoid scope creep.
  4. Solution concept – Now that you have enumerated the problems, priorities and goals for your project, you need to describe the solution you will implement and how it will achieve the desired outcomes for your organization.
  5. Cost-benefit analysis – A cost-benefit analysis showing the value and ROI of the new construction software system is imperative to getting buy-in from senior management, stakeholders and users alike.
  6. High-level scope, budget and schedule – Your scope, budget and schedule will be preliminary at this point, but you should make educated estimates now and revisit as you further define your project.

Congratulations – you now have a draft business case. Keep it handy, you will be updating it as you progress through the next steps.

Step 2 – Secure project resources

You should next ensure that you have the right resources dedicated to your project to keep your construction software deployment on schedule and within budget.

Here are some general guidelines about the roles you will need for your project team and their necessary time commitments:

Product Managers – There needs to be a Product Manager responsible for the deployment within your organization. The Product Manager might need to commit 25-50% of their time during the deployment.

If there is a construction software vendor or solution provider involved, they should designate a Product Manager for you to work with throughout the process.

Sponsor – The Sponsor, typically a senior manager or higher, handles the overall strategy and budget. A Sponsor might need to commit 10-15% of their time during the life of a construction software deployment.

Champion – The job of the Champion is building support among key team members and making tactical decisions. The Champion is typically a project manager who knows the processes and is well respected across the organization. A Champion might need to commit 10-15% of their time during the life of the deployment.

Subject Matter Experts (SMEs) – SMEs provide real world experience in their area of expertise. Each major discipline that will be using the construction software system should have an SME representative so that the solution isn't built in a silo. A SME might need to commit 10-100% of their time to the project.

Other Contributors – Finally, think about other resources you will need. For example, any major system deployment will involve some level of IT support. Even if you are using an external solution, you will need IT help with potential hardware or software issues that could affect the system’s success.

You also need to consider contractors or other third parties who will use or be affected by the system. They will need to be involved to ensure a successful deployment.

Step 3 – Analyze the needs of your stakeholders

You identified stakeholders in Step 1 and assembled your team in step 2. Next you should carefully review the needs of your stakeholders by asking the following questions:

  1. What are their goals?
  2. How will they use the construction software solution?
  3. What other systems are they using and how will this project affect them?
  4. What does success look like to them?
  5. What technologies do they currently have and what technologies and tools are the best fit for their future needs?

Do your assumptions about your system align with what you learned from your stakeholders? In other words, does the system you are implementing meet their needs? If not, it may be necessary to revisit some of your premises from Step 1.

It can be helpful to gather user stories as part of this step. These are basically use cases describing the challenges encountered by a specific user or group with a description of how the new system will provide a solution.

Step 4 – Document your business processes

Now it’s time to document the business processes affected by the new construction software system.

We’ve written about documenting processes on our blog before – but here’s a quick primer:

  • Your business process document should include workflows, form mockups, reports, stakeholders and current tools used by those performing the tasks.
  • There are two types of business processes you will want to capture:
    • “As Is” Processes – How you do business now. What works and what doesn’t work.
    • “To Be” Processes – How you want to do business. This is where you can document an ideal process that you would like to create with the new system. Think about whether you can implement the process changes before the new construction software implementation.
  • Treat process definitions as living documents that you keep up-to-date. Put them on a collaborative workplace to share with internal stakeholders and any software or services vendors involved with the project.

Chances are you’ve gained new insights since you put together the first draft of your business case from Step 1. Go back to your business case and make any updates based on what you have learned in Step 3 and Step 4.

Step 5 – Implementation Plan

Finally, you are now ready to create a proper implementation plan. This plan should draw from your updated business case and include the following items:

  • Project scope
  • Budget (combining expenses for both the capital and people involved with the project)
  • A list of the resources required to complete the project
  • A description of any dependencies or integrations
  • A step-by-step project schedule--

We have found the foundational steps above critical ingredients to planning a successful construction software deployment project. What about you? What has worked or not worked at your organization? Let us know in the comments below.

Part 2 in our “How to plan for a construction software deployment” series will offer a few more tips and best practices. Part 3 will cover how to manage a construction software deployment.

Are you considering a new construction software or PMIS deployment?

The items above offer a high-level starting point for planning a system implementation project, but there can be a lot more to each step depending on the needs and circumstances of your organization.

We’re here to help if you need it. Lydon Solutions has years of experience assisting organizations with construction software projects. Contact us to get a free consultation to learn more.

Check out more blogs from How to Plan for a Construction Software Deployment

  • Part 2: How to Plan for a Construction Software Deployment – Part 2
  • Part 3: How to Successfully Manage a Construction Software Deployment

Why Your Construction PMIS Solution Should be Unique

How-To | June 27, 2017

Your organization’s needs are unique. Your Construction PMIS should be too.

A surprising number of construction Project Management Information System (PMIS) implementations fail. Why is this the case? We published a blog article listing the top 10 most common reasons why PMIS deployments don’t succeed a couple years ago.

But I can boil that top-10 list down to two primary reasons for you:

  1. Runaway costs
  2. Poor user adoption

Underlying both the above points of failure, however, is the myth of a one-size-fits-all PMIS solution. 

Debunking the myth of a one-size-fits-all PMIS solution

Many vendors promise that their PMIS is turnkey, that it includes everything you need and is ready-to-deploy for your organization. They show off all the pretty automated reports and tout their long feature list.

This may all sound good in a slide presentation. Problem is, there is simply no such thing as an out-of-the-box PMIS solution.  

Any PMIS you deploy will require costly customizations to fit your business processes:

  • Every PM and team in your company will do things a little differently. Those cookie cutter workflows, forms, and processes will need be modified.
  • You may need to interface your PMIS with various other internal company systems, some of which are probably legacy software. That means custom integration and programing.
  • Your stakeholders input data differently (e.g. offline forms, maps, interactive dashboards, etc.) and they consume data differently (e.g. interactive lists, reports, Excel, etc.). More customization will be required to meet those needs.
  • Finally, management will want custom reports pulling together data from multiple systems and sources. Since those reports are specific to your organization, they will need to be custom created by the vendor or a consultant.

You get the idea. There is simply no way that something off-the-shelf will seamlessly fit all your organization’s processes and workflows without modifications. This is where the runaway costs start.

Even after the customizations, that off-the-shelf PMIS still probably won’t be flexible enough to help your team do their job, so they won’t use it. They may enter data if you mandate it. But they’ll primarily rely on familiar tools (like Excel) that help them get their job done. Poor user adoption now means the data in your PMIS is incomplete or your teams are duplicating efforts by using multiple systems.

All the above add up to one sad fact: Your organization just wasted a ton of time and money based on the myth of a one-size-fits all PMIS deployment.

Why you need a construction PMIS tailored to you

Every company, project and PM is unique. The PMIS you deploy should be unique too. It should fit how you and your team work while also being powerful, extensible, mobile, and easy to use.

Meeting the unique needs of construction organizations was the inspiration behind Construction Viz, our recently introduced subscription-based construction project management solution.

We designed Construction Viz based on the belief that every aspect of a PMIS needs to be meticulously designed around your organization’s processes by professionals that have both construction and IT experience.

Our expert staff will collaborate with you to fully customize Construction Viz to meet your organization’s unique needs. That includes workflows, forms, reports, and integrations.  It’s this solution provider mentality that sets Construction Viz apart in the industry.

We also wanted Construction Viz to be cutting-edge, but still ensure complete backward- and forward-compatibility with essential construction industry systems.  Which is why we selected Microsoft SharePoint 2016, SQL 2016, and Azure to power Construction Viz. Not only are these established enterprise platforms that you already know and trust, they also support all the features your organization needs in a PMIS solution. Construction Viz tailors these tools for your construction project management needs.

Construction Viz’s industry leading technology and features

Construction Viz gives you the power and extensibility of the Microsoft ecosystem – including SharePoint, SQL, Office and more – optimized for construction and customized for your organization.

Key Features of Construction Viz:

  • Complete flexibility – Extensive customization and integration options powered by SharePoint 2016 and the Microsoft enterprise ecosystem.
  • Robust reporting – Powerful SQL 2016 database technology and reporting capabilities, including SSRS (mobile and paginated reports), geospatial mapping, dashboards, KPI widgets and more.
  • End-to-end security – Second to none security and compliance with the Microsoft Azure cloud platform.
  • Mobile support – Productivity in the office and the field with complete mobile and offline support.
  • Integration galore – Ready integration with the industry standard software you use every day (Office, Oracle Primavera P6, SAP, ArcGIS and more).

There is another advantage to consider. Because Construction Viz is built upon industry-leading enterprise platforms like SharePoint, SQL and Azure, you can rest assured that your organization won’t be stranded in a proprietary walled garden where customizations or integrations are prohibitively costly. Or, worse yet, surprised by a vendor going out of business.  Construction Viz offers you the peace of mind and reliability of using Microsoft’s widely deployed and extensively support platforms – optimized and enhanced for construction project management.

There are many PMIS platforms to choose from out there. Only Construction Viz is designed around you and your project.

A version of this post also appears in the special CMAA section of the June 19th issue of ENR. 

See what Construction Viz can do for you

Find out more about Construction Viz by visiting our microsite, or contact us to schedule a free consultation and demo.

  • « Go to Previous Page
  • Page 1
  • Interim pages omitted …
  • Page 4
  • Page 5
  • Page 6
  • Page 7
  • Page 8
  • Go to Next Page »

Primary Sidebar

Recent Posts

How-To | October 3, 2023

Keeping it Simple: Cost Report Using Microsoft 365 Lists

Microsoft News | September 7, 2023

Microsoft Planner vs. Project: Which Should You Use for Team Tasks? 

Microsoft 365 Syntex AI
Microsoft News | August 9, 2023

Let Microsoft 365 Syntex AI Read and Organize Your Construction Images for You

sensitivity labels
Microsoft News | July 19, 2023

Redefining Project Permissions with Sensitivity Labels in Microsoft 365

Company News | June 13, 2023

Murph 2023 – We took the challenge!

Microsoft News | April 25, 2023

The end of an era with Microsoft SharePoint Server 2013

Footer

About

Lydon Solutions is a WBE consulting group specializing in construction project management software solutions using Microsoft SharePoint. Learn more >

Products & Services

  • Construction Viz
  • Clover AI
  • Professional Services
  • Business Consulting
  • Microsoft 365 Managed Services
  • Government Agencies

News & Events

  • Events
  • Blog

Company

  • About
  • Careers
  • Contact Us

Join our Mailing List

  • This field is for validation purposes and should be left unchanged.
Lydon Solutions

© Lydon Solutions

  • Sitemap
  • Privacy
  • Cookies
  • Terms of Use
  • Disclaimer

Click here to start a Microsoft Teams chat.

Contact Us
Name(Required)
This field is for validation purposes and should be left unchanged.