• Skip to primary navigation
  • Skip to main content
  • Skip to primary sidebar
  • Skip to footer
Lydon Solutions

Lydon Solutions

Construction Project Management Software Solutions

  • Construction Viz
  • Clover AI
  • Services
    • Business Consulting
    • Professional Services
    • Microsoft 365 Managed Services
    • Government Agencies
  • Company
  • Events
  • Blog
  • Careers
  • Contact
  • Search
  • Free Consultation
Show Search
Hide Search

Tips from the Field

Don't miss out. Receive blog updates on the latest Lydon Solutions company news, product updates, and much more by joining our mailing list today.

  • This field is for validation purposes and should be left unchanged.


Tips from the Field: Creating Office 365 Groups

Tips from the Field | January 13, 2020

In a previous post, we discussed the advantages of Office 365 Groups, which bring all Office 365 productivity apps together so you have an integrated solution to manage your projects.  

Office 365 Groups represent a new way to enable team members to collaborate in a common workspace with a standard set of tools.  You can create an Office 365 Group from Outlook, Yammer, Teams, SharePoint Online, and Planner. What’s unique is that when an Office 365 Group is created, you are automatically provisioned a shared Outlook mailbox and calendar, One Note Notebook, Planner instance, and SharePoint site collection. 

A Team’s Team and Yammer Groups can also be associated with the Office 365 Group. Also, you don’t have to worry about permissions since everyone added to the group automatically gets permissions to the appropriate applications. It’s a quick way to set up a collaboration space with all your favorite tools integrated and accessible in one place.  

Creating an Office 365 Group

So how do you create an Office 365 Group? It’s pretty simple and depends on which Office 365 application you start from. Here are the steps: 

  1.  Create New Group. The method is similar in each application. 

Outlook: 

Navigate to Groups in the left navigation and click “New group,” 

tips1-e1578440233540

Yammer: 

Navigate to Groups in the left navigation and click “Create a group.”  

tips2-e1578440210493

SharePoint, Teams, and Planner: 

When you create a modern site collection in SharePoint, a new Team in Teams, or a new Plan in Planner, an Office 365 Group with the same name will be automatically created. 

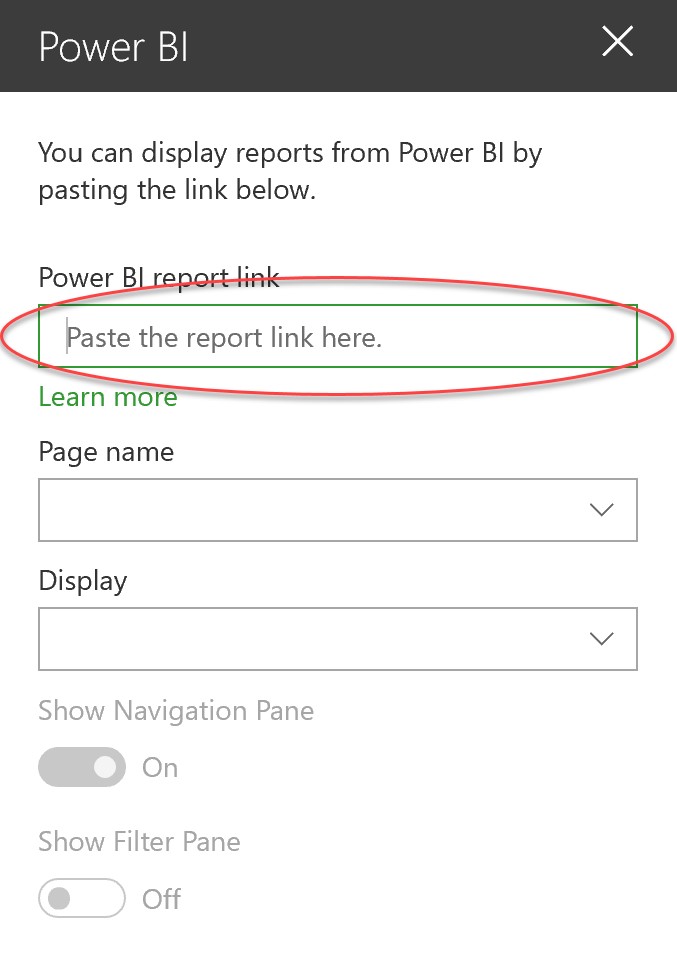
2. When you create a new Group, you get a window like this. (The exact display may vary depending on your application.) 

tips3
  • Provide a Group name that is related to the project. 
  • Describe the Group’s purpose. 
  • Select whether the group will be Private or Public. My recommendation is to default to Private since you will probably want to restrict access to the Group. Also, leave the box checked for “Members will receive all group conversations and events in their inboxes." They can stop following this group later if they want to.
  • Under “More settings” are the language preferences. 

3. Add members to your Group. This step allows you to add users who will have access to the applications associated with the Group. 

tips4

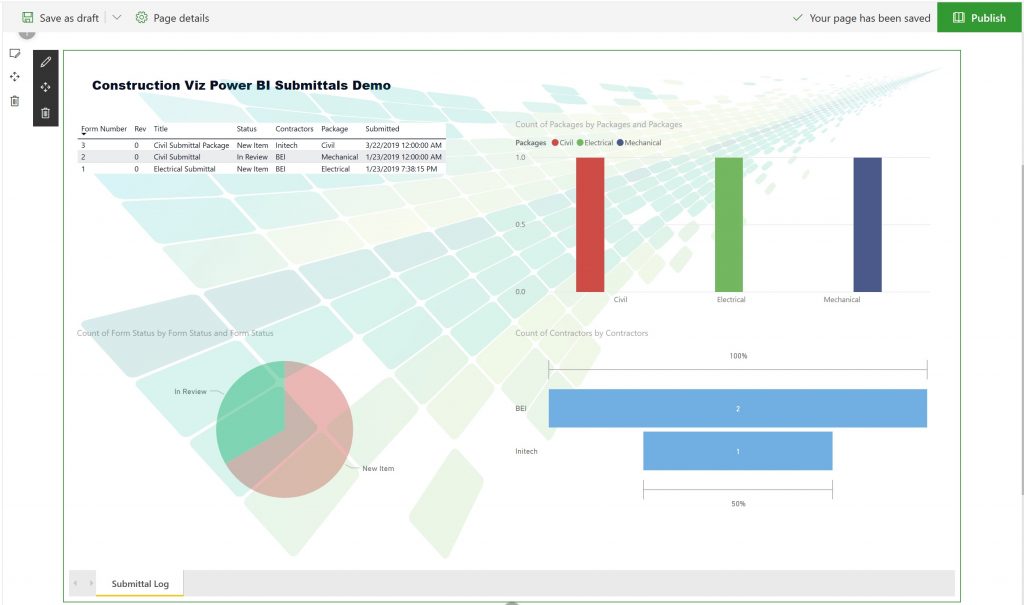
4. The Group is created with the associated applications. The new Office Group menus within each application are very similar. (At some point, I expect Microsoft will make them identical.)  You can navigate into Planner, SharePoint, One Note, Yammer, and even Teams from within the Office 365 Group. For comparison purposes, see Outlook and Planner below: 

Outlook: 

tips5

Planner: 

tips6

That’s it. Pretty simple overall. I suggest reading my blog post on Office 365 Groups where I provide some considerations for creating Office 365 Groups.  

Microsoft continues to bring the Office 365 suite of productivity tools together into a cohesive productivity solution. The Office 365 Groups seem to be the first step, and Microsoft’s Fluid Framework will take this even further. Make sure to subscribe to our blog as we’ll update you on developments as they are rolled out.  

Don’t Mess with Default Content Types in SharePoint

Tips from the Field | September 6, 2019

Most of our “Tips from the Field” are how-to guides to help novice SharePoint users better support their construction projects. This tip is different because it focuses on avoiding a problem that can have dramatic consequences. In short, don’t mess with the default content types.  Read on to learn why, and also how to properly configure custom content types if necessary.

Changing Default Content Types Can Break Your SharePoint Site

SharePoint’s default content types are the foundation of SharePoint apps, lists, and libraries. Content types define behavior and include various columns by default. SharePoint users who modify default content types can render an entire site unusable if done incorrectly. (Yes, you read that right.)

To illustrate, let’s look at a document library, which includes a “document” content type by default. If you don’t see a similar view, make sure “management of content types” is activated in the advanced settings of your document library.

content types in Sharepoint

If you click on the “Document” hyperlink under the Content Type column, you’ll see the included fields and attributes. For example, the screenshot below shows that the document content type has the “Name” and “Title” fields, and that name is a required field. 

So, whenever you add documents to this library, it will enforce the attributes of the document content type, and “Name” will be a required field (as denoted by a star).

content types in Sharepoint

With the right permissions, you can modify and add to the default content type, which will change the behavior of that specific document library.

So what’s the big deal?  There are several implications for modifying the document content type at the document library (content) level:

  • Library setting vs. content type. Changing the configuration of the library settings can conflict with modifications made to the default document content type.  For example, different columns could become required fields. This can result in documents being automatically checked out or disappearing.
  • Differences between libraries. Unless you drill into the document content types within the document library, you will have no idea why one library works differently than another. On the surface, they can look exactly the same.
  • Content type hierarchy. Document content types with the same name reside at the content hub or site collection. Sites, lists, and libraries inherit default content types from their parents, so behavior cascades from the highest to the lowest level. If you modify a specific app’s default content type at the document library level, any subsequent changes made at the hub or site collection will overwrite the document library content type. So, lists and libraries will be inconsistent.
  • SharePoint software updates. SharePoint software updates, when applied, could overwrite functionality for the default content types.

So, what do you do about it?  Do not modify the default content types. Instead, you can add your own custom content types.

How to Add Custom Content Types

If you are going to use content types, create new ones at the highest level (hub, site collection or site) for reuse and add them to the document library at the content level. If you click on “Add” from the existing site content types, you can select from the existing content types.

content types in Sharepoint

Choose the content type from the Groups and click “Add” to move each type from the left to the right box. Then click “OK.”  For example, see the project documents content type in the image below.

Once you add a new content type to your document library, you can make it the default setting for that library. From that point forward, every time you add a new document to that library it will use your new content type. Alternatively, you can also have your new content type appear as an option when a user clicks the “New” button to add a document. Both of the above methods will ensure the default document content type stays intact and you can easily see when a new one is being used instead of the default, making it easier to troubleshoot any problems.

If you want to know more, ask questions in the comments below.

Managing content types is an important part of using SharePoint for construction management, and one of the many ways Construction Viz makes your job easier. Contact us for a free consultation.

And be sure sign up for our monthly newsletter in the footer below to get our latest blog updates, tips on using Microsoft SharePoint, and other useful info.

Adding Microsoft Power BI to an Office 365 SharePoint Web Page

Tips from the Field | July 16, 2019

Microsoft Power BI is a powerful reporting tool for providing dashboards and analytics. This business analytics service, which is offered with Office 365, transforms data into stunning visuals that facilitate fast, informed decision-making, the kind you need to make your construction project a success.

One really cool thing you can do with Power BI is embed your report into Office 365 SharePoint online so that you can share it with your team members. Here are the steps to do this. Publish your report from Power Bi to Office 365. Log into the Power BI app from the Office 365 portal and click on your report from My Workspace.

1. Publish your report from Power Bi to Office 365. Log into the Power BI app from the Office 365 portal and click on your report from My Workspace.

Microsoft Power BI

2. Click “File,” “Embed” in SharePoint Online.

3. Copy the link.

4. Navigate to Office 365 SharePoint Online and create a page (modern Page) that you want to share with your team.

5. Click on the plus sign at the bottom of the page to add a web part.

6. Scroll the available web parts and select Power BI. A new Power BI web part will be added to the page.

7. Click “add report.”

8. Paste the Power BI report link you copied earlier (Step 3) into the Power BI report link.

9. And that’s it. Your report will display in SharePoint.

Do Even More with SharePoint & Power BI using Construction Viz

Construction Viz enables you to leverage all the power of the Power BI data-analytics tool to help you make decisions about your construction project. As a SharePoint-based solution, Construction Viz integrates with Power BI. You don’t have to do any heavy lifting to add sophisticated visual reporting to your construction management toolkit.

We hope you found this information helpful. We encourage you to check out our other Tips from the Field, which feature valuable information for construction project managers. And subscribe to our newsletter in the footer below.

How and Why to Use Promoted Links in SharePoint

Tips from the Field | February 5, 2019

Have you ever wondered about those “get started with your site” icons that appear on the home page when you create a site? Odds are you remove them quickly without even thinking. However, they are actually Promoted Links, a SharePoint app that is added in Site contents.

Promoted Links help you (as a SharePoint administrator) build attractive sites with easy-to-configure navigation. This feature lets you create links to content you want to feature. You can assign images to the links and easily organize them from the Promoted Links List, which is automatically created when you add the app.

Promoted Links are similar to Summary Links. The main difference is that Promoted Links are organized at the list level, while Summary Links are added to a web page and are organized when you edit a web page.

How to Create Promoted Links in SharePoint

First find the images you want to use as icons for your links, and create a library of the images.

Next, identify the content you want to promote. Create a library or list of this content. Also create a view your users will access when they click the links.

Next:

1. Click the cog wheel icon on the top right of your website page.

2. Select “Site contents.”


3. Click “add an app.”

4. Select “Promoted Links.”

5. Enter a name for the Promoted Links app and click “Create.”

6. The Promoted Links list is created. To add links, click the “Add tiles from the All Promoted Links view” hyperlink.

7. Click “new item” to add a link.

8. Add the following data to add a single link. You’ll need to make several choices, as follows:

1) Title: This is a required field for adding a link. This text will display with your image when viewed on your website:

2) Background Image Location: Copy and paste the entire URL where you stored the image that will be associated with the link.


3) Type the Description: Describe the image. This text only shows in the Promoted Links list and not on your website.


4) Description: This text will display with the image once you mouse over it on the website.

5) Link Location: This required field links to the content that you want users to navigate to. Copy and paste the entire URL to the library or list item in the field.


6) Type the Description: Describe where the link is pointing to. This text only shows in the Promoted Links list and not on your website.


7) Launch Behavior: This required field has a few options:

a. In-page navigation – This is the default behavior where the users are redirected to a link once they click on the image.

b. Dialog – This option opens a modal window (a pop-up window on the same page) once users click on the image.

c. New tab – This option opens a new browser tab once users click on the image.


8) Order: This is the sequence of how the images with their corresponding links will appear from left to right across the website.

That’s it! Promoted Links are an easy way to create simple, well-organized navigation for a website.


Want to Do More with SharePoint or Office 365?

If you want more in-depth SharePoint development, or are looking for apps to manage your construction projects, contact Lydon Solutions.

We now offer Construction Viz Apps for Office 365 for managing your projects all within your own Office 365 tenant. The data resides with you, and you can leverage Office 365 security and reduce costs by selecting only the apps you need. Learn more today with a free demo and consultation.

Keep Your Documents in Sync with SharePoint Copy

Tips from the Field | November 6, 2018

It’s a common problem. You have a Microsoft Word document work plan that has to be available in multiple sites or projects, all of which need the latest version. However, updating the document in different places is tedious and time-consuming, not to mention error prone.

Fortunately, you could instead make a Copy. Note that “Copy” is capitalized. It is a special feature in SharePoint 2016 and Microsoft Office 365 SharePoint Online, and can be found in the document library file menu.

With this feature you can easily and quickly copy a document from one library to one or more other locations while keeping everything in sync with the original. When the original document is changed, its owner or the document control specialist gets an alert. So, in our work plan example, the person receiving the change notice can then push those changes to all instances of that work plan with a few clicks. This can save lots of time, and ensure that every site and project file has the latest work plan.

How to Use the SharePoint Copy Feature

Using the SharePoint Copy feature is simple. Here’s how it works:

1. Upload a document to a document library.

2. Select the uploaded file.

3. Click on the three dots next to “Follow.”

4. Click on “Copy.”

5. Enter the location where you want to store your copy. Make sure to paste in the entire URL.

6. Enter a new file name or keep the existing file name for the copy.

7. Click “Yes” for the option to “prompt the document author to send out updates when the document is checked in.”

8. Click OK for the “create an alert for me on the source document” option.

9. Confirm the copy by selecting OK.


The document will now appear in the new destination location.


As changes are made to the original file, those changes can be pushed to the destination locations by going into the Manage Copies Menu and selecting the destination locations that should be updated.


1. From the Original File Document Library, click on the SharePoint Files Menu.

2. Select “Manage Copies” from the Copies menu.

3. From the Manage Copies menu, you will see the locations of all the copies and which copies will prompt you for updates. From here you can create a New Copy or Update Copies. Select “Update Copies.”

4. Select all the copies to update by clicking on the checkbox and clicking OK.

5. Confirm the Copy by clicking OK.

And that’s it. The SharePoint Copy feature is a great way to keep your work plans synchronized for multiple locations.


Get more tips and tricks for construction project management professionals

This is just a small example of how SharePoint and Construction Viz, our powerful construction project management software solution, can help you manage your projects quickly and cost-effectively.

Newsletter (Blog)

Insert blog description here.

  • This site is protected by reCAPTCHA and the Google Privacy Policy and Terms of Service apply.
  • This field is for validation purposes and should be left unchanged.

Save Time and Stay on Top of Your Construction Project with SharePoint’s Calculated Columns

Tips from the Field | August 7, 2018

Do you want to:

  • Calculate the amount of retention on an invoice form?
  • View all your inspection reports organized by month?
  • Calculate all your Change Requests greater than $x requiring your approval?

It’s easy to get all that information, and more, with SharePoint’s calculated column feature.

Calculated columns (as the name implies) make calculations based on fields in a list or library.  You can add calculated columns to any list or library to do things like total or sub-total the value of documents and lists into a monthly view or add a condition to determine who needs to review a form.

The formulas used in the calculated fields are unique to SharePoint and are not necessarily the same as Excel formulas. Calculated fields only run when a record or item is saved, but custom event handlers can be added to trigger calculations if needed.

How to Add a Calculated Column in SharePoint

To add a calculated field to a list or library:

1. Select the List or Library where you want to add the calculated column and then click on “Create Column.” See #1 below.

This will pop up a modal dialog box showing you column selections.

Note: You can also click on “List Settings.” See #2 above. Then scroll down and click on “Create Column.” See the corresponding #2 below.

The “Settings: Create Column” page will display. See #3 below.

2. Type a name for the field and select the “Calculated (calculation based on other columns)” option.

Once you have made this selection, the options to configure this column will appear.

3. Enter a description if you want an explanation of the field as a reference. See #4 below.

4. Add a formula by selecting a column in the “Insert Column” box and then clicking on the “Add to formula” hyperlink. See #5 below.

Note: You build formulas from left to right (see samples below). Also, do not manually type column names in the Formula area. Instead select them using the “Insert Column” option. Once selected, Columns will be displayed within square brackets, e.g. [ColumnOne].

5. Select the data type (e.g., number or currency) you want the formula to display for the value of the field. See #6 below.

6. Choose whether you want to add the calculated column to the default view or not and select OK. See #7 below.

Frequently Used Formulas for Calculated Fields in SharePoint

Below are some sample formulas for calculated fields in SharePoint. You do not have to use these exact formulas. However, understanding the logic behind them may help you design your own calculations.

Sum values in a form

This formula is appropriate if you want to add up multiple columns in a form whenever you save the record (e.g. Change Order with line items that you want to total)

Note: Standard operators such as minus (-), plus (+), divided by (/) and multiplied by (*) will work. Make sure to enclose each individual calculation in parenthesis (not square brackets) if multiple calculations are required.

Formula:

=[Column1]+[Column2]

Example Data:

Column1: 10

Column2: 20

Example Result: 30

Document summarized by month

This calculation is helpful If you have multiple documents with a date field and you want to group the documents by month in a view (e.g. inspection reports grouped by date).  This calculation uses a built-in function TEXT(…) to apply formatting and the ampersand (&) to link the text together.

Formula:

  • =TEXT(Date,”yyyy – “)&TEXT(Date,”mm”)&TEXT(Date,” (mmmm”)&TEXT(Date,” yyyy)”) )

Example Data:

  • Date: 11/15/2017

Example Result:

  • 2017 – 11 (November 2017)

Apply a condition if value is greater than

This formula is appropriate if you want to know whether an entered value is greater than a set value. For example, this could help you check Change Order requests over a certain amount, which might affect the approval cycle.

Formula:

  • =IF([EnterValue]>[CheckValue], “Yes”, “No”)

Example Data:

  • EnterValue: 20
  • CheckValue: 10

Example Result:

  • Yes

Get more tips and tricks for construction project management professionals

By now, we hope you see that calculated columns are a great way to keep your finger on the pulse of your construction management projects. The formulas above are just a small sample of what is available to help you manage your projects quickly and cost-effectively. The ability to do calculated columns is another one of the valuable capabilities that SharePoint makes possible in Construction Viz, our powerful construction project management software solution.

Contact us to see how Construction Viz can quickly, easily and cost-effectively make your job easier. You can also sign up for our monthly newsletter below to get our latest blog updates, tips on using Microsoft SharePoint, and other useful info delivered directly to your inbox.

  • « Go to Previous Page
  • Page 1
  • Page 2
  • Page 3
  • Page 4
  • Go to Next Page »

Primary Sidebar

Recent Posts

Microsoft Tips | March 12, 2025

Take Project Photos in the Field Using the Microsoft 365 Copilot App!

Microsoft Tips | March 3, 2025

Portfolio Management in Project for the Web (Planner Premium)

Microsoft Tips | February 27, 2025

Use AI on Your SharePoint Sites with Copilot Agents

Case Study | February 11, 2025

How to Work Successfully with Vendors on a Software Deployment

Company News | January 31, 2025

Get in Shape in 2025 with the Murph Challenge

Microsoft Tips | November 21, 2024

Say Goodbye to Post-It Notes with the New Microsoft Sticky Notes App

Footer

About

Lydon Solutions is a WBE consulting group specializing in construction project management software solutions using Microsoft SharePoint. Learn more >

Products & Services

  • Construction Viz
  • Clover AI
  • Professional Services
  • Business Consulting
  • Microsoft 365 Managed Services
  • Government Agencies

News & Events

  • Events
  • Blog

Company

  • About
  • Careers
  • Contact Us

Join our Mailing List

  • This field is for validation purposes and should be left unchanged.
Lydon Solutions

© Lydon Solutions

  • Sitemap
  • Privacy
  • Cookies
  • Terms of Use
  • Disclaimer

Click here to start a Microsoft Teams chat.

Contact Us
Name(Required)
This field is for validation purposes and should be left unchanged.