• Skip to primary navigation
  • Skip to main content
  • Skip to primary sidebar
  • Skip to footer
Lydon Solutions

Lydon Solutions

Construction Project Management Software Solutions

  • Construction Viz
  • Clover AI
  • Services
    • Business Consulting
    • Professional Services
    • Microsoft 365 Managed Services
    • Government Agencies
  • Company
  • Events
  • Blog
  • Careers
  • Contact
  • Search
  • Free Consultation
Show Search
Hide Search

construction project management information systems

How to Plan for a Construction Software Deployment – Part 2

How-To | September 12, 2017

This is part two of three in a series of blogs called How to Plan for a Construction Software Deployment.

Here are several tips to help your organization successfully deploy a construction project management information systems (PMIS) or other similarly large-scale IT solution.

We shared five foundational steps for planning a construction project management software implementation in our last blog post – so if you haven’t read Part 1 yet, you should start there.  For Part 2, we'll offer a handful of best practices to keep in mind whenever you plan any major system deployment for your organization. In our upcoming Part 3, we will cover managing a construction software deployment.

Step 1 – Get IT onboard early

We recommend getting your IT team involved early in the project even if you are working with an outside vendor. Any major system deployment will involve multiple IT infrastructure considerations. The software, hardware, firewalls and virus protection in use at your organization can all impact your new system and it is best to discover and resolve any compatibility issues as soon as possible.

Chances are your IT group will also have a compliance checklist. Any new software platform or externally hosted solution will need to meet relevant information governance or other requirements. Obtaining early input and approval from IT will prevent issues downstream for your project.

Step 2 – Start small

It will be tempting to go big with the construction project management software implementation and deploy it across your organization or on multiple projects. Caution!!!! Don’t do it.

Our recommendation is to select a single project or two to pilot on first. This keeps your investment small. If things don’t work, you can easily write it off and move on to something else. If your trials succeed, you then have a better justification to move on to a wider deployment with more budget and resources.

Starting small also lets you build grassroots acceptance for your system among project team members as well as test and refine your assumptions. Top-down, mandated software deployments are much more challenging and have a low success rate. Do yourself a favor and score some wins early to pave the path forward.

Step 3 – Have a communications plan

Make sure you have a communications plan in place from the start of your project that includes a regular cadence of updates to other teams in your organization. Start educating potential stakeholders and project teams early so that they understand the project’s goals as well as its value to them and the organization. Building interest in this way not only helps find potential sponsors and champions, it also improves user adoption down the road.

Related to the above, communications shouldn’t just be one way –  you need to collect feedback. Set up open forums or focus groups to get input from stakeholders and users. Doing this early and consistently will help you pre-emptively resolve concerns before they become roadblocks to your project.

Step 4 – Don't forget about legacy data

Consider how your organization handles existing data in other systems or locations. If you followed the steps in our previous blog post, you should have documented your business practices and know where your new system will intersect with legacy data. You will need a migration strategy for any information that needs to be imported or converted to your new construction project management software system.

Step 5 – Develop an ongoing support strategy

Don’t forget to figure out who will support the solution and for how long. An effective support strategy will need to involve both your solution vendor, the business owners (Sponsor, Champions, SMEs), and your IT group – with clear handoff points and escalation paths.

Your support strategy should also include a roadmap of future project priorities for any upgrades or enhancement as well as potential integrations with other systems.

Step 6 – Invest in a solution, not software

Do not buy software, buy a solution. Software is only one piece of the pie. It is easy to be wowed by a long list of features and promises from prospective construction project management software vendors. But don’t lose track of what is most important.

You want a solution that is flexible and user-friendly to ensure that your users will actually want to use the system. Most importantly, the system you deploy should fit your business, not the other way around.

Finally, any vendor or service provider you select should know the construction industry, have proven successes, demonstrate content expertise and be flexible with their offering to meet your business needs.

We hope you found these tips helpful. Part 3 in this blog series will share advice on managing a construction software deployment. In the meantime, let us know if you have questions in the comments below. And if you recently deployed a new construction project management software system, what tips did you pick up along the way?

Your organization is unique, your PMIS should be too

We designed Construction Viz based on the idea that ever organization, project and PM is unique. Construction Viz is our flexible, subscription-based construction project management solution powered by Microsoft SharePoint 2016, SQL 2016 and Azure. The platform includes everything you need to manage your construction projects— document management, dashboards, reports, forms, workflows and more—in one place.

Contact us to get a free consultation to learn more about what Construction Viz can do for your organization.
Check out more blogs from How to Plan for a Construction Software Deployment

  • Part 1: How to Plan for a Construction Software Deployment
  • Part 3: How to Successfully Manage a Construction Software Deployment

Takeaways from CMAA National Conference & Trade Show 2016

Events | October 26, 2016

We had a great and productive CMAA Conference this year, including announcing our new Construction Viz solution at the event. Here are some insights we took home from the show.

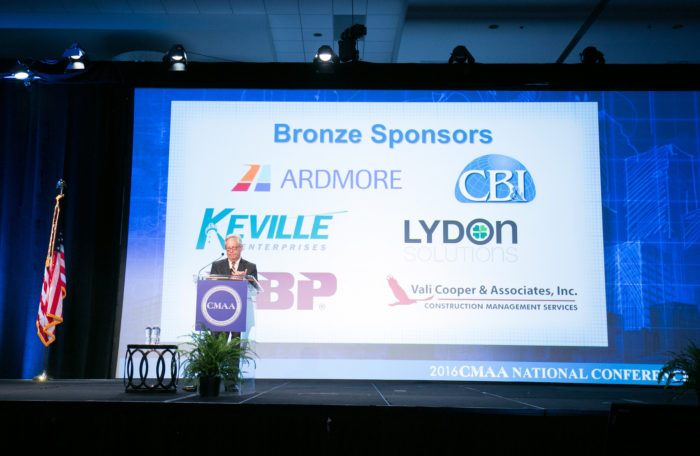
Lydon Solutions was proud to be a bronze-level sponsor at the annual CMAA National Conference & Trade Show held Oct. 9-11th in San Diego. As always, our team had a great time chatting with our colleagues in construction program management. This year’s event was extra special for us because we unveiled Construction Viz, our new subscription-based construction project management solution.

2016 CMAA Conference - Construction Viz Announcement

Below are a few of our takeaways from the three-day conference:

1.       Organizations are wrestling with how to replace Primavera Contract Manager

The industry is facing the impending end of life for Primavera Contract Manager. Oracle is directing its clients to SKIRE Unifier. Many companies we spoke with, however, are weighing their options before making the move.

2.       User experience matters

Companies like Apple and Google on the consumer side and leading SaaS vendors in other industries, have raised the bar for user experience by providing streamlined and intuitive user interfaces.

So, it is no surprise that CMAA attendees we spoke with expect that same ease of use in their construction program management tools. They are tired of complex and convoluted software platforms. They want simple and intuitive interfaces. They don’t want to read a bunch of manuals or attend multiple training sessions.

3.       Users don’t want a one-size-fits-all platform

Related to the above, a lack of flexibility in many Project Management Information Systems (PMIS) was one of the biggest gripes we heard from users this year. In fact, we have heard this issued raised for several years running.

This complaint makes a lot of sense. After all, companies have different processes. Each project has its own set of requirements. Project teams and their individual members have their own workflows and ways of doing business.

Yet many PMIS platforms are not flexible enough to accommodate this reality.

4.       Mobile-first is a necessity for construction project management

Users want mobile-first tools that enable them to be productive in the field or away from their desk, with or without an internet connection. This isn’t just about convenience. Today’s fast-paced, competitive business environment makes this a necessity.

5.       Construction Viz really is project management perfected

The above observations mostly fall in the “industry challenge” column. Which is why it was so gratifying to announce Construction Viz at the CMAA this year.

Construction Viz builds on our award-winning Construction Project Management Portal powered by the industry-leading Microsoft SharePoint. Our portal is used by leading construction and utility companies to manage their multi-billion dollar projects. We believe our Construction Project Management Portal is the most flexible and extensible PMIS solution available.

Construction Viz takes everything we learned deploying our portal and makes it available as an affordable, subscription-based hosted solution. The Construction Viz platform is as flexible as project teams need it to be, offering customizable pages, forms, dashboards, reports, workflows and more. Since it is based on SharePoint, users can dive in and get to work right away without a steep learning curve.

Companies looking for a better way to manage their projects can start with the turnkey Construction Viz today and be confident that the underlying framework is scalable and flexible to keep pace with their changing business needs. Users can even seamlessly migrate from Construction Viz to our fully customized Construction Project Management Portal in the future.

6.       Construction Viz and SharePoint: the perfect PMIS solution with full mobile-first support

Most everyone is familiar with SharePoint, but not necessarily as an ideal construction PMIS solution. What blew folks away, however, was how we have mobilized the SharePoint experience with Construction Viz.

Construction Viz is fully responsive so users can access and update their project data on virtually any mobile device.  That means dashboards, reports and forms are always at the project team’s fingertips. Robust off-line support enables team members to be as productive in the field as they are in the office.
The mobile capabilities of Construction Viz we showed off to attendees really blew them away – and it is always fun to see someone’s eyes light up when they realize the benefit this functionality would provide them and their team.

Want to perfect your construction project management?

We loved showing off Construction Viz to everyone who stopped by our booth and presentation at the CMAA conference this year.

Not able to see our CMAA demo? Contact us today for a free consultation and demo to see what Construction Viz can do for your organization.
Why You Should Document “As Is” Processes

How-To | August 17, 2016

How you do business today – your “as is” process – is just as important as how you would like to do business in the future when gathering requirements for a new construction Project Management Information System.

You may be tempted to focus on how you would like to do business going forward when putting together requirements for a new Project Management Information System (PMIS). Resist this temptation. You will design and deploy a better PMIS by capturing the best practices from your existing business processes. And you will improve user adoption, simplify training, and avoid business disruptions.

Capture Current Business Processes with “As Is” Requirements Gathering

Collecting detailed requirements should be a two-part process:

  1. First document how groups in your organization currently do business. These are “as is” requirements.
  2. Next understand how they would like to do business going forward.  These are “to be” requirements.

Documenting the “as is” process first enables you to understand what worked and what didn’t work. You can then apply the current best practices to make your “to be” processes better.

Tips for gathering “as is” requirements

  1. Not every process needs to be replaced: “As is” processes should be the starting point for any potential “to be” processes. But don’t assume that every “as is” process needs to be replaced by the new system. Take the time to understand the effort and investment involved with the existing process. Document the benefit and ROI for any new process.
  2. There is no “standard process”: Every company, project, and person does things differently. So make sure to include a representative sample of stakeholders in your requirements gathering team and focus groups.
  3. Don’t judge what came before: Avoid being judgmental when documenting existing processes. Business processes often evolve as the best way forward based on various past circumstances and constraints (e.g. limited budgets, tools, or available technology). Focus on understanding the current process.
  4. Mind the gaps: Related to #3 above, current processes and systems often have gaps filled by manual or undocumented steps. This is because information workers will turn to other tools to get their job done when they encounter holes in an existing process. For example, Excel spreadsheets passed around via email frequently become an undocumented part of the project management process. Your “as is” requirements should capture all of these undocumented and manual steps.
  5. Requirements take time and should be comprehensive:  There are no shortcuts to requirements gathering. Listen to each set of stakeholders. Take the time to learn how the PMIS system will be used across your organization. Understand all the interactions with other groups and their processes.  Your final design will be better if you capture this information.
  6. Don’t confuse the system with the business processes:  When documenting an “as is” requirement, be sure to capture how work is actually done with or without a system. Don’t simply capture the steps involved in using whatever system is currently in use.
  7. Beware of reengineering: When asked about how they do business today, users often want to tell you about how they would ideally like to do business in the future. Don’t substitute a wish list for actual processes. Change sounds great on paper, but implementing it can take significant time and resources. Often these reengineered or idealized processes don’t have buy-in from other groups. Your new PMIS will face resistance if it rolls out with processes that are way off from how users actually get their work done. So be careful when you hear “tomorrow we are going to be doing it this way” or “we are in the process of changing over to this.” Focus on documenting how groups do business today.
  8. Manage requirements gathering as a project:  Requirements gathering is just like any other project. You need to set a scope, schedule, and budget. This will keep everyone – you, your stakeholders, your developer, the IT group, and executive management – engaged and accountable for the finished product.
  9. Gather requirements with standardized templates: Create standardized collection templates for both the “as is” and “to be” processes.  This will help you ask the right questions. It will also ensure a consistent format and accelerate the collection process.  Having all of this documented can also help down the road if there are questions about what should be in or out of scope for the project.
  10. They’re ALIVE!   Remember that your requirements documents are living documents. Keep versions, update regularly, and refer back to them often.

If you keep the above in mind while capturing your “as is” and “to be” requirements, you will be well on your way to implementing a successful PMIS for your organization.

Are you considering a new Project Management Information System?

Be sure to read our previous posts with more tips and advice on requirements gathering:

10 Tips for a Successful Project Management Information System Implementation

Requirements Gathering for a Project Management Information System

Gathering Detailed Requirements Via Use Cases

And we’re here to help if you need it. Lydon Solutions has years of expertise compiling detailed requirements for construction software projects.  Get a free consultation to learn more.

How to add a text box to a SharePoint page

Tips from the Field | August 9, 2016

Here’s how you can use the Content Editor web part to include a text message on your project web pages in SharePoint.

If you’ve ever created a new project web page in SharePoint, you probably wanted to include some kind of text box for your team. This is a great way to present useful information like project scope, contact or support details, or even a training message to help team members use the site

The first idea that may come to your mind is to simply type directly into a SharePoint zone on a page directly like this:

There is nothing wrong with the above. But you can get more flexible results using the Content Editor web part.

The Content Editor web part offers the following advantages:

·       Flexibility – You can move the web part to any zone on a page without having to copy and paste your text. Plus, you won’t get broken URLs if you include them in the Content Editor web part.

·       One-click visibility control – You can hide the text contained in the Content Editor web part with a click. This can come in handy if you want to show a reminder message on certain days only – or if you want to prepare but not publish the content right away.

·       Audience targeting – You are able to target the Content Editor web part by permission group. So messages can be displayed only to specific project teams based on permissions.

·       Consistency –  You can keep all your pages looking consistent by using standard web part titles.

How to add a Content Editor web part in SharePoint

You can add the Content Editor web part to your SharePoint page in a few clicks:

Add the Content Editor web part

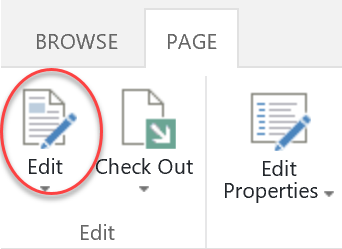
1.       Click Edit from the Page ribbon.

2.       Click on the zone where you would like to add the text.

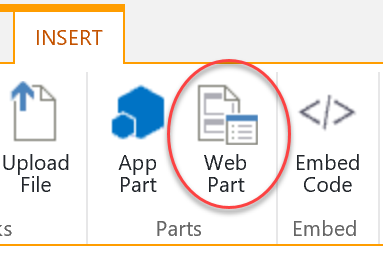
3.       Click on Insert. Then click on the Web Part icon in the ribbon.

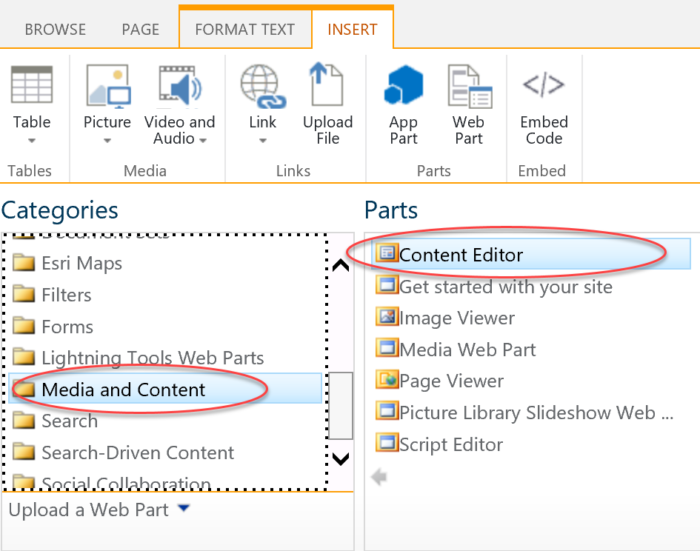
4.        Under Categories, select Media and Content. Then select Content Editor under Parts (don’t see Content Editor? Get instructions to enable it below). Click Add.

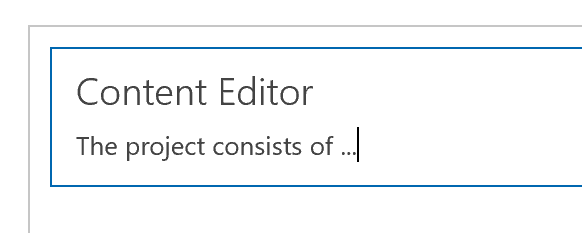
You should now see the Content Editor web part in the zone you selected.

Edit the Content Editor web part

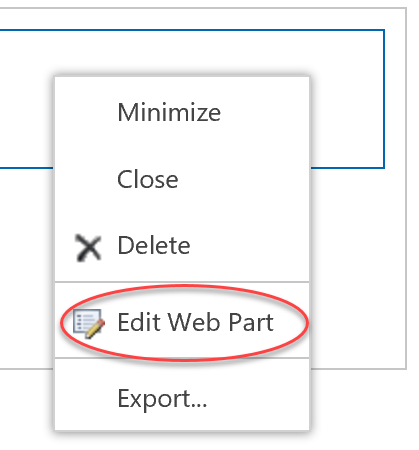
1.       To edit the Content Editor, click on the upside down triangle on the right and select Edit Web Part.

2.        Enter your text into the Content Editor web part.

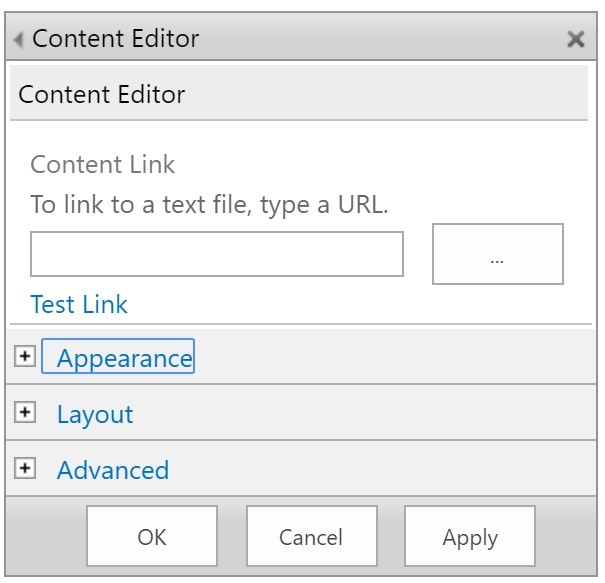
3.       You can customize the Content Editor under Appearance, including changing the title and specifying the height and width of the web part.

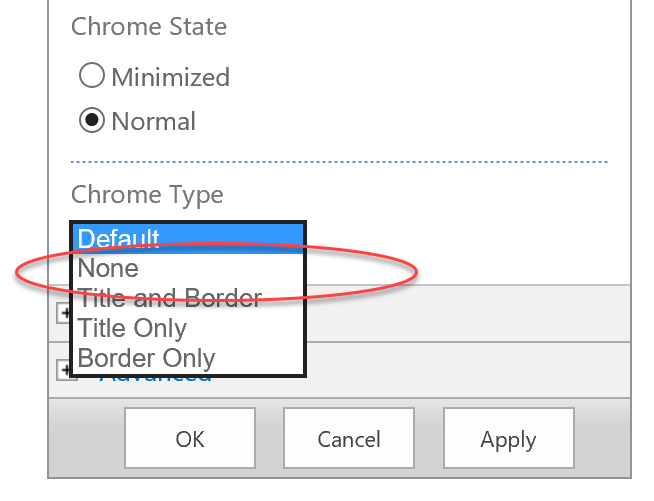
4.       If you want to remove the title of the web part entirely, click Appearance and change the Chrome Type to None.

5.       When you are done, click OK in the Content Editor web part and save the page

There you have it.  You built your own flexible web part for text entry that can be placed anywhere on the site page.

Content Editor web part is missing from your SharePoint?

Don’t see the Content Editor web part as an option in your ribbon? Microsoft released an update last year that disables certain web parts by default in Office 365 and SharePoint online. To restore the Content Editor web part, you or your SharePoint admin will need to turn the scripting capabilities back on for your site.

You can find instruction to do so here. After you enable scripting and refresh your site, you can continue where you left off above.

Want more tips and tricks for construction project management professionals?

Our new ‘Tips from the Field’ series features time-saving information for construction project managers. Subscribe to our newsletter to get our latest tips and tricks delivered directly your inbox each month.

And be sure to check out our previous tip to learn how to import data from Excel into SharePoint.

Requirements Gathering for a Project Management Information System

How-To | June 1, 2016

The requirements gathering process is critical to successfully deploying a Project Management Information System (PMIS). Here are tips on how to gather requirements for a construction project management solution.

The success of any software development project hinges on the requirements gathering process. Would you build your house with no drawings, no material list, or no schedule?  No, of course not.

The same planning is required for a software solution.

Good requirements help enable a successful final product. Poor requirements can result in cost overruns, schedule delays and poor client/contractor relations due to excessive changes and rework.

The right way to gather requirements

Here are a few definitions and best practices to help you better collect and communicate effective requirements from the start:

1.       What is a software requirement?

A software requirement is a detailed definition of a function or feature that must be met to ensure the product achieves what it was designed to accomplish for its users.

2.       Why do I need to do requirements?

Requirements are needed in order to define the scope of the development, provide a cost estimate, and manage the project.

3.       Who does requirements?

It’s not any different than a construction project.  The client has a need. So they develop a design, issues bid packages, manage changes, and ultimately own the overall scope and budget.

The developer doesn’t define the client’s scope.  The developer may help quantify or qualify the scope, but the requirements are owned by the client.

4.       When do I start requirements?

Start with requirements before you look at any software product.

Documenting your requirements, and taking stock of your existing tools, will help you better understand what you truly need. It is also important to talk with other departments in your organization. Chances are you could combine efforts in order to save costs and avoid duplicating software.

When companies start looking at software products before understanding their requirements, they often end up buying into features that are unnecessary or redundant.  By defining requirements first, software options can be better evaluated.

5.       Where do I document my requirements?

Microsoft Excel, Word, Visio and Adobe Acrobat are the most user-friendly and commonly available tools for collecting and documenting requirements.  If you have better tools than those, then by all means, use them.

The key is ensuring that your requirements document can be easily updated, shared, and stored in a central location such as SharePoint or a File Share with version control and change management.  Version control is essential since these documents should be shared between client and developer.

Remember that these are living documents that change over time and the “story” should be captured to support changes.  If done correctly, these documents will evolve into testing documents and training documents.

6.       How do I start?

There are many proven approaches to requirements gathering.  We recommend that different types of requirements should be gathered for different phases of the project.

Budgetary/ROM requirements phase: Your first step will typically be getting budget approval for your project. To do this, you will need to define high-level requirements.  Examples would include X number of reports and dashboards, X number of forms with workflow, etc.  The details of these inputs and outputs are minimal at this point.

Summary requirements phase: Next you will need to create an RFP. Here you must list out the key requirements based on your business needs. This phase often includes a long wish list of items of different priorities. Estimates from developers for both cost and schedule based on your RFP are usually +/- 50% with a lot of assumptions and risks called out by the vendor.

Detailed requirements phase:  Finally, a formal requirements process should be conducted once you select a vendor and before any work starts.  While a good software development organization with both construction and IT experience, like Lydon Solutions, can turn lemons into lemonade, it is advisable to follow best practices when collecting and communicating detailed requirements.  These requirements can be used to estimate the cost to within +/- 10-25%.

Want to know how to get started with requirements? Read our next article where we go over how to put together your Detailed Requirements document utilizing use cases.

Need expert help gathering requirements for a construction project management solution?

We know that the requirement gathering process can be daunting. We are here to help! Lydon Solutions has a set of standard business requirements documents that we use as a starting point. Get a free consultation to learn more.

PMIS the Right Way

How-To | September 22, 2015

Considering a new Project Management Information Systems (PMIS) for your construction company?

We covered the reasons PMIS implementations typically fail in our previous blog post. Below we share the best practices we’ve learned implementing successful PMIS solutions for our clients over the years. Follow these tips and you will save yourself and your company headaches.

In a future blog post, we’ll explain why we believe Microsoft SharePoint, a tool already in place at most organizations, is the best PMIS option for many companies.

10 Tips for a Successful Project Management Information System Implementation

Do not go into an Enterprise PMIS rollout with your eyes shut.  A PMIS needs a scope, schedule and a budget just like any other construction project.  Buying software is the last step in the process not the first.  Do your homework and follow these best practices:

  1. Take stock of what you already have.  Analyze what you have before going out and buying an expensive new PMIS. You may find you already have tools that will meet your needs. For example, most companies already have Microsoft SharePoint. We have been able to provide 95% of our clients’ requirements by supplementing SharePoint with P6 and Arc GIS integration. Be sure to read our next blog article to learn why SharePoint may be the best PMIS solution for your company.
  2. Take time to do requirements.  We cannot say this emphatically enough. Taking time to do a proper requirements gathering phase is the difference between project success and failure. Requirements are independent of a PMIS, so spend the time defining your process before you even look at platforms. Understanding what your organization needs will make it easier to pick the right tool, prioritize features, avoid bloatware and ultimately save you time and money.
  3. Shoot High, Aim Low.  Plan the deployments so that functionality is released in phases.  The shotgun approach does not work.  Everybody on the project team is busy and their ability to change is very limited.  Small wins build support and foster empowerment of project teams.
  4. Assign Subject Matter Experts. A PMIS doesn’t build itself and magically know how you do things. You have to commit internal resources to collecting requirements, testing, training, encouraging adoption and managing feature requests. Establish a team of internal subject matter experts (SMEs) to support the PMIS throughout the entire Software Development Lifecycle (SDLC). These should be experienced SMEs from each discipline that will use the PMIS, not “newbies.”
  5. Get the right team.  Ensure your PMIS deployment is successful by entrusting the project to a team that is expert on the platform. Many construction companies hire one-off contractors or consultants from staffing agencies to develop functionality and deploy solutions. Companies do this because they believe they will save money. But hiring IT generalists often leads to wasted time, incomplete solutions and ballooning project costs. A PMIS solution should be deployed by a team that knows the product – both hardware and software – inside and out. Hire a team that specializes in PMIS deployments that can efficiently deliver a complete solution.
  6. Build grassroots support for your project.  PMIS systems are successful when users embrace them, not when they are forced to use them by upper management. You can increase adoption by ensuring the PMIS makes things easier and more efficient for all stakeholders. Otherwise you are just creating more work for other teams. Find internal champions in each department who know the business and can influence the rest of the organization. Work closely with them to gather their group’s requirements.
  7. Focus on core competencies.  A successful PMIS implementation requires the help of technology experts with experience deploying project management systems. You are probably thinking that this is convenient advice coming from a consulting company. That doesn’t make it any less true. You know your business backwards and forwards, but you are probably not an IT expert. Your internal IT department specializes in software and hardware refreshes. But they are not experienced with the intricacies of PMIS deployments. Bottom line: you will end up spending double the cost and tenfold the time trying to develop and roll out a PMIS without expert help.
  8. Embrace the cloud.  Companies spend millions maintaining data centers that will never keep up with the latest technology and security requirements.  We realize moving to the cloud seems daunting, But if you want to save cost, improve efficiency and foster innovation, your best bet is to get out from behind your firewall.
  9. Make your IT partner part of the construction team.  Your ideal IT partner should become part of your construction team to understand your business and your requirements. This will allow them to respond quickly to project needs and build solutions as they are needed.
  10. Expect to spend money.  Software is only part of the cost you need to consider. A bigger cost is the labor to develop and support your implementation.  A PMIS should be treated just like rolling out an enterprise financial system or CRM.  You don’t buy a system and then walk away. A successful long-term implementation requires careful initial planning followed by expert installation, maintenance, and support. Make sure your budget takes into account the full lifecycle of the PMIS.

Why Microsoft SharePoint is an ideal PMIS platform

In a future post, we’ll pull everything together to discuss why we recommend Microsoft SharePoint to our clients as the ideal foundation for a robust PMIS solution.

  • « Go to Previous Page
  • Page 1
  • Interim pages omitted …
  • Page 4
  • Page 5
  • Page 6
  • Page 7
  • Go to Next Page »

Primary Sidebar

Recent Posts

Tips from the Field | December 20, 2023

Tips from the Field: Speed Up Your Excel Workflow

How-To | November 16, 2023

Keep Your Construction Data Safe with Microsoft 365 Permissions – Part 3

SharePoint permissions
Tips from the Field | November 10, 2023

Keep Your Construction Data Safe with Microsoft 365 Permissions – Part 2 

Microsoft News | October 20, 2023

Keep Your Construction Data Safe with Microsoft 365 Permissions – Part 1 

How-To | October 3, 2023

Keeping it Simple: Cost Report Using Microsoft 365 Lists

Microsoft News | September 7, 2023

Microsoft Planner vs. Project: Which Should You Use for Team Tasks? 

Footer

About

Lydon Solutions is a WBE consulting group specializing in construction project management software solutions using Microsoft SharePoint. Learn more >

Products & Services

  • Construction Viz
  • Clover AI
  • Professional Services
  • Business Consulting
  • Microsoft 365 Managed Services
  • Government Agencies

News & Events

  • Events
  • Blog

Company

  • About
  • Careers
  • Contact Us

Join our Mailing List

  • This field is for validation purposes and should be left unchanged.
Lydon Solutions

© Lydon Solutions

  • Sitemap
  • Privacy
  • Cookies
  • Terms of Use
  • Disclaimer

Click here to start a Microsoft Teams chat.

Contact Us
Name(Required)
This field is for validation purposes and should be left unchanged.