• Skip to primary navigation
  • Skip to main content
  • Skip to primary sidebar
  • Skip to footer
Lydon Solutions

Lydon Solutions

Construction Project Management Software Solutions

  • Construction Viz
  • Clover AI
  • Services
    • Business Consulting
    • Professional Services
    • Microsoft 365 Managed Services
    • Government Agencies
  • Company
  • Events
  • Blog
  • Careers
  • Contact
  • Search
  • Free Consultation
Show Search
Hide Search

construction project management

Keep Your Construction Data Safe with Microsoft 365 Permissions – Part 2 

Tips from the Field | November 10, 2023

In part 1 of this three-part series on Microsoft 365 permissions, we discussed Microsoft 365 admin roles and application-specific permissions. Part 2 of this series will focus on Microsoft SharePoint Online permissions management. SharePoint brings another level of permissions management to Microsoft 365 applications, which is why we are keeping this topic separate.  

Think of SharePoint as the database for Microsoft 365 applications. Microsoft Teams, Microsoft Planner, and Microsoft Lists store data in SharePoint lists and libraries. You can thus extend the default permissions from the app level through the underlying SharePoint site permissions.  

This article will discuss SharePoint permission levels and groups and how you can modify them to help manage overall project permissions. 

Structure of SharePoint Permissions

Picture1

To understand permission controls within SharePoint, you must first understand SharePoint permissions levels.  

SharePoint Permission Levels

Permission levels navigation link from the advanced permissions settings

Permission levels enable users to perform specific tasks. Permission levels are assigned to permission groups or can be assigned to a user directly (not recommended). The permission levels that we typically see on construction projects are the following:

  • Full control - Enables users to view, add, update, delete, approve, and customize items or pages on the website. This level is typically reserved for just the SharePoint admins since this level could delete entire pages and libraries. 
  • Read – Enables users to view pages, list items, and download documents. This level is suitable for managers and external stakeholders viewing but not modifying data. 
  • Contribute - Enables users to manage personal views, edit items and user information, delete versions in existing lists and document libraries, and add, remove, and update personal Web Parts. You typically assign this level to users who add and upload data. This level is most common for construction team members sharing files and forms. 

You can create and modify permission levels from the advanced permissions settings menu if you are a site owner or have full-control permission.  

Default Permission Levels 

Lydon Solutions typically adds a custom permission level to projects, and we name it “Contribute No Delete” to accommodate external contractors. This custom level allows users to upload but not delete records, which is handy when sharing files between internal and external stakeholders.  

Uncheck "delete items” in the permission level settings to create a new “Contribute No Delete” level. 

SharePoint Permission Groups

Permission groups are containers where you can assign a permission level and users. You can add a permission group to an entire SharePoint site, and its permission level would be inherited across every artifact (list, library, folder, and record) in the site. Alternatively, you can break inheritance and assign a different permission level to a group or user for individual SharePoint artifacts.  

As with any other Microsoft 365 application, there are default permission groups available: 

  • Site owners – Site Owners can manage site permissions, add and delete artifacts, edit site settings, and change site themes. This group has the Full Control permission level assigned in SharePoint.  
  • Site members – Site Members can add and delete records in lists and libraries. This group has the Contribute permission level assigned in SharePoint. 
  • Site visitors – Site visitors can see site content but not edit it. This group has the Read permission level assigned in SharePoint. 
SharePoint Default Permission Groups 

These default permission groups are automatically assigned to every artifact on the site and will be added to every new artifact you create. This means that while site visitors cannot edit content, they can still see everything in the site, which might not be ideal if you share the site with external users and have sensitive documents on your site.  

For sites with external contractors, you will want to create new named permission groups and possibly a new permission level to control project permissions. You can add new permission groups from the advanced permission settings. 

Advanced permission settings – Create a Permission Group 

Also, instead of every user having access to all of the content on the site, you will most likely want to break inheritance (permissions) for specific artifacts. To change the permissions for each artifact, go to the library settings menu, select permissions, and click Stop Inheriting Permissions. 

Library Permission settings – Stop Inheriting Permissions 

At this point, you should have a general idea of permission levels and groups. Please be aware that most projects have different permission levels and group needs, but here are a couple of examples of what you might have on a construction project for owner-project managers and external contractors: 

Owner-Project Managers: 

  • Permission group name: Owner Project Manager. 
  • Permission level: Contribute. 
  • Assigned: Site level. 
  • Scope: Project Managers can add and delete list items and documents across the entire site. 

External Contractors: 

  • Permission group name: Contractor. 
  • Permission level: Contribute No Delete. 
  • Assigned: Contractor Document Library. 
  • Scope: Access to only the Contractor Document Library to upload files but not delete anything. 

This article is just the tip of the iceberg regarding SharePoint permissions. SharePoint permissions can get pretty complex, and you might end up with a spiderweb of assigned permissions. If you need help with permissions or just setting up your projects in Microsoft 365, you can reach out for a free one-hour consultation here. 

For Part 3 of this series, we will be covering file sharing. While this is the easiest way to assign permissions at a folder or file level on a case-by-case basis, we wanted to get the concepts of permissions management in Microsoft 365 out of the way first. Stay tuned. 

Check out more blogs from Keep Your Construction Data Safe with Microsoft 365 Permissions

  • Keep Your Construction Data Safe with Microsoft 365 Permissions – Part 1
  • Keep Your Construction Data Safe with Microsoft 365 Permissions – Part 3

Keep Your Construction Data Safe with Microsoft 365 Permissions – Part 1 

Microsoft News | October 20, 2023

The process of granting permissions in Microsoft 365 seems straightforward. Most users are familiar with Microsoft's three default permission groups: owners, members, and visitors. These three permission roles simplify permission management, but do you understand what those access levels mean? And what if you need more control over who can do what on your projects? Read on to learn how Microsoft 365 structures permissions and how to manage permissions for your construction projects effectively. 

Microsoft 365 consists of several layers of permission management. In this article, we will discuss the following two: 

  1. Microsoft 365 Admin roles
  2. Application specific roles 

In our upcoming installments in the series, we will cover SharePoint permission levels, groups, and sharing. 

Microsoft Admin roles

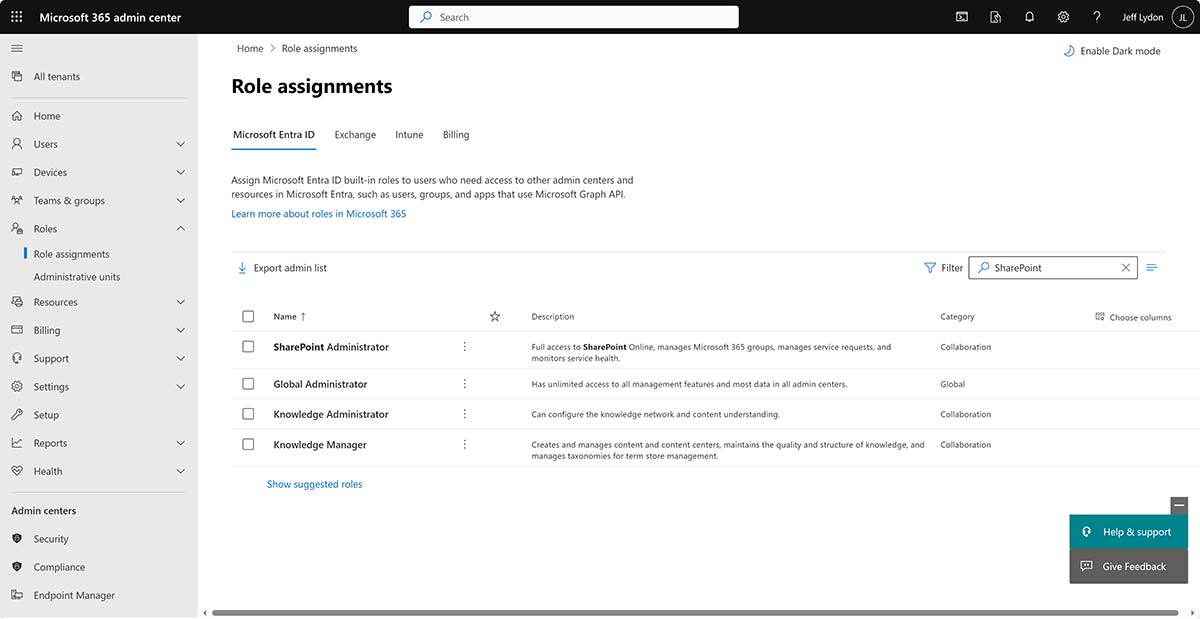
Admin roles are assigned from the Microsoft 365 admin center. There are many administrative roles, such as billing, licensing, and Office Apps. Most construction organizations already have a Microsoft 365 tenant administrator overseeing the administration duties. However, suppose you want separate users responsible for SharePoint or Teams administration. In that case, you must assign those admin roles to those users.

Microsoft 365 Admin center permission roles filtered for SharePoint

SharePoint Admin: This permission role would be needed if the user plans on creating/deleting SharePoint site collections and modifying their settings. This role allows the admin ability to:

  • Create and delete site collections. Note: a non-Admin can still indirectly create SharePoint sites, but they are associated with an application (e.g., Teams, Planner, etc.).
  • Manage site collections and global SharePoint settings.

Application Permissions

Each application in Microsoft 365 has some level of permissions or sharing that follows a somewhat consistent pattern. The three common roles you will find in most Microsoft 365 applications are:  

  • Owner – Typically allows users to create, edit, and delete artifacts (sites, plans, teams, etc.) and records. This role also can add and assign users/permissions and manage site-scoped features. 
  • Member – Allows users to create, edit, and delete records. A record could be a document or a line item in a SharePoint list. 
  • Visitor/Guest – Allows users to view records. They cannot add or delete records. 

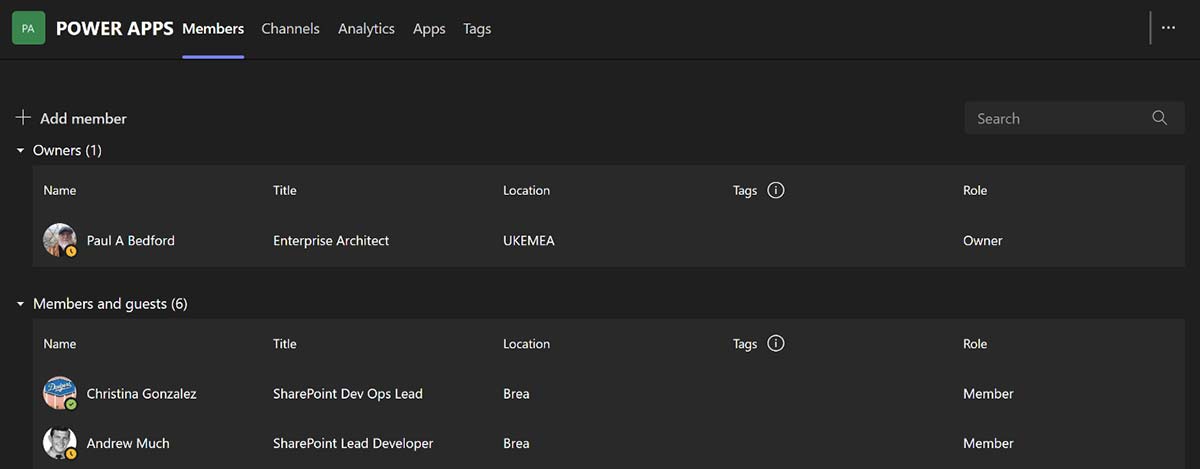
An example of these roles in Microsoft Teams is below:

Permission roles in Teams
  • Owner - Team owners manage specific settings for the team. They add and remove members and guests, change team settings, and handle administrative tasks. There can be multiple owners in a team. 
  • Members - Members are the people in the team. They talk with other team members in conversations. They can view, upload, and change files. They also do the usual collaboration that the team owners have permitted. 
  • Guests - Guests are people from outside your organization that a team owner invites, such as partners or consultants, to join the team. Guests have fewer capabilities than team members or owners, but there's still much they can do. 

Next up: SharePoint Permissions

The basics of assigning permissions are simple, but what if you want to change or make permissions more granular?  

At the core of most Microsoft 365 applications is SharePoint. Data created in applications like Microsoft Teams is stored in SharePoint-named sites. So, when you create a new team, a SharePoint site is created automatically associated with the team. The same goes for Microsoft Planner when you create a plan. Microsoft Lists saves your lists to SharePoint based on the site you select. So, to modify permissions, you need to understand SharePoint permissions. We will cover SharePoint permissions in our next article. 

Meanwhile, contact us for a free one-hour consultation if you need help with Microsoft 365 permissions or setup. If you need a turnkey construction management solution for Microsoft 365, you can request a demo of Construction Viz. 

Check out more blogs from Keep Your Construction Data Safe with Microsoft 365 Permissions

  • Keep Your Construction Data Safe with Microsoft 365 Permissions – Part 2
  • Keep Your Construction Data Safe with Microsoft 365 Permissions – Part 3

Keeping it Simple: Cost Report Using Microsoft 365 Lists

How-To | October 3, 2023

Many construction organizations have transitioned to Microsoft 365 but might not leverage all the applications included in their subscription. Microsoft Lists is an often overlooked application that can provide unique features for tracking project deliverables such as issues, asset management, action items, and even a simple cost report. Read on to learn how to build a simple cost report using Microsoft 365 Lists.

What is Microsoft 365 Lists?

Lists is a Microsoft 365 application that allows you to create a configurable data grid, with multiple views, that can be shareable with your team members. Lists is a modern application that stores its data behind the scenes in good old-fashioned SharePoint lists. Within Lists, you can view all the lists from all the SharePoint sites you can access. The benefit of having the separate Lists application is that users don’t have to go to every SharePoint site to create or find the needed list.

Let’s create a cost report!

Let’s create a simple cost report list to demonstrate how easy Lists is to use.

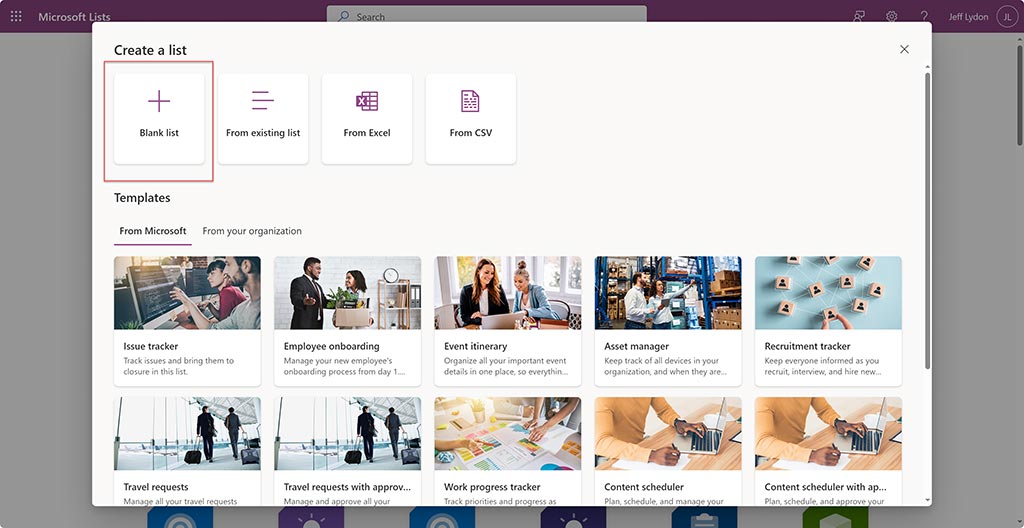
Navigate to the Lists app in Office.com, click New List, and select a Blank List.

Cost-Report_1

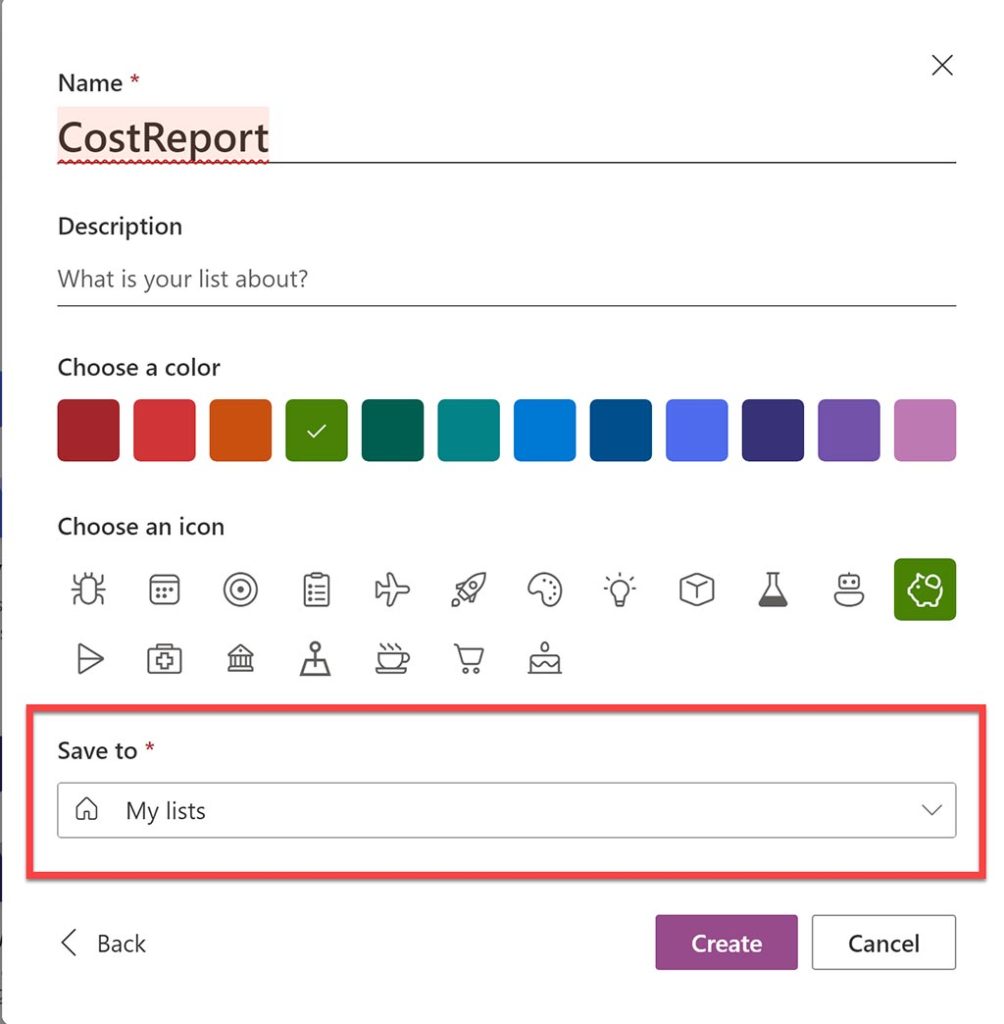
You can name your list “CostReport” and add some basic theming.

Select where to save the list. You can save your list to an existing SharePoint site or My Lists, which is saved to a SharePoint site that is automatically created for you, and you can get to My List directly through OneDrive. For this exercise, select My Lists to save your data. Note: If you intend to extend the functionality of this simple cost report, I recommend choosing a SharePoint site to save your data instead of My Lists.

Cost-Report_2

Create Columns

Once you create the list, you can begin creating columns. Note: The title field is automatically created. Consider using cost code/WBS name as the title.

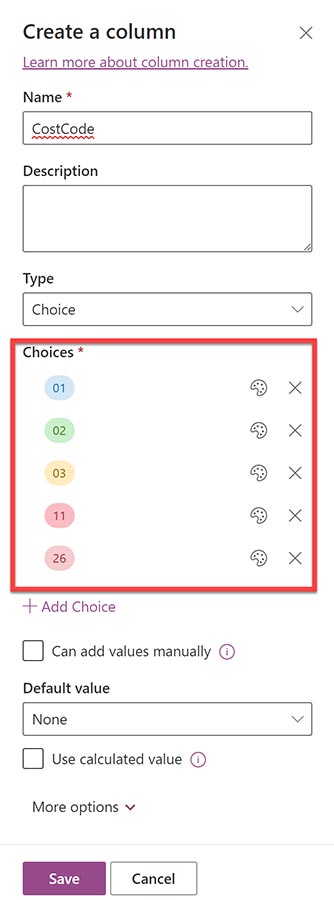
For your cost report’s actual cost code field, you could create a column and name it CostCode. Select “choice” as the field type and add each corresponding WBS/cost code identifier choice.

Cost-Report_3

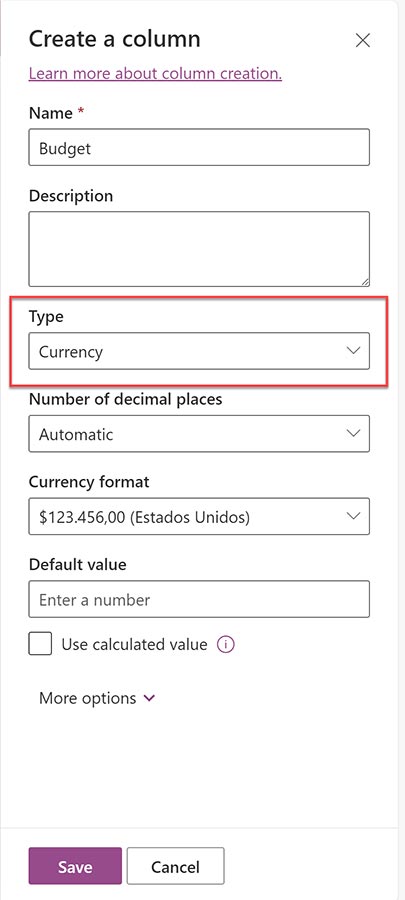
For each financial column of your cost report, create currency columns:

Cost-Report_4

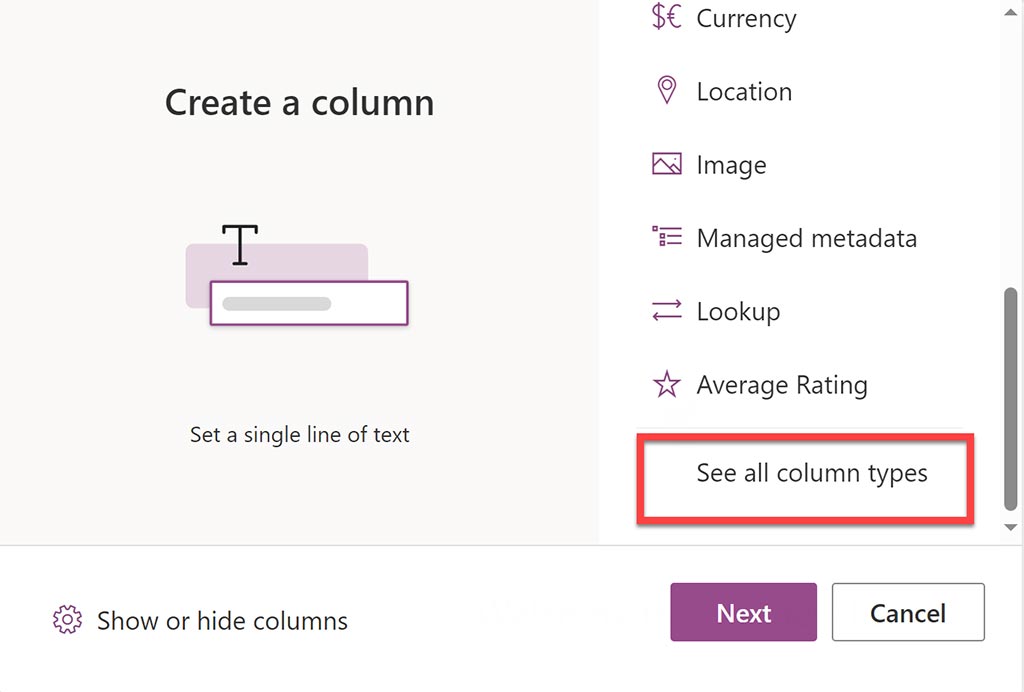
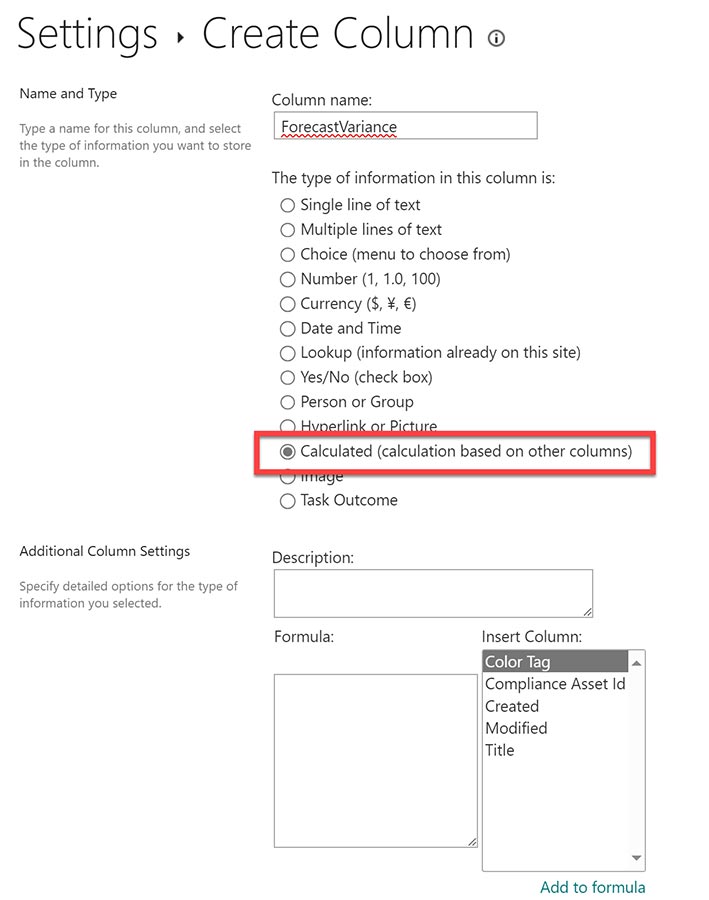
To calculate fields such as budget or forecast variance, create calculated columns. Calculated columns are not readily apparent from within the Lists “create a column” menu. You have to select “see all column types” and click next, which then navigates you to a SharePoint list settings create column menu

Cost-Report_5

From the SharePoint list settings “create column” menu, select calculated for the “type of information in this column” and select currency as the “data type returned from this formula.”

Cost-Report_6

Formulas allow you to select columns that you have previously created in your list and add them to a calculated column. Here is a list of common formulas you can use for a calculated column.

You are going to want to create your variance columns using calculated fields.

Once you create all the columns you need to track your project costs, click New to add records for each row of your cost report.

Cost-Report_7

From the SharePoint list settings “create column” menu, select calculated for the “type of information in this column” and select currency as the “data type returned from this formula.”

While every cost report for every project can be different, we created a simple cost report so you understand how it can be built and customized.

Sample of a simple cost report:

  • Title = WBS/code description text field
  • CostCode = choice field
  • Budget, commitment, spends, and forecast are currency fields
  • ForecastVariance and BudgetVariance are calculated columns
    • ForecastVariance = PreviousForecast-Forecast
    • BudgetVariance=Budget-Forecast
Cost-Report_8

Going outside the box

If you are looking for something a bit more complex than a simple cost report using Lists, you could extend the functionality further by incorporating other Microsoft 365 applications into your solution. For example:

  • Integration from your financial systems for commitments and spends using Power Apps and Power Automate workflows.
  • Standardized WBS/cost codes across cost reports using SharePoint site columns for consistent reporting.
  • Build Power BI reports for slicing and dicing the cost report data.
  • Automatically save cost reports by period and compare variances between periods using Power Automate to copy the list and update the PreviousForecast column.

We hope this simple cost report exercise provides an easy way to spin up a straightforward tracking tool for your project. If you need help customizing Lists to your specific project needs or need help with Microsoft 365, you can contact us for a free consultation.

If you need a more robust solution for Microsoft 365, you can request a demo of Construction Viz, our enterprise construction management solution that can be deployed to your Microsoft 365 tenant.

Visualize Your Project Data with Microsoft Lists Calendar View (constructionviz.com)

Let Microsoft 365 Syntex AI Read and Organize Your Construction Images for You

Microsoft News | August 9, 2023

Photos are heavily used on construction projects to document progress, identify defects, visualize site conditions, capture safety incidents, and even celebrate milestones. Hundreds, if not thousands, of images are taken throughout a project. Once taken, those images then need to be categorized and stored. What if you could drop off images and have Microsoft 365 Syntex read your images and categorize them for you? Read on to find out more.

What is Microsoft 365 Syntex?

Microsoft 365 Syntex is an AI solution that can find, organize, and classify documents in your SharePoint libraries, Microsoft Teams, OneDrive for Business, and Exchange. Rather than clicking and manually sorting through hundreds or thousands of files, Syntex extracts, analyzes, and categorizes the data for you. Syntex can be used in many different scenarios, such as:

  • Generating repetitive business documents like contracts.
  • Extracting data from business documents using models for searching and indexing.
  • Extracting printed or handwritten text using optical character recognition (OCR) for searching and indexing.
  • Image tagging, where AI scans images and provides image tags.

In a prior post, we covered Use AI to Manage Your Construction Projects with SharePoint Syntex, where we created several AI models and extracted data from PDF files. In this article, we walk through the new image tagging feature and how it could be used with construction images.

Syntex Image Tagging Set Up

To set up image tagging, you will need to set up your Azure subscription to link to Microsoft Syntex.

  • Check out this link to understand the process: Configure Microsoft Syntex for pay-as-you-go billing - Microsoft Syntex | Microsoft Learn
  • Syntex is billed as a pay-as-you-go service. You can check the pricing here: Pay-as-you-go services and pricing for Microsoft Syntex - Microsoft Syntex | Microsoft Learn.
  • To set up Syntex in Microsoft 365, follow these steps: Set up and manage image tagging in Microsoft Syntex - Microsoft Syntex | Microsoft Learn

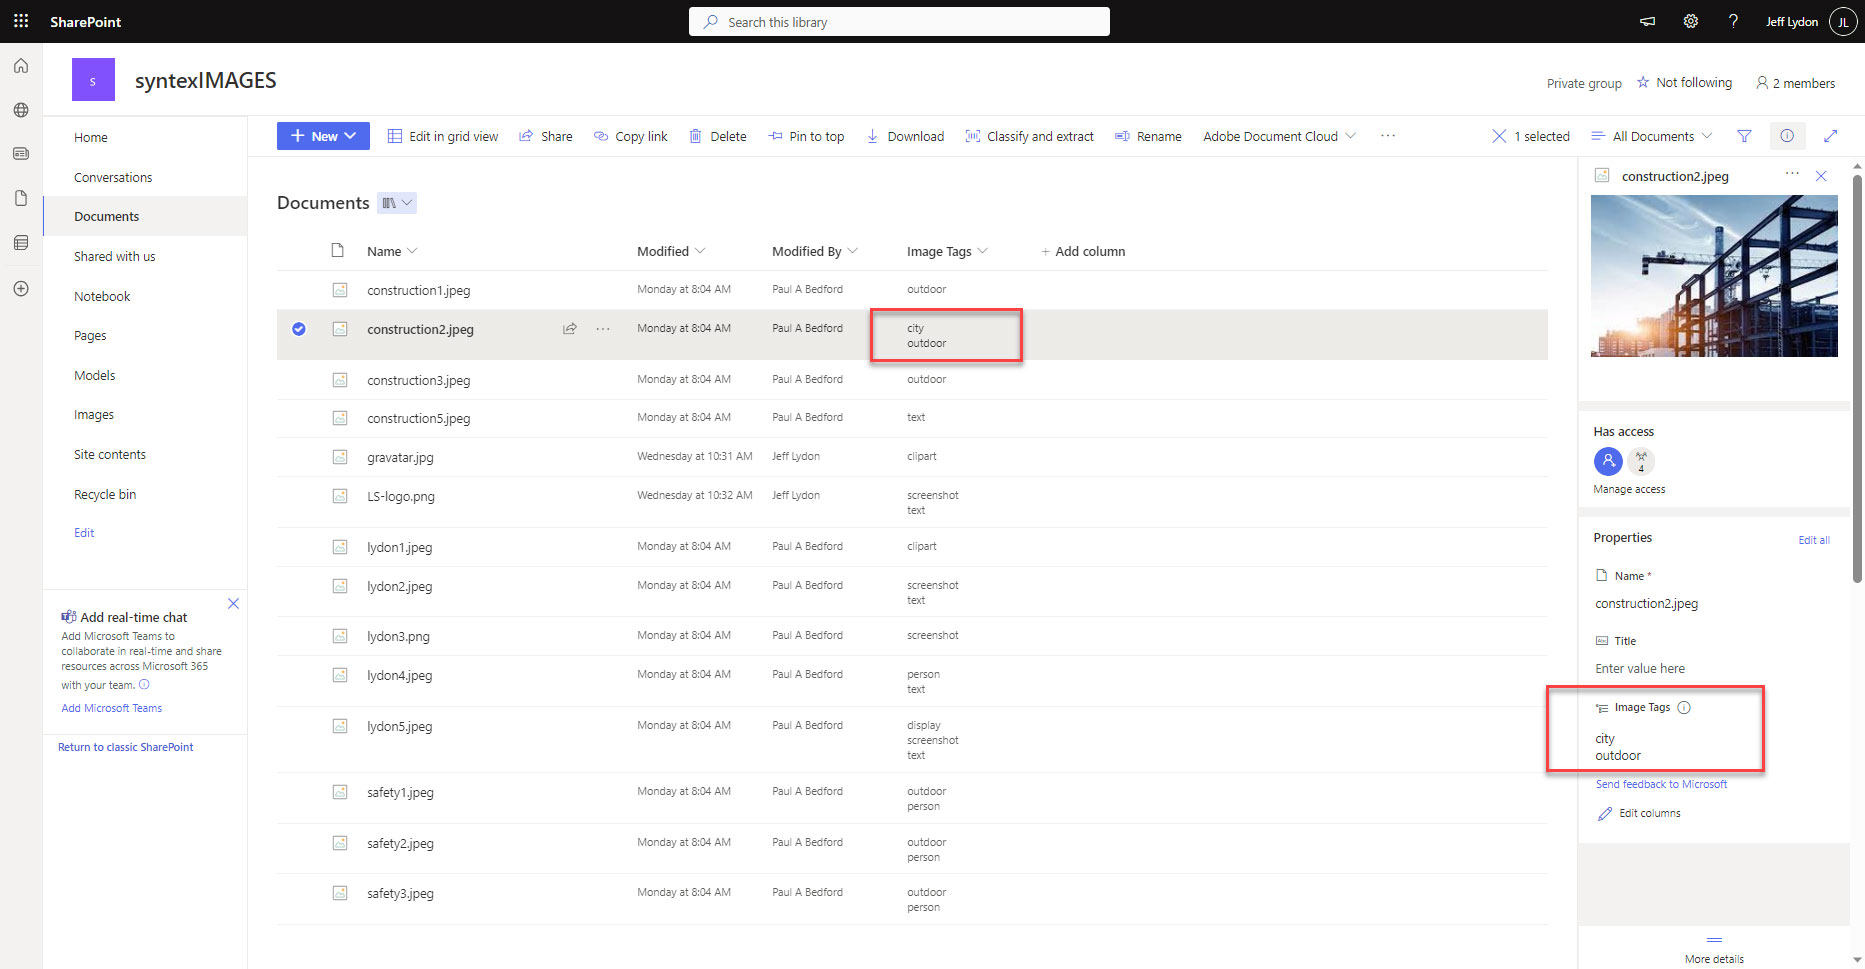
Once Syntex is set up, make sure to show the image tag column in the SharePoint document library you intend to use for dropping off images.

Using Syntex to tag images

When you drop off images in a SharePoint document library, Syntex image tagging will automatically run through all of your images using AI. You can set Syntex to run on new files only or new and updated files. It can take up to 24 hours for Syntex to provide image tags to the images.

Microsoft 365 Syntex AI
Image Tags assigned to a construction image

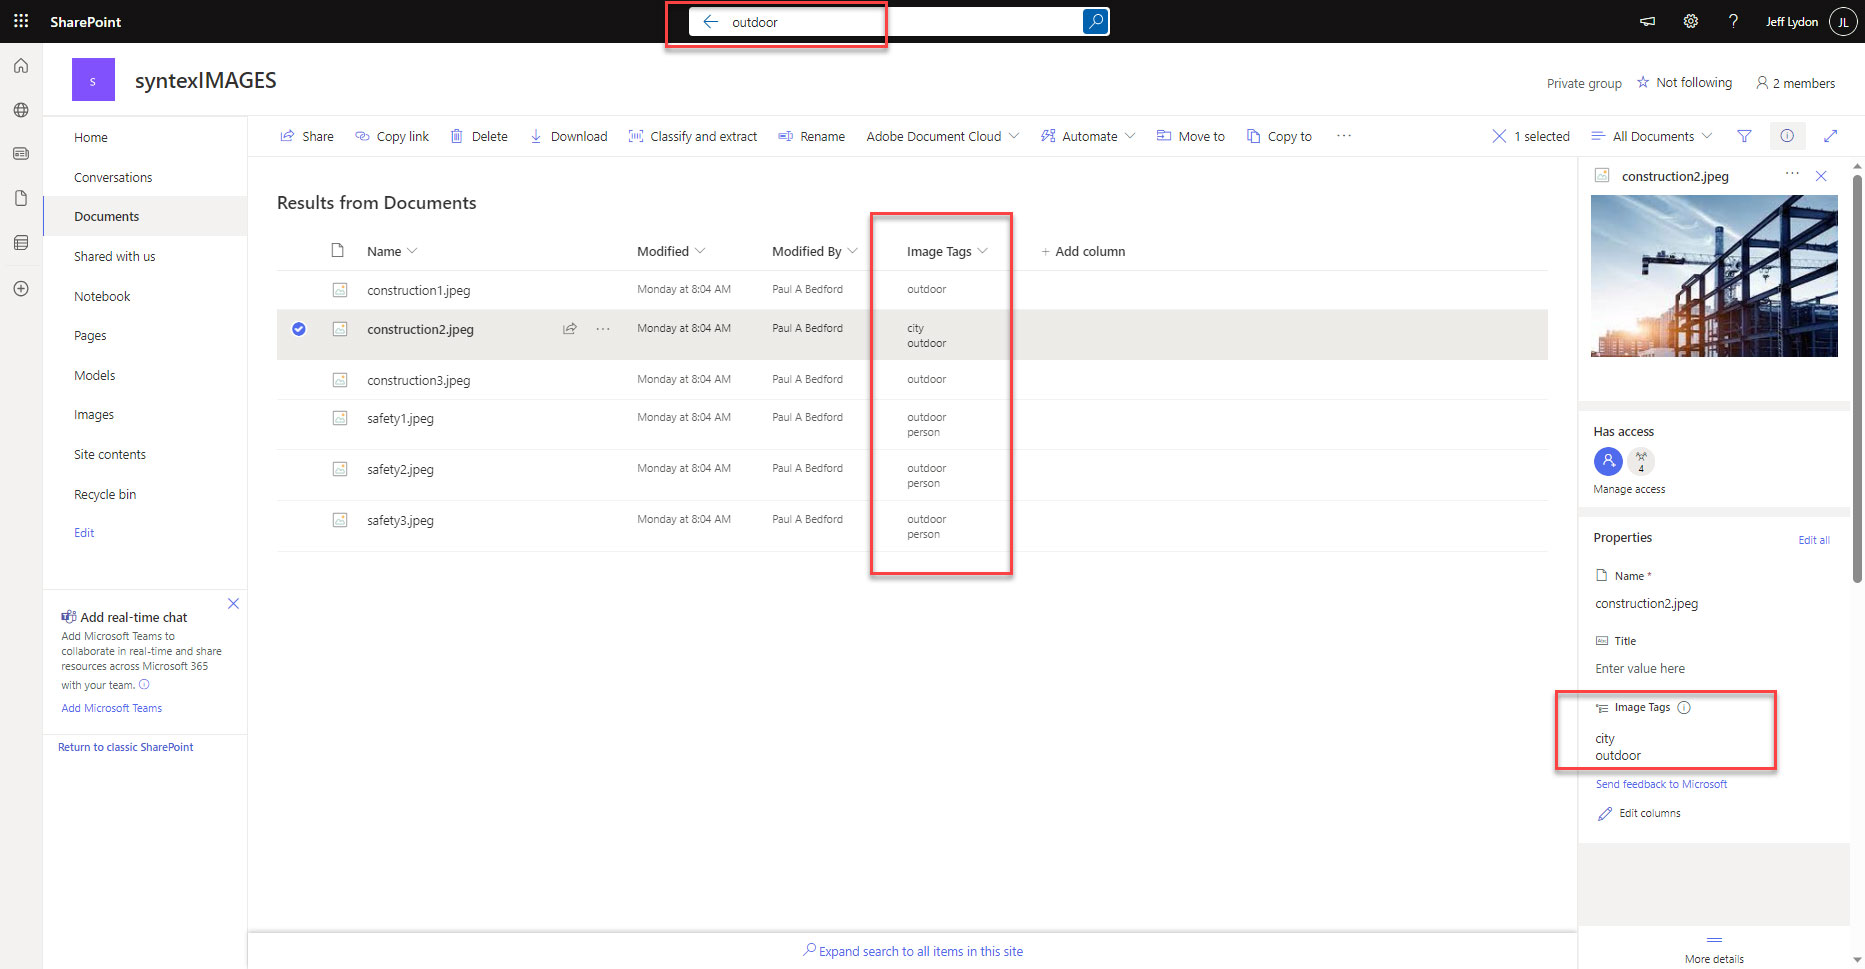
There are currently 37 image tags that Microsoft uses to categorize and update the image tag column. You can also add your own tags. These image tags are great for searching and filtering since they are managed metadata that can be used across sites.

Microsoft 365 Syntex AI
Search by Image Tag filters Documents

Wrap up

Microsoft 365 Syntex is a leading-edge solution that could save project teams a ton of time in categorizing and organizing project images in the future.

Currently, the number of image tags available for Syntex to assign is very small, so its value is limited without manually adding tags. The number of image tags may increase in the future and with new AI models, you may be able to train Syntex to perform a deeper analysis of the images and extract more relevant data, such as buildings being constructed or the type of equipment being used in the image.

For now, we recommend getting familiar with how it works and keeping an eye on this space. As Syntex AI improves and the image tags available expands, this new Syntex feature could significantly benefit your projects.

To learn more about utilizing Microsoft 365 to manage your projects or need general support, you can request a free one-hour consultation here. If you are looking for a turnkey construction project management system in Microsoft 365, click here.

Redefining Project Permissions with Sensitivity Labels in Microsoft 365

Microsoft News | July 19, 2023

Sensitivity labels are an entirely new way to implement permission controls in Microsoft 365. They are more powerful and easier to administer than groups and SharePoint permissions. Will sensitivity labels ultimately be the future of permissions management in Microsoft 365? Read on to find out more.

Historical Microsoft 365 permissions overview

If you are familiar with Microsoft 365 permissions, you know how complicated administering permissions can be between external and internal users or even controlling permissions for different types of information.

If you use SharePoint to store your documents, you gain additional permission controls that you can apply by user or group by site, app, folder, list, library, or even record. And with SharePoint permission levels, you have an extensive range of options to fine-tune further what specific users can do once they gain access, such as read and edit.

Administering permissions from a content location-centric mindset (i.e., where the file is stored) can become tedious depending on the number of sites and applications in play. Also, while these types of permissions prevent access to the document in SharePoint, they do not prevent someone from getting a copy of a document from an email attachment or a chat and simply downloading it locally.

What if you could apply permissions based on a type of record or the type of person interacting with the data and ensure the permissions permeate through your entire Microsoft 365 tenant?

Introducing Sensitivity Labels

Now that we covered Microsoft 365 permissions, as we all know and love, you might wonder how sensitivity labels could improve on the foundation. Here are some of the features of sensitivity labels:

  • Persistence. Because the label is stored in metadata for files and emails, it stays with the content, no matter where it’s saved or stored. The unique label identification becomes the basis for applying and enforcing policies you configure, which apply online and offline.
  • Encryption. Emails and documents can be encrypted to prevent unauthorized people from accessing the data. You can even add expiration dates.
  • Watermarks. Sensitivity label watermarks can be automatically applied to documents and emails. You can configure the watermarks to display on the documents’ header, body, and footer.
  • Microsoft Office support. Microsoft Word, Excel, PowerPoint, and Outlook, both on the desktop and on the web, support sensitivity labels. Sensitivity labels work on Windows, macOS, iOS, and Android. Users can assign sensitivity labels directly to the file as they work on them, and that metadata is saved with the file throughout Microsoft 365. Even Power BI reports can recognize sensitivity labels.

Real-world construction examples

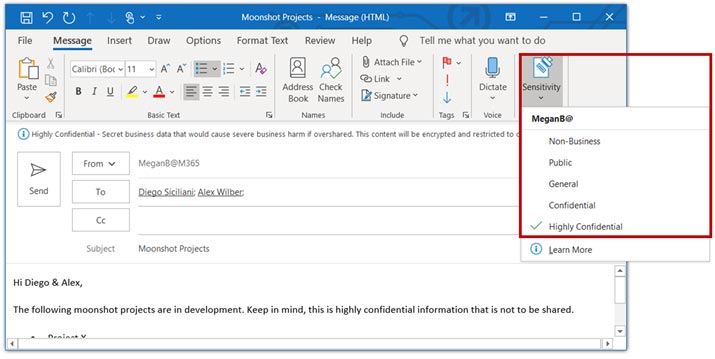
Scenario #1. You have confidential correspondence that only the project manager and the project controls lead should be able to see. You could create a sensitivity label called Confidential and only include PMs and PCM users. You can select the sensitivity label from right within your Outlook menu. Now that email will be restricted to only PMs and PCMs.

Applying a sensitivity label to an Outlook email.

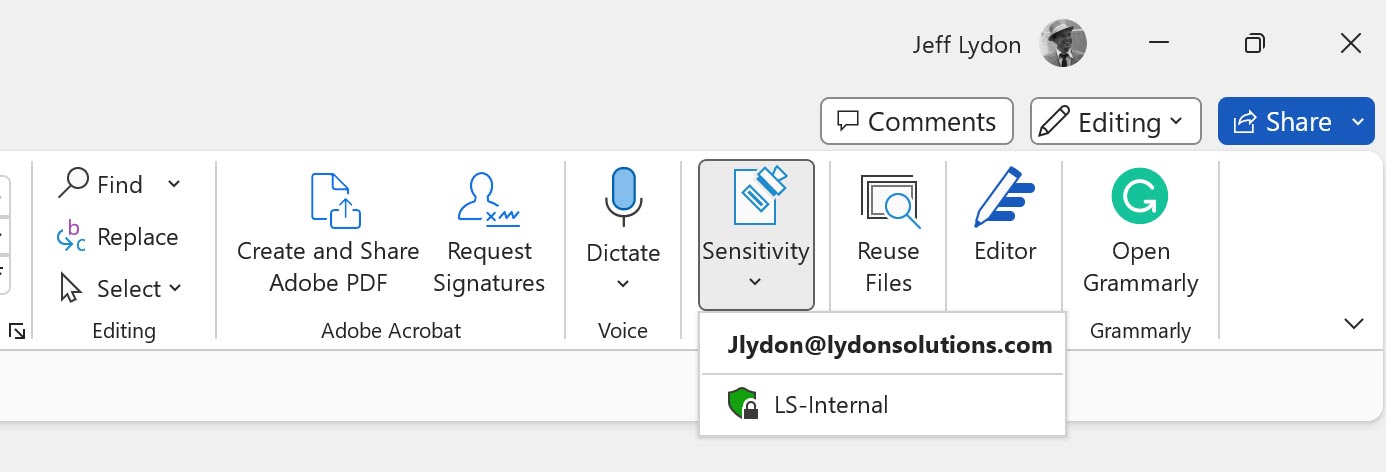
Scenario #2. You want all internal correspondence documents in a SharePoint document library to not be shared externally. You can create an internal sensitivity label, grant access to all internal company users, and then set up a default sensitivity label on the entire document library. Now when every file gets dropped off, it is automatically restricted to internal company users.

Sensitivity menu from Microsoft Word.
Sensitivity labels applied in a SharePoint document library.

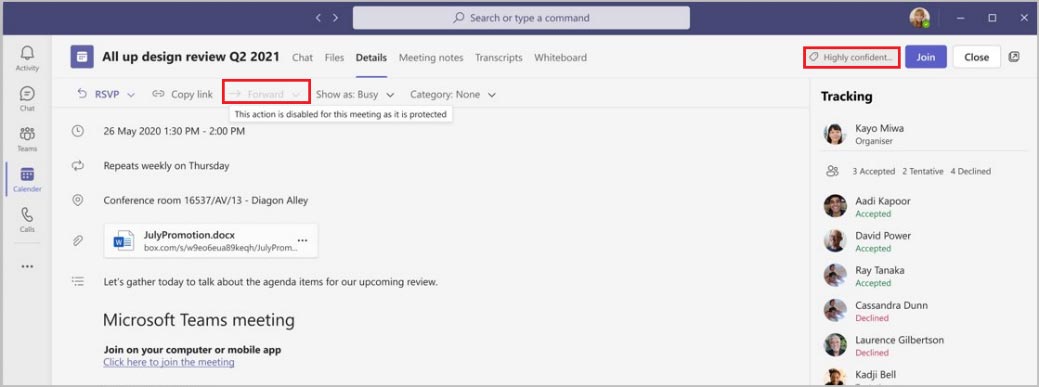
Scenario #3. You want to conduct regular vendor review meetings, but you only want to include the construction contract management (CCM) team and control any access to what is discussed and shared. You can create a sensitivity label called “vendor review” and include the CCMs. Then apply the sensitivity label from Outlook and Teams when you set up the meeting. The meeting settings can consist of:

  • Who can bypass the lobby.
  • Who can present.
  • Who can record.
  • Encryption for meeting video and audio.
  • Automatically record.
  • Video watermark for screen sharing and camera streams.
  • Prevent copy of meeting chat.
  • Prevent or allow copying chat contents to the clipboard.
Sensitivity label applied to a Teams meeting

Considerations

If you are interested in utilizing sensitivity labels, there are a couple of items to consider:

  1. Sensitivity labels only work with Microsoft Office documents. It is possible to use PDFs but refer to the latest documentation on how to set it up: Microsoft Purview Information Protection support in Acrobat (adobe.com)
  2. Sensitivity labels are created and managed in the Microsoft 365 Admin center, which very few users can access.

Overall, Sensitivity Labels are very powerful tools for managing who has access to your information. They provide a different permissions vector than traditional permissions management and are much more robust across the Microsoft 365 ecosystem. You can use both models simultaneously since it is not an either-or decision. I suggest trying them out for confidential documents that should not be shared externally to see how you can incorporate them into your daily work process.

If you need any help with sensitivity labels, permissions, or Microsoft 365 in general, you can request a one-hour free consultation. You can request a demo here if you are looking for an enterprise construction management solution for Microsoft 365.
Microsoft 365 Loop will change your work day. Are you ready?

Microsoft News | April 14, 2023

You might be wondering what Microsoft 365 Loop is. Microsoft Loop is a little difficult to define, so let’s use a typical office work scenario. You start your work day by opening Outlook to check your email and Teams so that you can chat with your coworkers. Next, you select a file to work on, such as updating your cost report in Excel, finishing a PowerPoint presentation for senior management, or maybe creating a status report in Word.

All of the above files reside in separate applications with their own file extensions. Wouldn’t it be easier if you started your day in a freeform workspace where you could include all of those applications, and more, without needing to go anywhere else?

Microsoft Loop is the one ring to rule them all. Loop organizes your work into workspaces like books. A workspace could be a project or re-occurring meeting like a monthly status update. The app further divides Workspaces into pages (like pages within the book).

Where Loop gets interesting is the ability to turn parts of the pages into shareable components, letting you share your workspaces, pages, and components with others to get their real-time feedback. Suddenly your work day is organized like a diary with real-time interactions without the need to switch applications.

How is Microsoft Loop different than One Note?

In theory, Loop could be the next evolution of One Note. Loop adds live integrations with Office and the ability to create shareable components.

Is there something similar to Microsoft Loop on the market?

Yes, there is a software product called Notion:

"Notion is a single space where you can think, write, and plan. Capture thoughts, manage projects, or even run an entire company — and do it exactly the way you want."

The difference between Notion and Loop is the ability to integrate with the rest of the Microsoft 365 suite.

Where does Microsoft Loop save data?

You would think Loop would save data in the Dataverse, but it actually saves to SharePoint. Here’s an article explaining the details - The SharePoint storage platform supports the Loop app - Components, pages, and workspaces (microsoft.com). This is great news for our Construction Viz product which deploys to SharePoint Lists and Libraries. I can see a day where we embed Loop components into Construction Viz, potentially even bi-directionally.😊

Microsoft Loop sounds great. When can I use it?

As of March 2023, Loop is still in preview and a little underwhelming since it only integrates with Outlook for the web and Teams. Still, Microsoft has done the heavy lifting, and you can see the potential of this cross-application tool.

We’ll monitor Microsoft Loop and provide updates on how construction project teams can use it in their daily workflows. Be sure to subscribe to our newsletter in the footer below not to miss future updates about Loop and other technologies essential for the construction industry.

You can also schedule a no-obligation consultation to learn more about using Microsoft 365 to manage your construction projects.

  • « Go to Previous Page
  • Page 1
  • Interim pages omitted …
  • Page 3
  • Page 4
  • Page 5
  • Page 6
  • Page 7
  • Interim pages omitted …
  • Page 12
  • Go to Next Page »

Primary Sidebar

Recent Posts

Microsoft Tips | February 22, 2024

Microsoft 365 Horror Stories

Microsoft Tips | February 14, 2024

How to Use Tags to Organize Files in Microsoft 365

Reviews | January 24, 2024

Surface Duo: Microsoft Thunk Differently

Tips from the Field | January 15, 2024

Tips from the Field: Easily Copy a SharePoint Library and All Its Content

Tips from the Field | December 20, 2023

Tips from the Field: Speed Up Your Excel Workflow

How-To | November 16, 2023

Keep Your Construction Data Safe with Microsoft 365 Permissions – Part 3

Footer

About

Lydon Solutions is a WBE consulting group specializing in construction project management software solutions using Microsoft SharePoint. Learn more >

Products & Services

  • Construction Viz
  • Clover AI
  • Professional Services
  • Business Consulting
  • Microsoft 365 Managed Services
  • Government Agencies

News & Events

  • Events
  • Blog

Company

  • About
  • Careers
  • Contact Us

Join our Mailing List

  • This field is for validation purposes and should be left unchanged.
Lydon Solutions

© Lydon Solutions

  • Sitemap
  • Privacy
  • Cookies
  • Terms of Use
  • Disclaimer

Click here to start a Microsoft Teams chat.

Contact Us
Name(Required)
This field is for validation purposes and should be left unchanged.