• Skip to primary navigation
  • Skip to main content
  • Skip to primary sidebar
  • Skip to footer
Lydon Solutions

Lydon Solutions

Construction Project Management Software Solutions

  • Construction Viz
  • Clover AI
  • Services
    • Business Consulting
    • Professional Services
    • Microsoft 365 Managed Services
    • Government Agencies
  • Company
  • Events
  • Blog
  • Careers
  • Contact
  • Search
  • Free Consultation
Show Search
Hide Search

microsoft 365

Tips from the Field: Easily Copy a SharePoint Library and All Its Content

Tips from the Field | January 15, 2024

Here is a simple tip that allows you to easily create project document libraries with their content from a template in Microsoft 365.

Lydon Solutions has been delivering SharePoint-based solutions for over 14 years. We’ve seen the evolution of SharePoint over that time from an on-premises application to the new cloud-based Microsoft 365 SharePoint Online. While the move has provided many benefits, some features have changed or deprecated with the new SharePoint Online. One such feature change is copying a document library and its contents from one location to another.

Back in the day, with SharePoint on-premises, if you wanted to create a list or library template, you would go to the list or library settings, click Create a Template, and provide a name. You could then use that template when you add a new list or library to your site. You could even export and import templates to other locations.

With SharePoint Online, the save a template feature is still there, but you unfortunately can’t use the template you save, which is weird. Caveat: the ability to save a template depends upon enabling features in the SharePoint site containing the document library. Straight out of the box, saving a template is unavailable.

This lack of copying ability creates a problem if you have a site where you manage multiple projects that all need to use the same document library structure with folders. Obviously, you don’t want to re-build a new document library whenever you have a new project.

How to Copy a SharePoint Library

Thankfully, there is a way out of this conundrum. SharePoint Online provides a way to copy libraries with their content but with a different approach than using list and library templates.

Here are the steps:

  1. Create a document library, name it “template,” and build out the folder structure as needed. Add any files that you want to have in your template document library.
  2. Create a new document library, but select “From existing library.” Select the template document library you created in step 1. This feature copies the template library and all the columns but does not copy the structure and content.
doc-lib_1
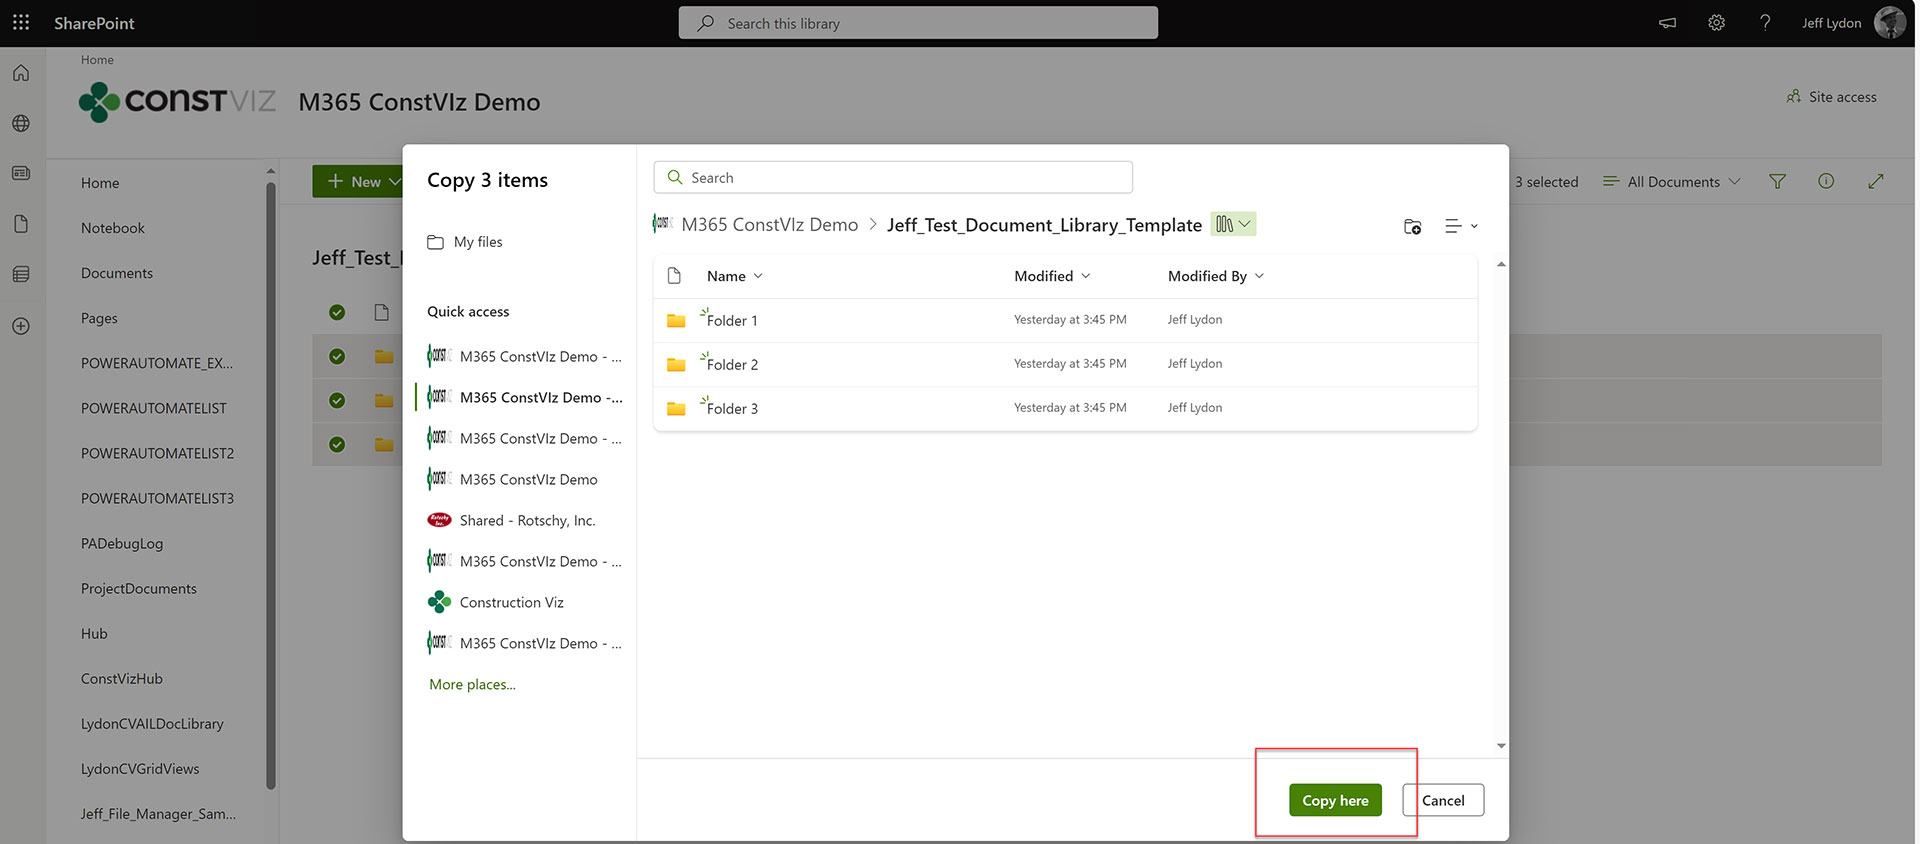
  1. Return to your template document library, select all the folders, click on the ellipses, and then select “Copy to.” You can then use the breadcrumbs in the pop-up window that appears to locate your new document library; then click on the “Copy here” button.
doc-lib_2
doc-lib_3

Presto, you have now replicated your template document library! Simple right? This is a great feature that allows you to copy content to any location.

So, instead of building a homegrown solution using an application such as Power Automate or installing a third-party tool that costs thousands of dollars yearly for a license, you combine two out-of-the-box features to solve the issue.

We hope this tip helps you use SharePoint Online to manage your projects. You can reach out for a free one-hour consultation if you need help with SharePoint or Microsoft 365.

Keep Your Construction Data Safe with Microsoft 365 Permissions – Part 3

How-To | November 16, 2023

In part 1 of this three-part series on Microsoft 365 permissions, we discussed Microsoft 365 admin roles and application-specific permissions. In part 2, we covered Microsoft SharePoint permissions. In the final part of this series, we will focus on file-sharing permissions in Microsoft 365.  

With Microsoft OneDrive and SharePoint applications, you can share individual files and folders directly with internal and external team members. The process is much more straightforward than the permissions management process in SharePoint, as discussed in part 2 of this series. Still, it is easy to overlook the underlying sharing features because of its perceived simplicity. Without understanding the extent and interdependences of sharing, determining who has what permissions and what level of permissions users have across all assets in your libraries, folders, and sites can be challenging. 

Recently, Microsoft has unified the sharing menu across Microsoft 365 applications, so the sharing user interface is consistent, making it easier for users.  

The New File-Sharing Feature in Microsoft 365

The new Microsoft 365 sharing menu packs a lot of functionality!  

Once you select a folder or file, you can click on share to bring up a modal window with the option to choose with whom you want to share the file. There is also an area to provide a message if you intend to email a link to the record. You can also copy and send the link manually via email or chat or paste it into a document.  

Picture1

A few features worth highlighting in the new share menu:

1. Sharing settings – If you click on the cog in the top right of the share menu, you will access the sharing. Depending on your SharePoint administrator’s permission management controls, you can select categories of people you can share the file with and the permission level you want to be associated with the file. You can even block the file from being downloaded.

Picture2

2. Permission Levels -  If you click the down arrow next to the “add a name, group, or email” field where you input who you want to share a file with, you will get the permission levels you can assign to the file.

Picture3

You will better understand permission levels if you refer to part 2 of this series of permission management articles. With regards to SharePoint, these levels correlate to:

    1. Can edit -  Contribute access.
    2. Can view – Read access
    3. Can review – This is new to those familiar with SharePoint permission levels. “Can review” allows you to add comments to a document, but you do not have edit control.

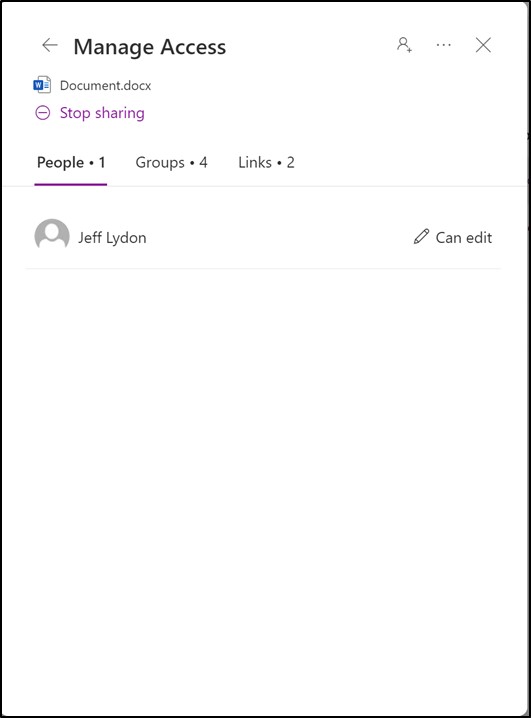
3. Manage Access – If you click on the avatars (people icons) in the bottom left, you will access the Manage Access settings.

Picture5
  • You can grant access/permission to the file from here if you click on the plus avatar in the top right of the screen.
  • Under the People tab, you change a person’s access/permission level.
  • The Groups tab displays the number and list of permission groups assigned. Links will display a link aligning with the access/permission levels given so you can easily copy the links.

There’s a lot of functionality in this small modal window, but make sure to investigate to know exactly who can do what with your files.

You might wonder how this aligns with SharePoint since it has its own permission management structure. From Part 2 of this series, we referred to breaking inheritance when you assign unique permissions on each asset (list or library) in SharePoint. When you share a document directly using the share menu, it breaks the inheritance behind the scenes in SharePoint. That’s an essential action in SharePoint that you need to be aware of because of the following:

  • If you add any new assets to the site, they will not automatically inherit the site permissions. You will have to add them manually.
  • It is not readily apparent that you are sharing your file at a glance. In SharePoint, you can see who can access the documents by editing the document library view and including the “shared with” column.

Sharing files in Microsoft 365 is relatively easy, but many considerations are needed to maintain the security of your data. We recommend using permission groups as much as possible and avoid assigning permissions to specific users. Also, it is a best practice to create a permissions matrix for each project that details permission groups, levels, members of each group, and the assets to which each group has access.

If you find permissions management complicated and need help getting things up and running or need help with Microsoft 365, you can reach out for a free one-hour consultation here.

Check out more blogs from Keep Your Construction Data Safe with Microsoft 365 Permissions

  • Keep Your Construction Data Safe with Microsoft 365 Permissions – Part 1
  • Keep Your Construction Data Safe with Microsoft 365 Permissions – Part 2

Keep Your Construction Data Safe with Microsoft 365 Permissions – Part 2 

Tips from the Field | November 10, 2023

In part 1 of this three-part series on Microsoft 365 permissions, we discussed Microsoft 365 admin roles and application-specific permissions. Part 2 of this series will focus on Microsoft SharePoint Online permissions management. SharePoint brings another level of permissions management to Microsoft 365 applications, which is why we are keeping this topic separate.  

Think of SharePoint as the database for Microsoft 365 applications. Microsoft Teams, Microsoft Planner, and Microsoft Lists store data in SharePoint lists and libraries. You can thus extend the default permissions from the app level through the underlying SharePoint site permissions.  

This article will discuss SharePoint permission levels and groups and how you can modify them to help manage overall project permissions. 

Structure of SharePoint Permissions

Picture1

To understand permission controls within SharePoint, you must first understand SharePoint permissions levels.  

SharePoint Permission Levels

Permission levels navigation link from the advanced permissions settings

Permission levels enable users to perform specific tasks. Permission levels are assigned to permission groups or can be assigned to a user directly (not recommended). The permission levels that we typically see on construction projects are the following:

  • Full control - Enables users to view, add, update, delete, approve, and customize items or pages on the website. This level is typically reserved for just the SharePoint admins since this level could delete entire pages and libraries. 
  • Read – Enables users to view pages, list items, and download documents. This level is suitable for managers and external stakeholders viewing but not modifying data. 
  • Contribute - Enables users to manage personal views, edit items and user information, delete versions in existing lists and document libraries, and add, remove, and update personal Web Parts. You typically assign this level to users who add and upload data. This level is most common for construction team members sharing files and forms. 

You can create and modify permission levels from the advanced permissions settings menu if you are a site owner or have full-control permission.  

Default Permission Levels 

Lydon Solutions typically adds a custom permission level to projects, and we name it “Contribute No Delete” to accommodate external contractors. This custom level allows users to upload but not delete records, which is handy when sharing files between internal and external stakeholders.  

Uncheck "delete items” in the permission level settings to create a new “Contribute No Delete” level. 

SharePoint Permission Groups

Permission groups are containers where you can assign a permission level and users. You can add a permission group to an entire SharePoint site, and its permission level would be inherited across every artifact (list, library, folder, and record) in the site. Alternatively, you can break inheritance and assign a different permission level to a group or user for individual SharePoint artifacts.  

As with any other Microsoft 365 application, there are default permission groups available: 

  • Site owners – Site Owners can manage site permissions, add and delete artifacts, edit site settings, and change site themes. This group has the Full Control permission level assigned in SharePoint.  
  • Site members – Site Members can add and delete records in lists and libraries. This group has the Contribute permission level assigned in SharePoint. 
  • Site visitors – Site visitors can see site content but not edit it. This group has the Read permission level assigned in SharePoint. 
SharePoint Default Permission Groups 

These default permission groups are automatically assigned to every artifact on the site and will be added to every new artifact you create. This means that while site visitors cannot edit content, they can still see everything in the site, which might not be ideal if you share the site with external users and have sensitive documents on your site.  

For sites with external contractors, you will want to create new named permission groups and possibly a new permission level to control project permissions. You can add new permission groups from the advanced permission settings. 

Advanced permission settings – Create a Permission Group 

Also, instead of every user having access to all of the content on the site, you will most likely want to break inheritance (permissions) for specific artifacts. To change the permissions for each artifact, go to the library settings menu, select permissions, and click Stop Inheriting Permissions. 

Library Permission settings – Stop Inheriting Permissions 

At this point, you should have a general idea of permission levels and groups. Please be aware that most projects have different permission levels and group needs, but here are a couple of examples of what you might have on a construction project for owner-project managers and external contractors: 

Owner-Project Managers: 

  • Permission group name: Owner Project Manager. 
  • Permission level: Contribute. 
  • Assigned: Site level. 
  • Scope: Project Managers can add and delete list items and documents across the entire site. 

External Contractors: 

  • Permission group name: Contractor. 
  • Permission level: Contribute No Delete. 
  • Assigned: Contractor Document Library. 
  • Scope: Access to only the Contractor Document Library to upload files but not delete anything. 

This article is just the tip of the iceberg regarding SharePoint permissions. SharePoint permissions can get pretty complex, and you might end up with a spiderweb of assigned permissions. If you need help with permissions or just setting up your projects in Microsoft 365, you can reach out for a free one-hour consultation here. 

For Part 3 of this series, we will be covering file sharing. While this is the easiest way to assign permissions at a folder or file level on a case-by-case basis, we wanted to get the concepts of permissions management in Microsoft 365 out of the way first. Stay tuned. 

Check out more blogs from Keep Your Construction Data Safe with Microsoft 365 Permissions

  • Keep Your Construction Data Safe with Microsoft 365 Permissions – Part 1
  • Keep Your Construction Data Safe with Microsoft 365 Permissions – Part 3

Keep Your Construction Data Safe with Microsoft 365 Permissions – Part 1 

Microsoft News | October 20, 2023

The process of granting permissions in Microsoft 365 seems straightforward. Most users are familiar with Microsoft's three default permission groups: owners, members, and visitors. These three permission roles simplify permission management, but do you understand what those access levels mean? And what if you need more control over who can do what on your projects? Read on to learn how Microsoft 365 structures permissions and how to manage permissions for your construction projects effectively. 

Microsoft 365 consists of several layers of permission management. In this article, we will discuss the following two: 

  1. Microsoft 365 Admin roles
  2. Application specific roles 

In our upcoming installments in the series, we will cover SharePoint permission levels, groups, and sharing. 

Microsoft Admin roles

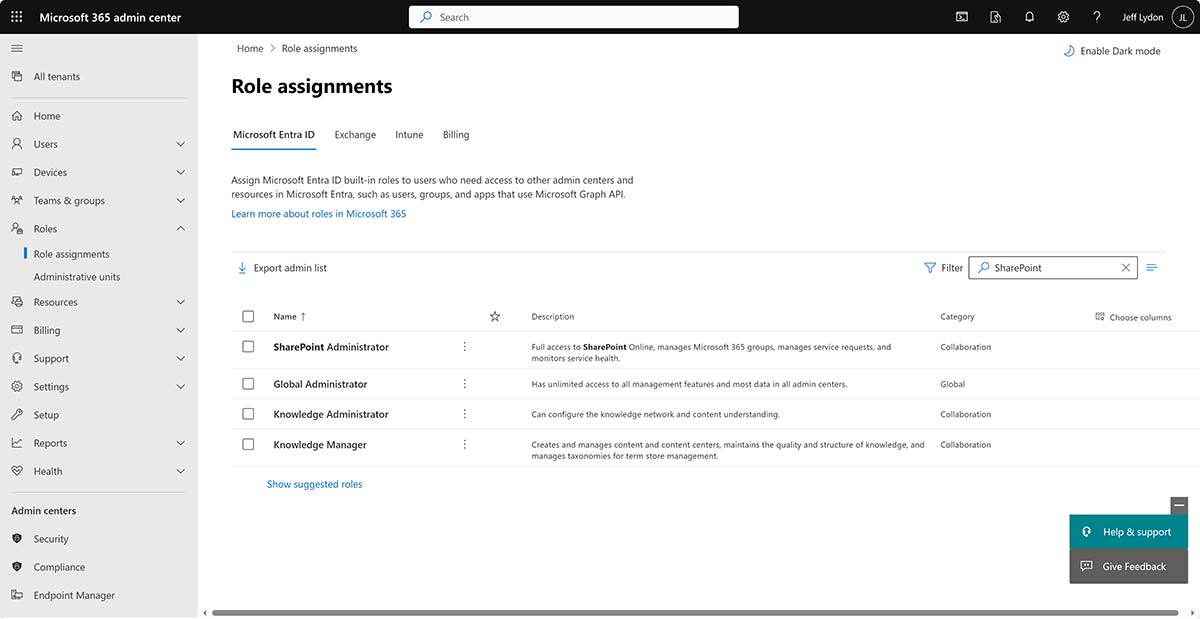
Admin roles are assigned from the Microsoft 365 admin center. There are many administrative roles, such as billing, licensing, and Office Apps. Most construction organizations already have a Microsoft 365 tenant administrator overseeing the administration duties. However, suppose you want separate users responsible for SharePoint or Teams administration. In that case, you must assign those admin roles to those users.

Microsoft 365 Admin center permission roles filtered for SharePoint

SharePoint Admin: This permission role would be needed if the user plans on creating/deleting SharePoint site collections and modifying their settings. This role allows the admin ability to:

  • Create and delete site collections. Note: a non-Admin can still indirectly create SharePoint sites, but they are associated with an application (e.g., Teams, Planner, etc.).
  • Manage site collections and global SharePoint settings.

Application Permissions

Each application in Microsoft 365 has some level of permissions or sharing that follows a somewhat consistent pattern. The three common roles you will find in most Microsoft 365 applications are:  

  • Owner – Typically allows users to create, edit, and delete artifacts (sites, plans, teams, etc.) and records. This role also can add and assign users/permissions and manage site-scoped features. 
  • Member – Allows users to create, edit, and delete records. A record could be a document or a line item in a SharePoint list. 
  • Visitor/Guest – Allows users to view records. They cannot add or delete records. 

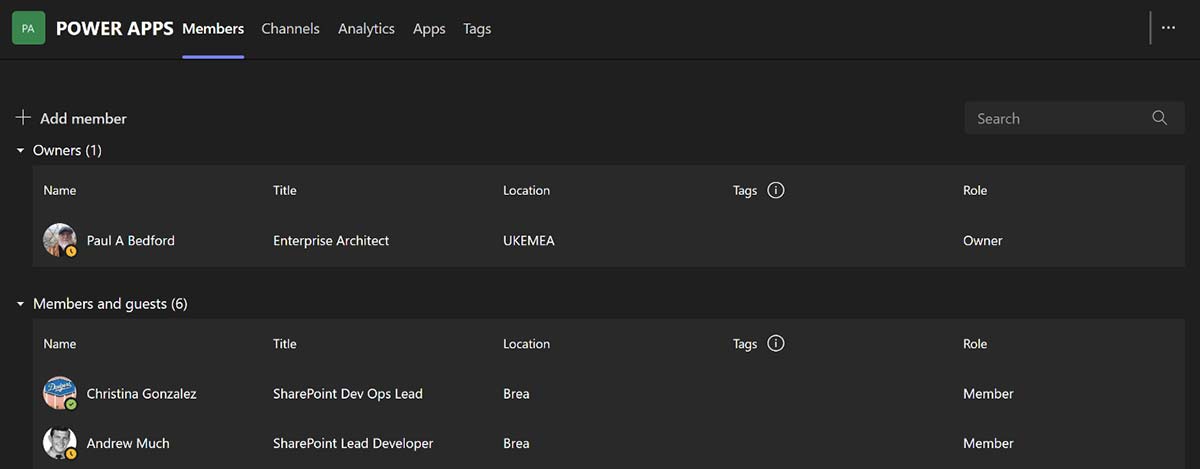
An example of these roles in Microsoft Teams is below:

Permission roles in Teams
  • Owner - Team owners manage specific settings for the team. They add and remove members and guests, change team settings, and handle administrative tasks. There can be multiple owners in a team. 
  • Members - Members are the people in the team. They talk with other team members in conversations. They can view, upload, and change files. They also do the usual collaboration that the team owners have permitted. 
  • Guests - Guests are people from outside your organization that a team owner invites, such as partners or consultants, to join the team. Guests have fewer capabilities than team members or owners, but there's still much they can do. 

Next up: SharePoint Permissions

The basics of assigning permissions are simple, but what if you want to change or make permissions more granular?  

At the core of most Microsoft 365 applications is SharePoint. Data created in applications like Microsoft Teams is stored in SharePoint-named sites. So, when you create a new team, a SharePoint site is created automatically associated with the team. The same goes for Microsoft Planner when you create a plan. Microsoft Lists saves your lists to SharePoint based on the site you select. So, to modify permissions, you need to understand SharePoint permissions. We will cover SharePoint permissions in our next article. 

Meanwhile, contact us for a free one-hour consultation if you need help with Microsoft 365 permissions or setup. If you need a turnkey construction management solution for Microsoft 365, you can request a demo of Construction Viz. 

Check out more blogs from Keep Your Construction Data Safe with Microsoft 365 Permissions

  • Keep Your Construction Data Safe with Microsoft 365 Permissions – Part 2
  • Keep Your Construction Data Safe with Microsoft 365 Permissions – Part 3

Keeping it Simple: Cost Report Using Microsoft 365 Lists

How-To | October 3, 2023

Many construction organizations have transitioned to Microsoft 365 but might not leverage all the applications included in their subscription. Microsoft Lists is an often overlooked application that can provide unique features for tracking project deliverables such as issues, asset management, action items, and even a simple cost report. Read on to learn how to build a simple cost report using Microsoft 365 Lists.

What is Microsoft 365 Lists?

Lists is a Microsoft 365 application that allows you to create a configurable data grid, with multiple views, that can be shareable with your team members. Lists is a modern application that stores its data behind the scenes in good old-fashioned SharePoint lists. Within Lists, you can view all the lists from all the SharePoint sites you can access. The benefit of having the separate Lists application is that users don’t have to go to every SharePoint site to create or find the needed list.

Let’s create a cost report!

Let’s create a simple cost report list to demonstrate how easy Lists is to use.

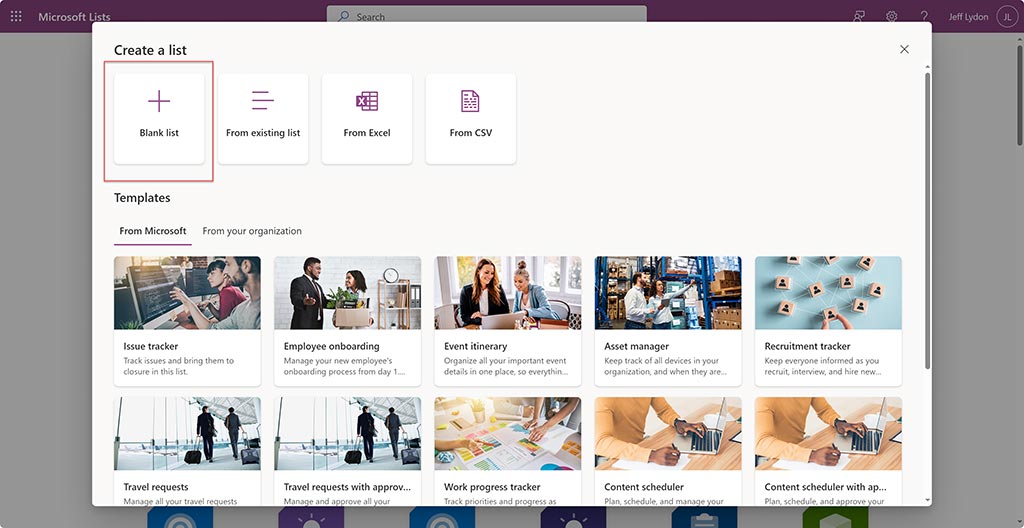
Navigate to the Lists app in Office.com, click New List, and select a Blank List.

Cost-Report_1

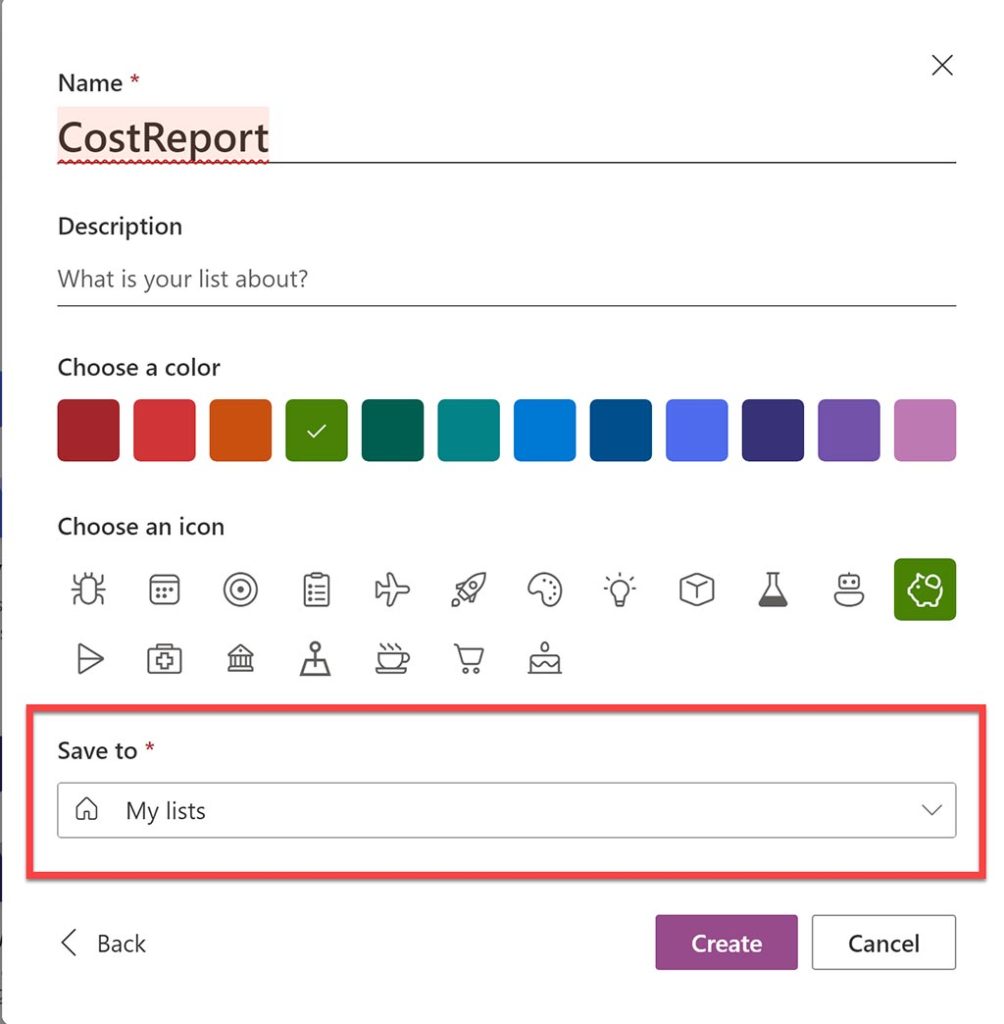
You can name your list “CostReport” and add some basic theming.

Select where to save the list. You can save your list to an existing SharePoint site or My Lists, which is saved to a SharePoint site that is automatically created for you, and you can get to My List directly through OneDrive. For this exercise, select My Lists to save your data. Note: If you intend to extend the functionality of this simple cost report, I recommend choosing a SharePoint site to save your data instead of My Lists.

Cost-Report_2

Create Columns

Once you create the list, you can begin creating columns. Note: The title field is automatically created. Consider using cost code/WBS name as the title.

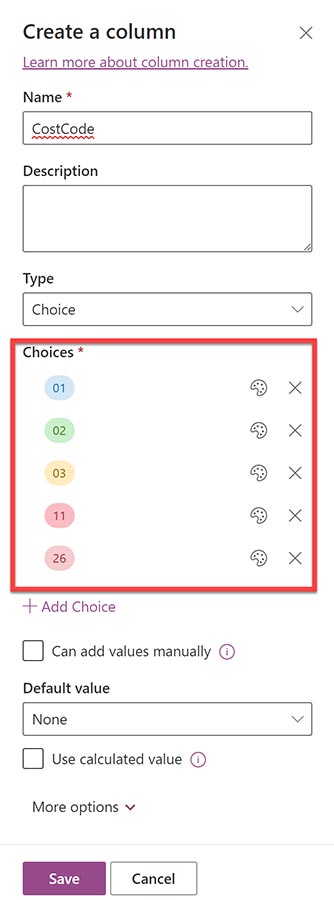
For your cost report’s actual cost code field, you could create a column and name it CostCode. Select “choice” as the field type and add each corresponding WBS/cost code identifier choice.

Cost-Report_3

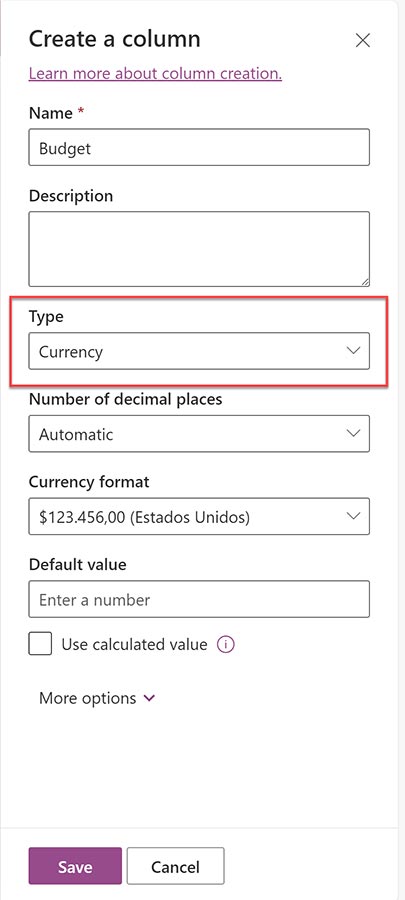
For each financial column of your cost report, create currency columns:

Cost-Report_4

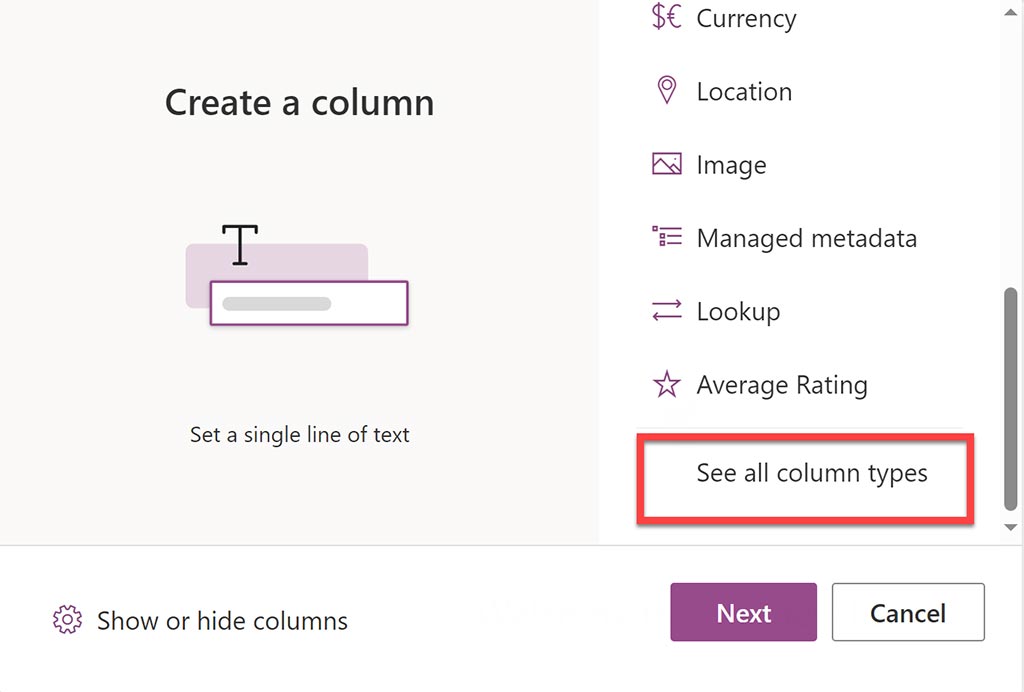
To calculate fields such as budget or forecast variance, create calculated columns. Calculated columns are not readily apparent from within the Lists “create a column” menu. You have to select “see all column types” and click next, which then navigates you to a SharePoint list settings create column menu

Cost-Report_5

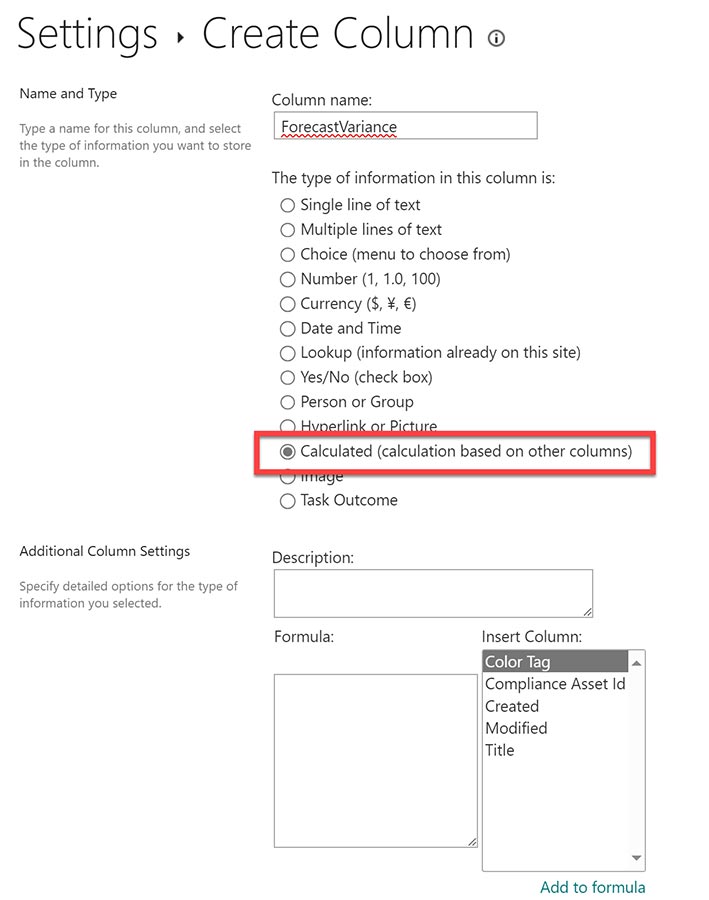
From the SharePoint list settings “create column” menu, select calculated for the “type of information in this column” and select currency as the “data type returned from this formula.”

Cost-Report_6

Formulas allow you to select columns that you have previously created in your list and add them to a calculated column. Here is a list of common formulas you can use for a calculated column.

You are going to want to create your variance columns using calculated fields.

Once you create all the columns you need to track your project costs, click New to add records for each row of your cost report.

Cost-Report_7

From the SharePoint list settings “create column” menu, select calculated for the “type of information in this column” and select currency as the “data type returned from this formula.”

While every cost report for every project can be different, we created a simple cost report so you understand how it can be built and customized.

Sample of a simple cost report:

  • Title = WBS/code description text field
  • CostCode = choice field
  • Budget, commitment, spends, and forecast are currency fields
  • ForecastVariance and BudgetVariance are calculated columns
    • ForecastVariance = PreviousForecast-Forecast
    • BudgetVariance=Budget-Forecast
Cost-Report_8

Going outside the box

If you are looking for something a bit more complex than a simple cost report using Lists, you could extend the functionality further by incorporating other Microsoft 365 applications into your solution. For example:

  • Integration from your financial systems for commitments and spends using Power Apps and Power Automate workflows.
  • Standardized WBS/cost codes across cost reports using SharePoint site columns for consistent reporting.
  • Build Power BI reports for slicing and dicing the cost report data.
  • Automatically save cost reports by period and compare variances between periods using Power Automate to copy the list and update the PreviousForecast column.

We hope this simple cost report exercise provides an easy way to spin up a straightforward tracking tool for your project. If you need help customizing Lists to your specific project needs or need help with Microsoft 365, you can contact us for a free consultation.

If you need a more robust solution for Microsoft 365, you can request a demo of Construction Viz, our enterprise construction management solution that can be deployed to your Microsoft 365 tenant.

Visualize Your Project Data with Microsoft Lists Calendar View (constructionviz.com)

Microsoft Planner vs. Project: Which Should You Use for Team Tasks? 

Microsoft News | September 7, 2023

Microsoft offers two similar products in Microsoft 365 for managing team tasks. Which one will work best for your needs? Read on to discover the pros and cons of Microsoft Planner vs. Microsoft Project. 

icon_planner

Microsoft Planner

Project-v-Planner_1

Microsoft Planner helps teams organize their work visually. Users create a plan that can include grid, board, chart, and schedule views to manage tasks, with file attachments stored in SharePoint Online. Each view provides different insights into managing tasks: 

  • Grid view - displays tasks assignable to team members in a log view. 
  • Board view – provides a Kanban view that organizes tasks into buckets such as status. Users can drag and drop tasks between team members and statuses. 
  • Charts - provides several graphs displaying the progress of your tasks. 
  • Schedule - shows a calendar view of your tasks by due date.  

Microsoft Planner Pros

  • Plans are typically created from Microsoft Teams, which makes setup easy.  
  • There are Planner templates available so you can hit the ground running. 
  • The user interface and process to manage tasks are intuitive. 
  • Microsoft 365 subscriptions include Planner, so there is no additional cost. 

Microsoft Planner Cons

  • Plans in Planner do not relate to “projects.” Instead, you can create plans in the app with a project name or from a team within Microsoft Teams with a project title, but Microsoft Planner is otherwise a stand-alone task-tracking application. 
  • There is no Planner rollup to see tasks across multiple plans. 

You can learn more about the app on the Microsoft Planner learning and support page. Or you can access Microsoft Planner on the web here if you have a Microsoft 365 subscription. 

icon_ms-project-sm

Microsoft Project

Project-v-Planner_2

Microsoft Project has two versions: Project for the Web (PFTW) and Project Web App (PWA). Check out this article to find out more about these two products. Since PFTW focuses more on task management and is the modern version of Project, we will compare this product to Microsoft Planner.  

When you sign into PFTW, you can create a new project or a roadmap. PFTW stores data in the Microsoft Dataverse as opposed to SharePoint (where Planner stores its data).  

A project in PFTW includes the following views: 

  • Grid – allows you to create a task, assign team members, add schedule information such as start date and duration, update % complete, calculate effort, define dependencies such as start to finish, and add custom columns. 
  • Board - provides a Kanban view that organizes tasks into buckets such as status. Users can drag and drop tasks between team members and statuses. 
  • Timeline – displays the traditional Gantt chart view where users drag and drop dependencies and update tasks from the bars. 
  • Charts - provides several graphs displaying the progress of your tasks 
  • People – shows a Kanban view by team members for managing the status of their tasks. 
  • Goals – provides a way to organize tasks into specific goals. 
  • Assignments – gives a view of team members’ tasks and their hours of effort planned and expended. 
  • Roadmap – shows one or more project tasks in a Timeline view. 

Microsoft Project Pros

  • Tasks reside in projects, giving you a consolidated view of multiple projects in the roadmap view. 
  • You can create projects or roadmaps from within Teams, making setting up easy. 
  • Custom columns can be added to projects to define and categorize tasks further. 
  • Dependencies are available so that you can add logic between tasks. 
  • Managing team resources and level of effort across tasks is easy and intuitive.   

Microsoft Project Cons

  • Microsoft Project might have too much functionality depending on the level of detail and controls you use to track tasks. 
  • PFTW is an additional cost to your Microsoft 365 subscription. 

Final Thoughts on Microsoft Planner vs. Microsoft Project

Cost, quality, and time to market are all factors when evaluating products or services. If we use this criteria to compare and contrast Microsoft Planner vs. Microsoft Project, here’s how they stack up: 

  • Cost – Microsoft Planner is free 
  • Quality – Both products are easy-to-use modern applications. Planner focuses on task management, while PFTW includes scheduling and resource management functionality. 
  • Time to Market – Updates by Microsoft to both products have been slow. 

Summary: 

Microsoft Planner may be the best option if you are looking for a simple task management solution that solely focuses on when a task is due and who is assigned.  

Microsoft Project for the Web (PFTW) might be a better solution if you don’t mind paying more for project-specific task tracking with scheduling and resource capabilities.  

The good news is that both products have a similar UI and can be added to Microsoft Teams, so you could start with Microsoft Planner and then move to PFTW later if you need the additional horsepower. 

  • « Go to Previous Page
  • Page 1
  • Interim pages omitted …
  • Page 3
  • Page 4
  • Page 5
  • Page 6
  • Page 7
  • Interim pages omitted …
  • Page 12
  • Go to Next Page »

Primary Sidebar

Recent Posts

IT services construction
Company News | March 26, 2024

Lydon Solutions Reaches the 15-Year Mark!

Microsoft Tips | February 22, 2024

Microsoft 365 Horror Stories

Microsoft Tips | February 14, 2024

How to Use Tags to Organize Files in Microsoft 365

Reviews | January 24, 2024

Surface Duo: Microsoft Thunk Differently

Tips from the Field | January 15, 2024

Tips from the Field: Easily Copy a SharePoint Library and All Its Content

Tips from the Field | December 20, 2023

Tips from the Field: Speed Up Your Excel Workflow

Footer

About

Lydon Solutions is a WBE consulting group specializing in construction project management software solutions using Microsoft SharePoint. Learn more >

Products & Services

  • Construction Viz
  • Clover AI
  • Professional Services
  • Business Consulting
  • Microsoft 365 Managed Services
  • Government Agencies

News & Events

  • Events
  • Blog

Company

  • About
  • Careers
  • Contact Us

Join our Mailing List

  • This field is for validation purposes and should be left unchanged.
Lydon Solutions

© Lydon Solutions

  • Sitemap
  • Privacy
  • Cookies
  • Terms of Use
  • Disclaimer

Click here to start a Microsoft Teams chat.

Contact Us
Name(Required)
This field is for validation purposes and should be left unchanged.