• Skip to primary navigation
  • Skip to main content
  • Skip to primary sidebar
  • Skip to footer
Lydon Solutions

Lydon Solutions

Construction Project Management Software Solutions

  • Construction Viz
  • Clover AI
  • Services
    • Business Consulting
    • Professional Services
    • Microsoft 365 Managed Services
    • Government Agencies
  • Company
  • Events
  • Blog
  • Careers
  • Contact
  • Search
  • Free Consultation
Show Search
Hide Search

Microsoft SharePoint

How to Start Managing Construction Projects in Microsoft 365 – Part 2

How-To | April 6, 2021

This is part two of three in a series of blogs called How to Manage Your Construction Projects in Microsoft 365.

In a previous post, I shared some tips on getting your organization set up to manage your construction projects using Microsoft 365. Now that you have your new Microsoft 365 tenant in place and have licensing covered, I'll cover which tools in the suite you can use for construction project management.

Microsoft 365 has an abundance of features and services that you can use to help manage your construction projects. There is not a right and wrong answer here; the important thing is to fully understand your users' requirements and assess the options against these to determine what works for your organization.

So, let's get started.

Microsoft 365 Tools to Manage Construction Projects

Database

The database is the most crucial feature of any IT solution. With Microsoft 365, you have several options, including the following:

SharePoint Online – Microsoft SharePoint's lists and libraries make it exceptionally flexible, allowing you to take it in almost limitless directions. It is a strong candidate for your database solution.

Teams – Microsoft Teams has been in the spotlight lately as Microsoft adds features to this collaboration tool. The Teams app, built on top of SharePoint Online sites, provides a quick-start alternative that will get you up and running faster. It also offers integration with lots of ready-made apps. There are some limitations, however.

OneDrive – OneDrive is Microsoft's personal file/document storage and sharing solution. While it can be a powerful database option, its user-centric design focuses on ad hoc file sharing, limiting its information sharing and collaboration capabilities.

Dataverse –Microsoft's Dataverse is a scalable low-code data platform that Power Apps can leverage. I'll talk more about it in a future blog post.

“Database” example - SharePoint site contents

Sites

Users need a way to access the system to view reports, search data, and act. While users can navigate to all the Microsoft 365 services using their Microsoft 365 portal, it can be a bit overwhelming. Building SharePoint sites or Teams sites allows you to aggregate data and simplify navigation. It also facilitates security and permissions to restrict sensitive information to specific users. However, consider how users will find information carefully, as planning the navigation and information architecture is critical to ensuring usability.

Example SharePoint site

Workflow

Power Automate is the workflow engine in Microsoft 365. Power Automate can connect data across all Microsoft 365 services and external sources (requires an on-premises data gateway). Most Microsoft 365 plans include some licensing level for Power Automate; however, more advanced features generally require additional licensing. Also, there are many third-party add-ons that you can leverage that typically have different licensing requirements.

Power Automate workflow

Permissions

Microsoft 365 and SharePoint have incredibly powerful permissions and access management controls for managing both licensed users and unlicensed guest users. Here is a quick rundown.

Microsoft 365 Groups

  • You can use groups to control access across all Microsoft 365 services. There are two roles, Owner and Member. Owners can change the group's settings and the membership while members can remove themselves, add members to a public group, and recommend guest users to receive invitations.
  • You can assign access to your team as owners or members to any Microsoft 365 service.
  • The Microsoft 365 admin center is where you manage groups and add members. Unfortunately, not everyone will have access to the Microsoft 365 tenant admin center, and this is where SharePoint's permission groups come into play for more granular permissions controls.
Admin center - 365 Group administration

SharePoint Permission Groups

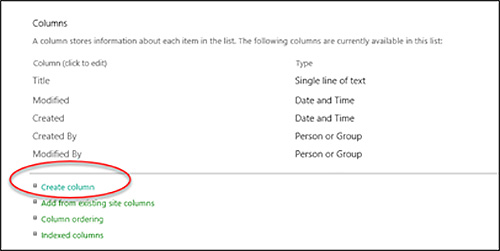
  • SharePoint permission groups assign permissions to SharePoint-specific content (e.g., sites, lists, libraries, etc.).
  • SharePoint groups provide permissions levels such as read, write, and everything in between. You can assign a group to any SharePoint content with unique permission levels.
  • If you selectively grant access to content within your SharePoint sites, make sure to map out a permissions strategy and develop auditable permissions templates, especially with guest users.
SharePoint permissions levels

Reporting

  • The primary reporting service in Microsoft 365 is Power BI. It is a powerful dashboarding and analytics tool. If you need paginated reports (for example, a log report of many records or a printable version of a form), you will likely need to consider additional Power BI licensing, SQL Server reporting, or other third-party tools. See my prior post on "Microsoft Power BI and Paginated Reports for Construction."
Power BI status report

With this blog, we have covered the critical infrastructure services required for building a construction management solution in Microsoft 365. While the path can differ for every organization depending on your budget, resources, and processes, we hope this series will provide insight into how you can use Microsoft 365 to manage your construction projects. Our upcoming third part in this series will cover construction-specific functionality like scheduling and cost management.

Get Export Help with Microsoft 365 Managed Services

If your construction organization needs help setting up your Microsoft 365 environment, you can request a free one-hour consultation. If you are looking for a turnkey construction project management solution or a specific construction app for Microsoft 365/SharePoint, check out ConstructionViz.com.

Check out more blogs from How to Manage Your Construction Projects in Microsoft 365

  • Part 1: How to Start Managing Construction Projects in Microsoft 365 – Part 1
  • Part 3: How to Start Managing Construction Projects in Microsoft 365 – Part 3

Supporting a new Project Management Information System

How-To | December 16, 2020

This is part four of four in a series of blogs called Tips on Deploying Construction Project Management Software for Your Organization.

In prior posts, we outlined the best practice to follow when rolling out a new Project Management Information System (PMIS) at your organization. Refer to the previous three articles for planning, evaluating technology, and implementing a PMIS. Now comes the often overlooked part of your journey: support.

Off-the-shelf solutions are pretty standard. Pay the monthly service level agreement fee, and off you go. The system dictates how you use it, requiring you to adjust your processes around it accordingly. You will need to monitor technology changes such as browser and device issues and storage, but for the most part, you should expect a consistent experience until you no longer do.

But what happens when you customize a solution? Or when your processes need to change after the system has been deployed? Over the past 11 years, we have seen this scenario play out in most, if not all, of our clients since our solutions can be highly configured and customized. There are some considerations to plan for before and after you implement a custom solution.

Tips to Better Support a Project Management Information System

Here are some things to keep in mind when planning support for your PMIS:

• Finalize business processes. You should revisit the business requirements documents and update them to represent the processes currently being used. Include adjustments as needed during the change control process. These documents feed training and are crucial to establishing scope management controls after implementation.
• Establish a ticketing system. Make sure to establish a ticketing process for collecting system and user issues. Ensure the ticketing system has enough data points to analyze the trending of requests by functionality, category, time to respond and close tickets, responsibility, and severity. This data will help target future enhancements, drive accountability, improve training and documentation, and ensure the users get the most out of the PMIS.
• Develop a knowledge center. Identify information and resources that you can provide for users as a ‘first port of call’ for support, such as FAQs, how-to videos, and training documents. Consider establishing a Center of Excellence and encourage key users to make themselves available to their colleagues for community support and knowledge sharing, helping triage many issues without opening a ticket.
• Implement change control. A change control process will be essential to prioritize new enhancements and fixes, update training material and requirements, and schedule future migrations and implementations.
• Develop a roadmap. Develop an enhancement roadmap for the system based on priority and cost-benefit analysis. Also, evaluate related technologies affected by the PMIS roadmap, such as versions of Microsoft Office, Adobe Acrobat, browser versions, etc.
• Simplify where needed. Frequently, the implemented PMIS can be overly complicated for the users. After using the system for six months or so, pause to assess usability. You may need to swing the control pendulum back to provide flexibility in what the system needs to track versus what you can handle using other legacy applications, such as email and Excel. Also, consider minimizing redundant functionality that may exist across your portfolio of systems or that your new PMIS can replace.
• Survey users. Reach out to users to find out what works and what does not work in the PMIS. Capture lessons learned and any suggestions for improvement. Surveys will help identify opportunities to adjust training based on responses.
• Communicate to users. Ensure regular communications with the users about system issues, changes to their processes, planned enhancements, and upcoming training sessions as needed.

We hope these tips will help you with your PMIS journey. Make sure to check out the prior articles of this series detailing upfront planning steps, technology to consider, and implementation strategies. In future posts, we will provide management tips for construction organizations to ensure the entire process stays on track. Stay tuned.

Get Expert Help Deploying the Right PMIS for Your Construction Organization

Implementing a construction Project Management Information System (PMIS) for your organization can be extraordinarily complex and costly without proper planning and management. If you have any questions or are looking for help implementing Microsoft 365 for construction, contact us for a free consultation. Alternatively, if you prefer a turnkey solution, checkout Construction Viz, our innovative app-based construction project management software solution powered by Microsoft Office and SharePoint.

Check out more blogs from Tips on Deploying Construction Project Management Software for Your Organization

  • Part 1: Picking the Right Construction Project Management Software
  • Part 2: The Best Technology for Your Project Management Information System
  • Part 3: Eight Tips to Successfully Implement a Project Management Information System

Which Microsoft 365 Collaboration App Should I Use?

Microsoft News | August 13, 2020

Microsoft 365 provides a unified environment for collaboration and teamwork. All services are managed under the same framework and identity management solution.

While there are many different Microsoft 365 applications available to users, some providing similar collaboration capabilities, it can be confusing as to which ones are best for your project. To help eliminate some of the confusion, Microsoft published an article explaining how information is organized by Loops, including the recommended applications. Below is the Microsoft Loops diagram:

Identifying Tools for Collaboration – Microsoft Loops and Office 365 Groups


Inner loop.
Targeted for interactions and collaboration between close knit teams. This loop is the day-to-day communication between team members working on a project.

• Teams. Teams provides communication (chat, VOIP, webinars, meetings), file sharing (where users can share and edit Microsoft Office applications in real time), and a centralized portal for collaboration across Microsoft 365 applications. It is fast becoming the go-to project management application in Microsoft 365 that brings all other applications together into a unified platform.

Outer loop. Targeted for conversations and discovery within the broader audience. This loop is for communicating within the entire organization. This includes company or organizational communities, meetings, training, and lessons learned.

• Yammer. Yammer is like a Facebook for your business. It provides a way to reach out and connect to your organization by posting questions, announcements, articles, news, blogs, videos, polls, and even praise for your employees or co-workers. While Teams has its own chat functionality, Yammer takes it to another level with the ability to create communities and search posts- which are currently not available in Teams. While there are many companies using Yammer, most of its functionality continues to be added to Teams. This could potentially lead to it being completely absorbed by Teams in the future.

Email. Personal method for communicating with another party electronically. It has been, and will continue to be, the preferred method of communication on projects.

• Outlook. Outlook is one of the largest email clients in existence and is designed for personal information management including webmail, calendaring, contacts, and tasks. Outlook is the De facto standard for how a business communicates in Microsoft 365- especially between internal and external team members.

Files, Sites, and Content. Every collaborative application in Microsoft 365 consists of Files (Microsoft Office application files such as Word and Excel) Sites (for organizing files and sharing your data) and Content (any other file types such as images, video, and other non-Microsoft Office 365 applications).

• SharePoint. SharePoint is the #1 Enterprise Content Management System in the world. All of your project content can be created, edited, stored, and shared in SharePoint. SharePoint is at the core of all Microsoft 365 applications – Teams, Yammer, Project, and Planner. Every time you create a team or a project, a site collection is automatically created in SharePoint. Think of SharePoint as the backend database where all applications integrate with each other. So if you prefer SharePoint over Teams or Yammer, it can be used as both the Inner and Outer loop and vice versa.

Office 365 Groups. Since there can be many site collections created from all of the Microsoft 365 applications, there needed to be a way to bring all of them together for access management. Office 365 Groups associate users across applications and automatically create outlook mailboxes. Combining Office 365 Groups with SharePoint Hub sites completes the access and navigation across these disparate site collections.  Here's a link to a previous post explaining Office 365 Groups.

Planner and Project. What about Planner and Project? Both applications seem to be a part of the Inner Loop, and while they are very much collaborative, they seem to be more task and activity management centric than the central hub for collaboration on your projects like Teams or SharePoint.

Discover Project Management and Organization in Microsoft 365

We hope this article helps provide some guidance when it comes to Microsoft 365 applications that you may use but have not had the chance to fully explore. If you have any questions or are looking to setup your construction project organizations in Microsoft 365, check out our Microsoft 365 Managed Services and submit a free consultation request.

Looking for more of a turnkey, enterprise-ready Project Management Information System (PMIS) for Microsoft 365? Check out Construction Viz and submit a request for a free demo.

Microsoft 365 is an ideal collaboration tool for challenging times

How-To | July 8, 2020

Efforts across the nation to combat the spread of Coronavirus have transformed the workplace overnight by emptying offices, halting business travel, and promoting remote work. We can all hope that the need for these measures will be short-lived, but it is safe to say that the future of how we work and interact will potentially be forever changed.

Some businesses were already ahead of the curve embracing digital collaboration and remote productivity tools. But many organizations, particularly in construction, are playing catch up. Fortunately, most companies already have access to best-in-class collaboration and remote work tools with Microsoft 365.

Read on to learn how the Microsoft 365 suite can empower your employees to be productive no matter where they are. And if your organization needs expert guidance getting up to speed on remote collaboration, Lydon Solutions is here help. Contact us for a free consultation today.

Using Microsoft 365 for Remote Collaboration

Microsoft 365 offers many features to improve collaboration across the enterprise that extend well beyond Outlook, Excel, Word, and PowerPoint. The service includes a host of new applications that let teams easily share information, manage projects, and effectively collaborate while working remotely.

Collaboration Tools in Microsoft 365

challengingtimes1

SharePoint Online is a web-based enterprise content management (ECM) tool that integrates with Microsoft Office. You can use SharePoint as a document repository and information portal to share and manage content, make information quickly searchable, empower teamwork, and enable seamless collaboration across the organization. SharePoint is also the backend to many of the popular applications in Office 365, such as Teams, Planner, Project, and Yammer. Microsoft has a getting-started resource for SharePoint here.

Microsoft Teams is a unified communication and collaboration platform combining persistent workplace chat, video meetings, voice-over-IP (VoIP), file storage, real-time document collaboration, and integration with a growing list of apps from Microsoft and third-parties. This impressive lineup of features is why the application is fast becoming an easy-to-use project management aid that can help you organize small teams, manage progress, and store project information. You can even combine Teams with Microsoft Whiteboard for real-time visual brainstorming and problem-solving. You can learn more about Microsoft Teams here.

challengingtimes2

Microsoft Planner is a project management application that allows organizations to create, assign, and organize work visually with support for private or shared plans for collaboration. This easy-to-use tool is an excellent option for those that prefer to manage simple projects using Kanban, calendars, and task lists. You can learn more about Microsoft Planner here.

challengingtimes3

Microsoft Project Online is a cloud-based tool to help project managers develop a schedule, assign resources to tasks, track progress, manage the budget, and analyze workloads. Microsoft Project is a staple in the construction industry for managing project schedules, and both the cloud-based and on-premise versions integrate deeply with the rest of the Office 365 suite, including other collaboration tools like SharePoint and Teams.

Reporting in Microsoft 365

Power BI is a business analytics solution that lets you visualize your data, making it easy to share insights across your organization or embed reports in your app, SharePoint sites, and websites. With Power BI, you can connect to hundreds of data sources and bring your data to life with live dashboards and reports. Power BI is a great reporting solution for creating interactive dashboards that can embed in SharePoint pages or external websites with the ability to permission control reports.

Workflow Automation Across Microsoft 365

challengingtimes4

Power Automate is an Office 365 service that makes it practical and simple for line-of-business users to build workflows that automate time-consuming business tasks and processes across applications and services. Power Automate is Microsoft’s workflow engine, and it continues to gain more and more connectors and functionality. Users can work smarter by creating workflows to automate manual processes such as approvals, alerts, and data integration, even sharing them with the rest of the organization.

Build Custom Applications in Microsoft 365

Power Apps is a suite of services, connectors, and a data platform that provides a rapid application development environment to build custom apps for your business needs. With Power Apps, you could create custom forms and make them available as a standalone application or post it to SharePoint Online.

Get Expert Help with Microsoft 365

Are you feeling a little intimidated by all the features and options found in Microsoft 365? Lydon Solutions can offer expert assistance if you need help setting up your Microsoft 365 tenant to manage projects. We also offer a complete turnkey solution for construction teams called Construction Viz that is powered by SharePoint and Microsoft 365.

Contact us today to request a free consultation.

Please be safe and look out for one another during these challenging times.

How and Why to Use Promoted Links in SharePoint

Tips from the Field | February 5, 2019

Have you ever wondered about those “get started with your site” icons that appear on the home page when you create a site? Odds are you remove them quickly without even thinking. However, they are actually Promoted Links, a SharePoint app that is added in Site contents.

Promoted Links help you (as a SharePoint administrator) build attractive sites with easy-to-configure navigation. This feature lets you create links to content you want to feature. You can assign images to the links and easily organize them from the Promoted Links List, which is automatically created when you add the app.

Promoted Links are similar to Summary Links. The main difference is that Promoted Links are organized at the list level, while Summary Links are added to a web page and are organized when you edit a web page.

How to Create Promoted Links in SharePoint

First find the images you want to use as icons for your links, and create a library of the images.

Next, identify the content you want to promote. Create a library or list of this content. Also create a view your users will access when they click the links.

Next:

1. Click the cog wheel icon on the top right of your website page.

2. Select “Site contents.”


3. Click “add an app.”

4. Select “Promoted Links.”

5. Enter a name for the Promoted Links app and click “Create.”

6. The Promoted Links list is created. To add links, click the “Add tiles from the All Promoted Links view” hyperlink.

7. Click “new item” to add a link.

8. Add the following data to add a single link. You’ll need to make several choices, as follows:

1) Title: This is a required field for adding a link. This text will display with your image when viewed on your website:

2) Background Image Location: Copy and paste the entire URL where you stored the image that will be associated with the link.


3) Type the Description: Describe the image. This text only shows in the Promoted Links list and not on your website.


4) Description: This text will display with the image once you mouse over it on the website.

5) Link Location: This required field links to the content that you want users to navigate to. Copy and paste the entire URL to the library or list item in the field.


6) Type the Description: Describe where the link is pointing to. This text only shows in the Promoted Links list and not on your website.


7) Launch Behavior: This required field has a few options:

a. In-page navigation – This is the default behavior where the users are redirected to a link once they click on the image.

b. Dialog – This option opens a modal window (a pop-up window on the same page) once users click on the image.

c. New tab – This option opens a new browser tab once users click on the image.


8) Order: This is the sequence of how the images with their corresponding links will appear from left to right across the website.

That’s it! Promoted Links are an easy way to create simple, well-organized navigation for a website.


Want to Do More with SharePoint or Office 365?

If you want more in-depth SharePoint development, or are looking for apps to manage your construction projects, contact Lydon Solutions.

We now offer Construction Viz Apps for Office 365 for managing your projects all within your own Office 365 tenant. The data resides with you, and you can leverage Office 365 security and reduce costs by selecting only the apps you need. Learn more today with a free demo and consultation.

Use the Choice Field in SharePoint to Ensure Consistent Input from Users

Tips from the Field | June 27, 2018

Do you need users to enter critical project information in a consistent way? If so, consider using SharePoint’s choice column type to prompt users for relevant information.

Sometimes you need to ensure that your project data conforms to a certain format for reporting or compliance. This is where choice fields in SharePoint are helpful. Choice fields can be configured to require users to pick from a preset list of values in a list or library.

Before using a choice field, however, consider your list’s size and use since there may be better options.  For example, if the list is large (e.g., a submittal form), consider using a separate SharePoint list app to store the values and then use a lookup to retrieve them. On the other hand, if the list is relatively short (e.g., a status field) and the field used in multiple lists and libraries, consider a site column. (We will discuss site columns in a future tip.)

Also, keep in mind that choice fields are not available as data sources in lookup columns. So you cannot create another list or library and have a column lookup and return values from a choice field.

If you decide that the standard choice field is the best option, here are the steps to set it up.

Setting Up a Choice Field in SharePoint

First, select “Create Column” within a list or library.

Then follow these steps, which correspond to the numbered sections on this screen shot:

1. Name the column, e.g., “Cables.”
2. Select “Choice Field.”
3. In the “Description” field, enter what you want users to see on the form when they update the record (e.g., “underground cabling”).
4. Select “yes” for the “Require that this column contains information” option if you want this field to be filled in as a condition of saving a record. This avoids blank data fields.
5. Choose “yes” for the “Enforce unique values” option if you want to stop a user from entering the same value in the fields for different items.
6. The box under “Type each choice on a separate line” is where you specify each value you want to display in the choice field (e.g., “copper” and “steel”). Enter each value on separate lines in the text box. Note that your entries can only have one space between characters – SharePoint will ignore any added spaces when displaying your values.

It is sometimes helpful to make “Choose a Value” the default choice (see step #9). This prompts the user to select a relevant value.

7. Choose from the following display options based on your needs:

  • Drop-Down Menu – This is the default functionality with a single pick from a drop-down list of values.
  • Radio Buttons – Buttons for each value are displayed under the choice field on the edit form. Only one selection can be made from the list of choices.
  • Checkboxes – This option allows the user to select multiple values in a checkbox-like format.  Once the values are selected, they are added to the data field, separated by commas.

8. Selecting “yes” for the “Allow Fill-in choices” option allows users to type whatever they want into the choice field. This can come in handy if you are not sure of all the choices your users might want to make. However, the user-entered value does not update the choice field options, so future users will not see the new fill-in option. Fill-in choices will show in a View filter, so you can retrieve them for reports or queries.

Note: In Quick Edit mode, SharePoint will store values entered into fields with the “Allow Fill-in” option enabled. This isn’t obvious when you switch to Quick Edit View, which can be confusing for users.

9. The “Default Value” allows you to define a default value for the field. Just remember that, even if you make the choice field required, having a default value will allow your users to proceed without having to make a selection.

Get more tips and tricks for construction project management professionals

We hope you found this information helpful. We encourage you to check out our other Tips from the Field blog series, which features valuable information for construction project managers.

Newsletter (Blog)

Insert blog description here.

  • This site is protected by reCAPTCHA and the Google Privacy Policy and Terms of Service apply.
  • This field is for validation purposes and should be left unchanged.

  • « Go to Previous Page
  • Page 1
  • Page 2
  • Page 3
  • Page 4
  • Page 5
  • Go to Next Page »

Primary Sidebar

Recent Posts

Microsoft News | April 1, 2025

Running Out of Storage? Check Out the New Microsoft 365 Archive Feature

Microsoft Tips | March 24, 2025

How to Manage Construction Project Photos in SharePoint

Microsoft Tips | March 12, 2025

Take Project Photos in the Field Using the Microsoft 365 Copilot App!

Microsoft Tips | March 3, 2025

Portfolio Management in Project for the Web (Planner Premium)

Microsoft Tips | February 27, 2025

Use AI on Your SharePoint Sites with Copilot Agents

Case Study | February 11, 2025

How to Work Successfully with Vendors on a Software Deployment

Footer

About

Lydon Solutions is a WBE consulting group specializing in construction project management software solutions using Microsoft SharePoint. Learn more >

Products & Services

  • Construction Viz
  • Clover AI
  • Professional Services
  • Business Consulting
  • Microsoft 365 Managed Services
  • Government Agencies

News & Events

  • Events
  • Blog

Company

  • About
  • Careers
  • Contact Us

Join our Mailing List

  • This field is for validation purposes and should be left unchanged.
Lydon Solutions

© Lydon Solutions

  • Sitemap
  • Privacy
  • Cookies
  • Terms of Use
  • Disclaimer

Click here to start a Microsoft Teams chat.

Contact Us
Name(Required)
This field is for validation purposes and should be left unchanged.